Setting Up Conversations with App Chat
Conversations
Conversations is a two-way messaging feature that makes client communication effortless. Say goodbye to phone tag and hello to quick, convenient messaging that keeps your team connected without disrupting your clients’ busy day. With Conversations, you can easily share photos and videos, send updates, ask questions, and follow-ups, making every interaction simpler, faster, and more efficient.
How to Enable Conversations:
Not sure who your coach is? Simply submit a support ticket, and our team will connect you with the right person to get you taken care of. 🐾
- Settings > Conversations:
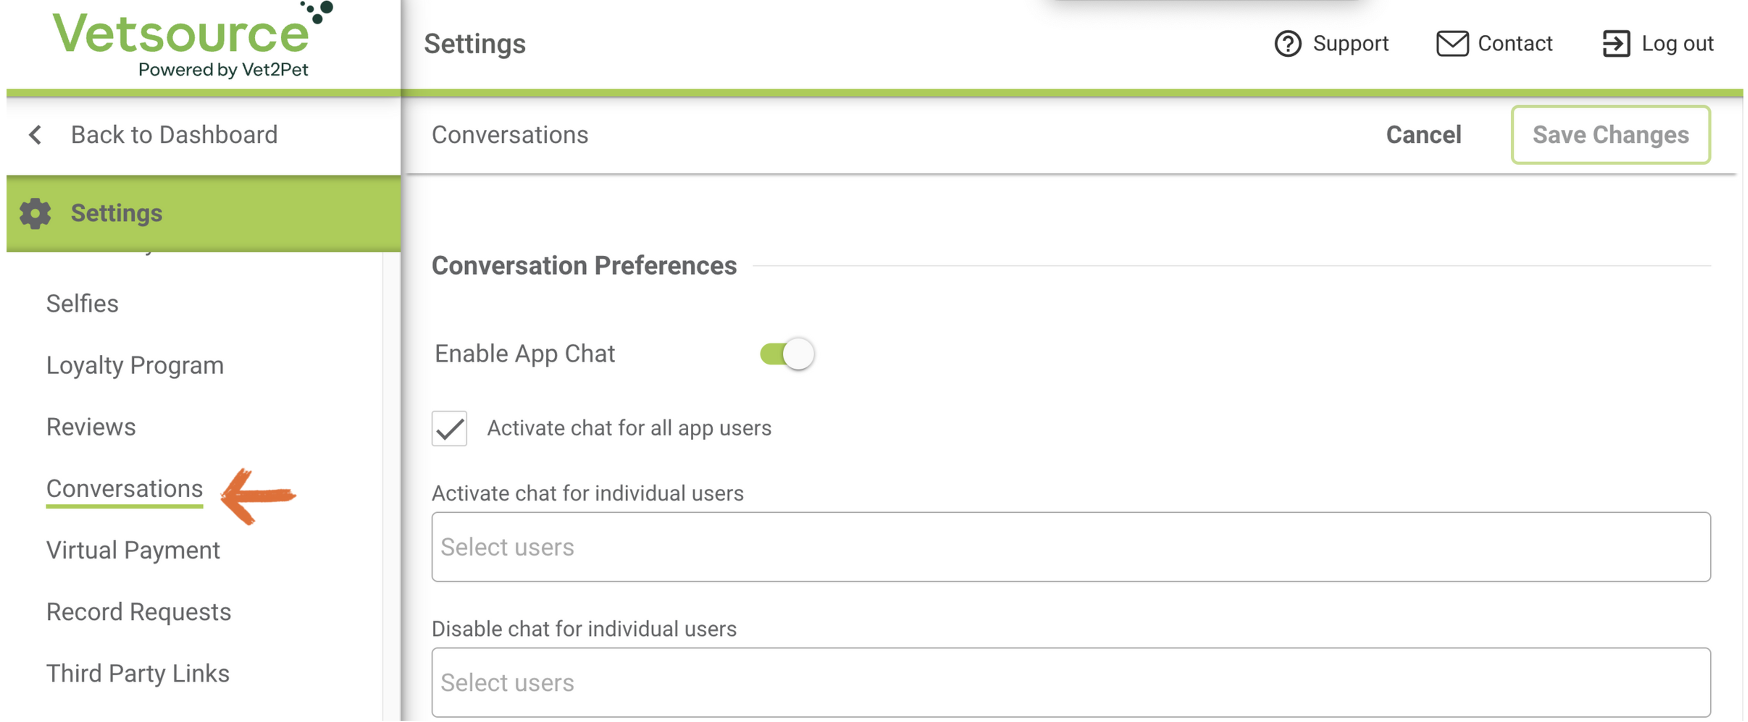
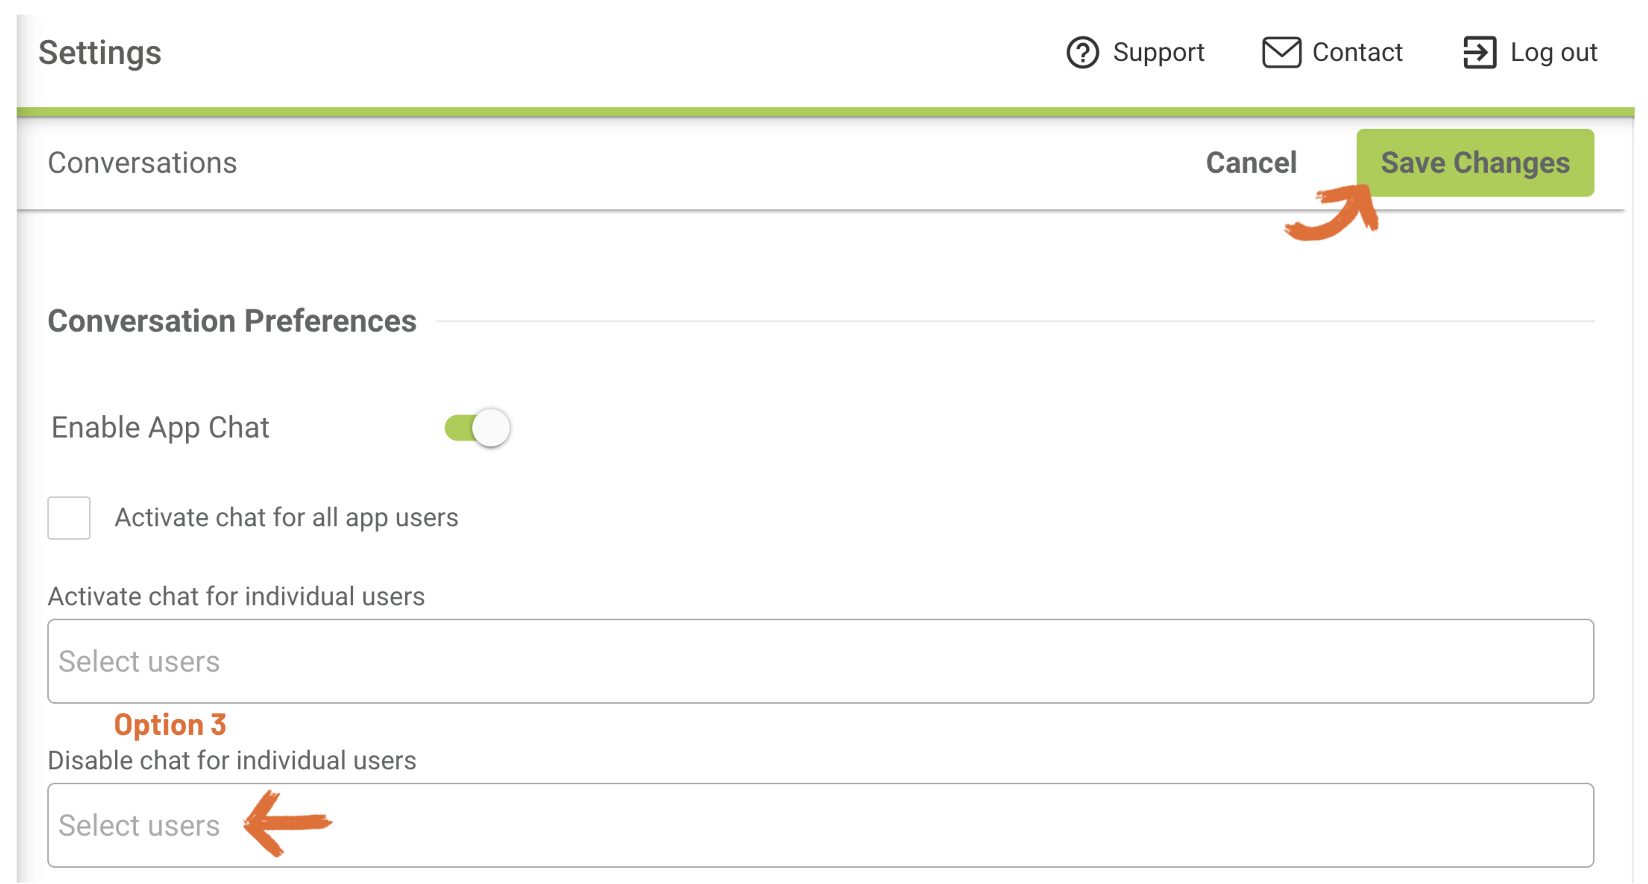
- Under Conversations Preferences, toggle on Enable App Chat.
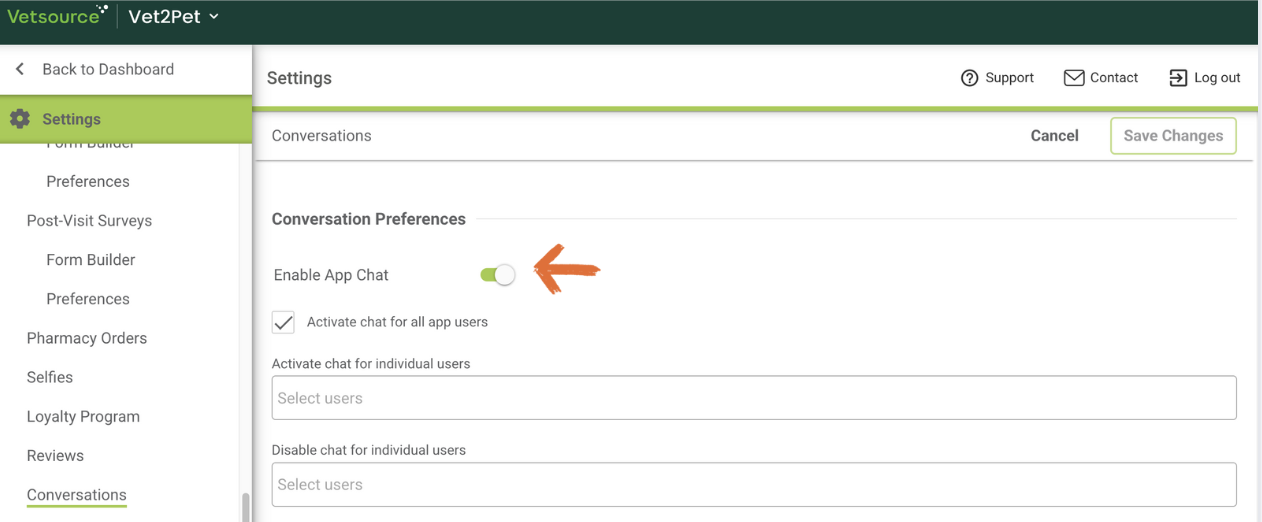
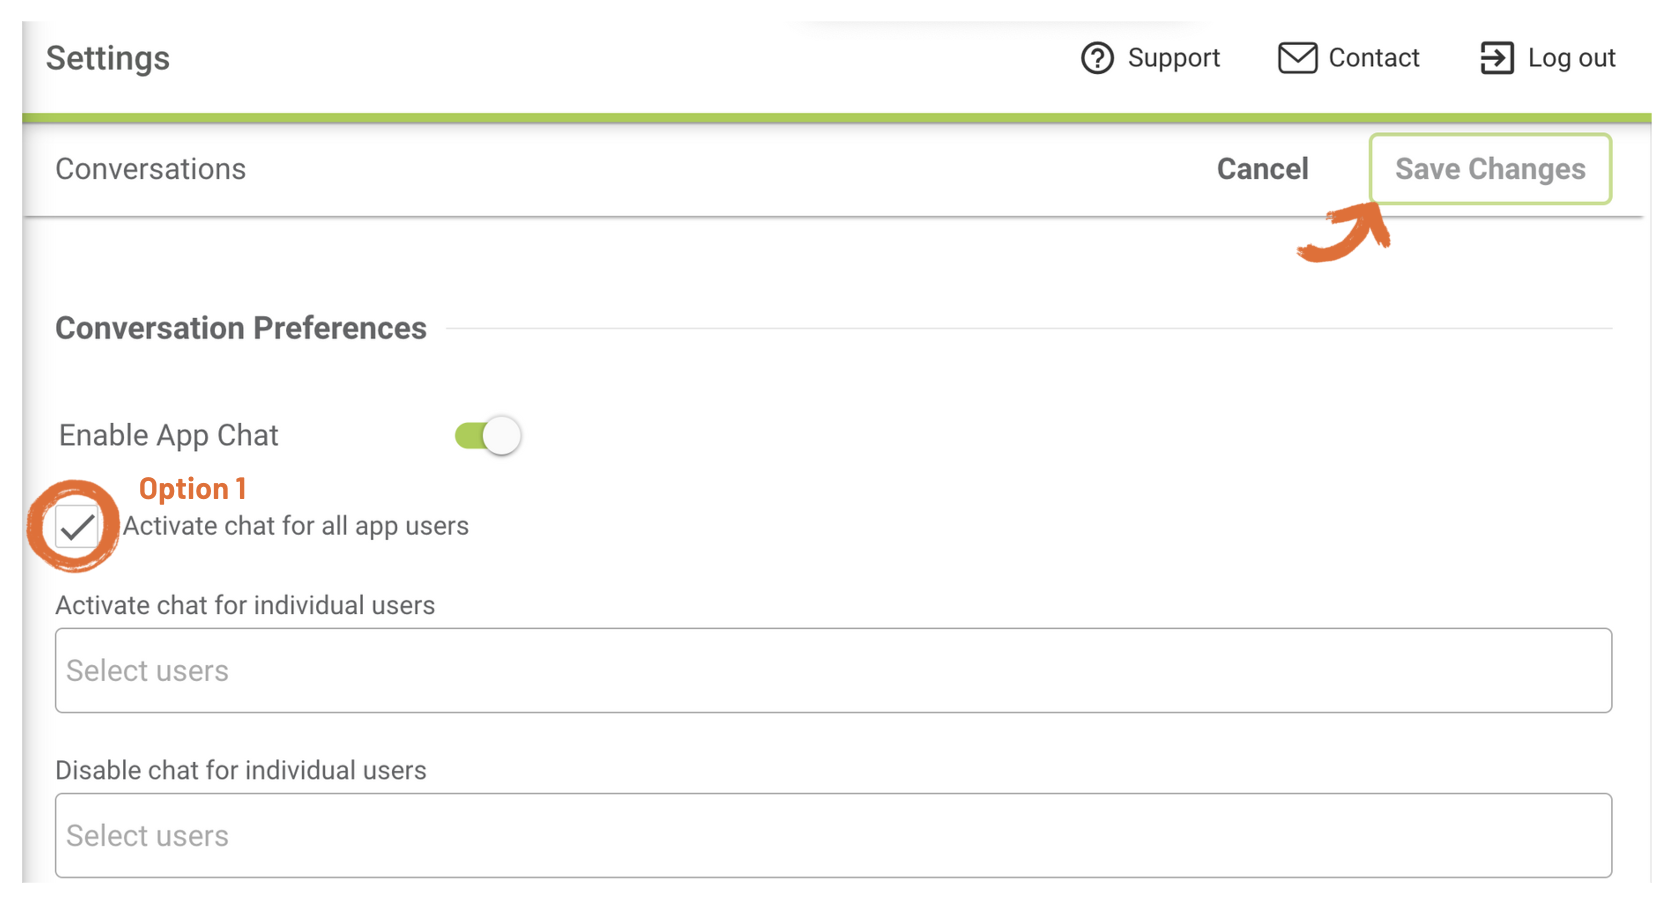
- Choose the audience who can access chat in the mobile app.
- Activate chat for all app users: Anyone who has downloaded and logged into your app can access chat in their app. Then you can start 2-Way messaging your client's TODAY!
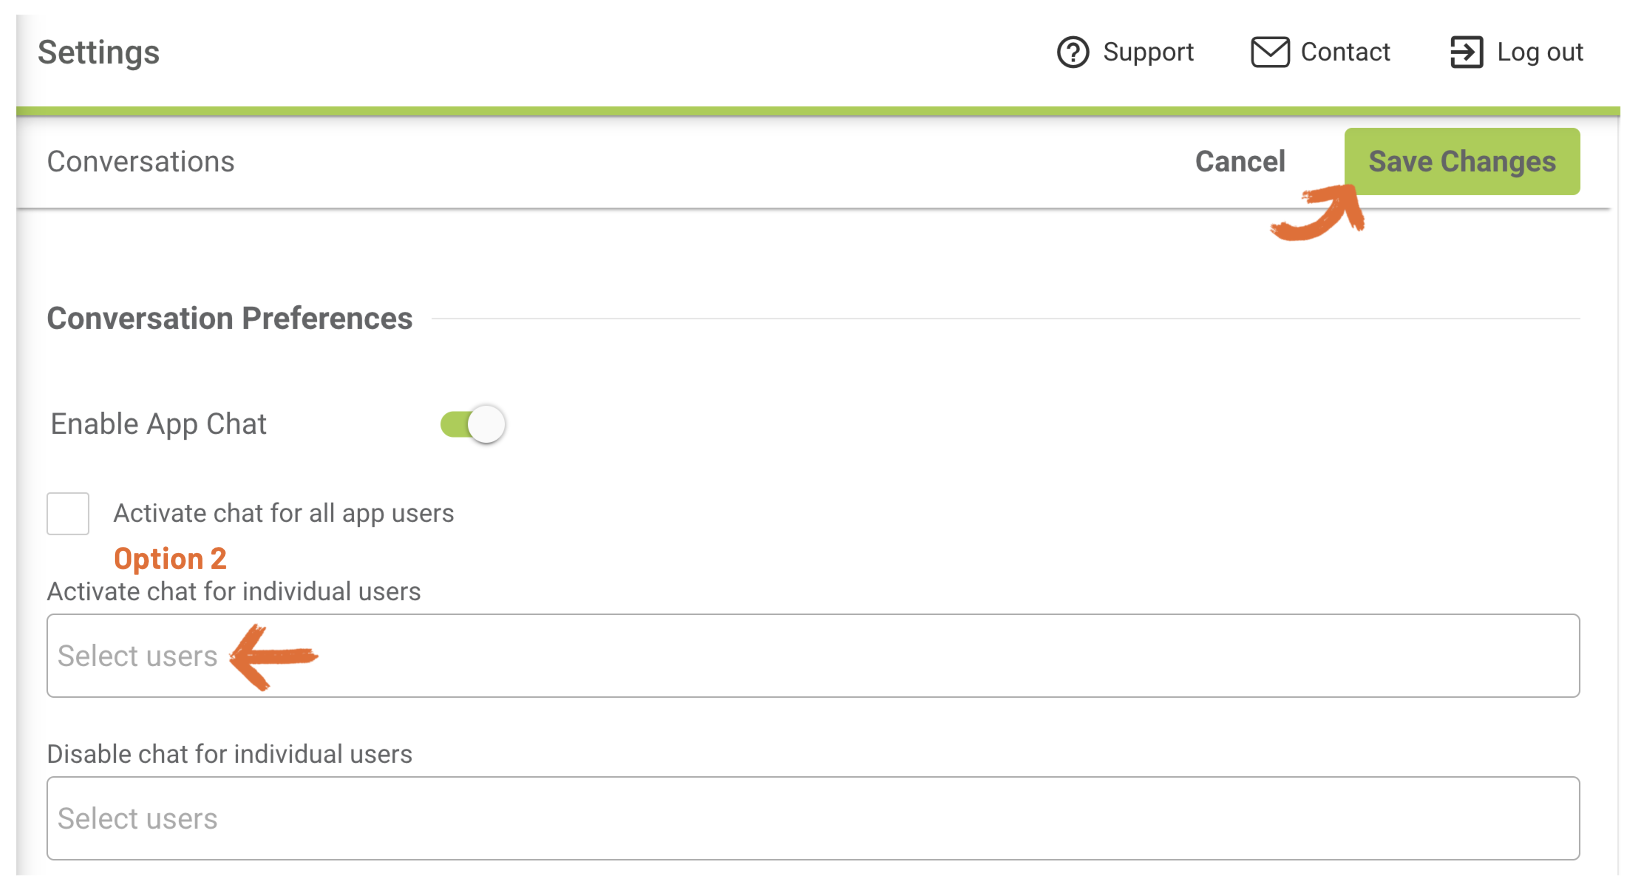
- Activate chat for individual users: Only individuals selected will be able to access chat in their app.
- Disable chat for user: Remove chat feature for individual users.
- Decide if you would like to utilize our 2-Way Texting feature. When you utilize our texting services your team can manage all communications from your clients through a centralized location. Currently, there is no limit to the number of texts you can send each month. *Additional fees may apply and will vary based on your subscription with us. Add this feature by clicking the purple button and filling out the required form.
 This feature is not immediate. 2-Way Texting does have a set-up time frame of 5-10 business days.Options:
- Toll-Free Number: We can provide a Toll-Free number for your practice upon request. If a client saves this number and calls your practice, the call will still connect to you.
- Landline Hosting: Prefer to text clients from your landline? We can do that too! Your coach can look up to see if we can host your landline prior to making any commitments. *Additional one time set up fee for this service is $299.
- If desired, set a conversation greeting, which will send automatically to the app user as soon as a chat message is sent from the mobile app.

- Set your Conversation Alert Preferences for internal notifications when conversations are received
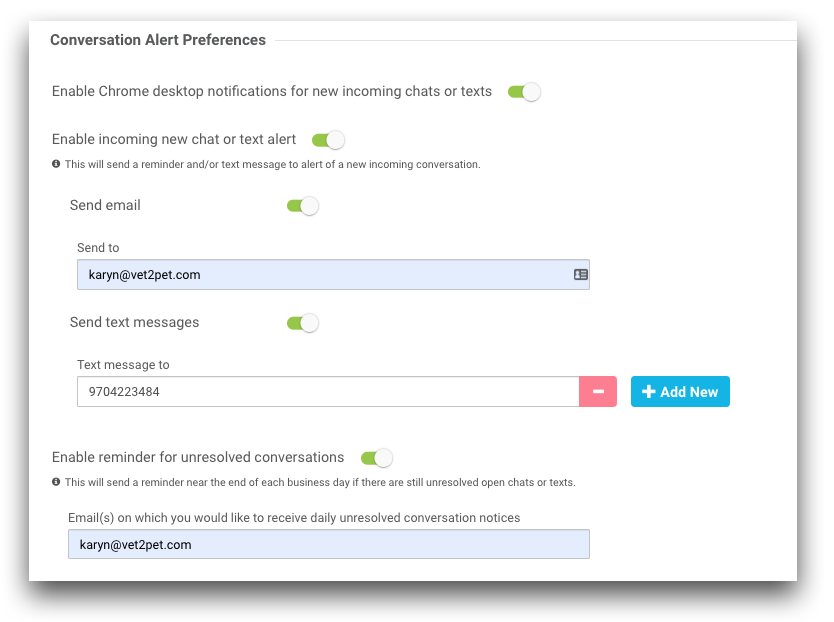
- If desired, enable Chrome desktop notifications.
- If desired, enable a new message alert to receive an email and/or text message to alert of a new conversation.
Multiple emails can be added to the same line when separated with a comma. To add multiple phone numbers, click Add New and add one phone number per line.Practices outside of the US and Canada will not be able to receive a text message for incoming new message alerts. - If desired, enable a reminder for unresolved conversation, which will send an email reminder near the end of each day to end any open conversations that are left unresolved.It is important to end all open conversations at the end of each day to avoid receiving further incoming messages from open conversations after hours.
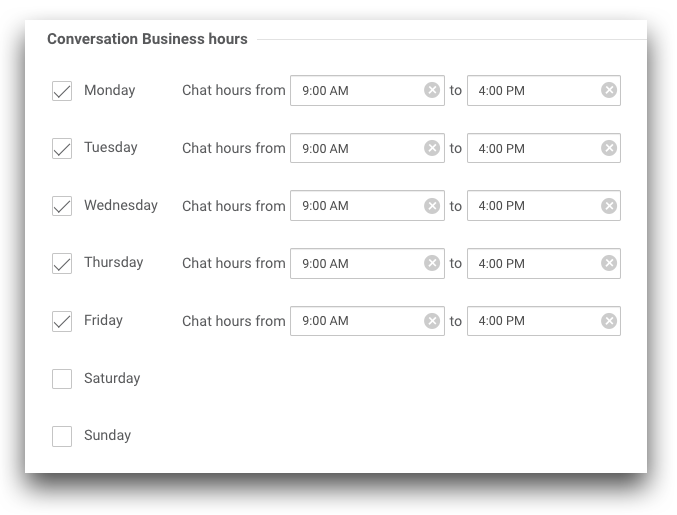
- Set your Conversation Business Hours:
- Decide what days of the week to accept incoming conversations and set conversation working hours for each day. This should represent the general availability you want to enable on a recurring basis. This can differ from your regular business hours.
 To set a practice closure or turn OFF Conversations on a specific day, such as holidays, go to the Dashboard > Settings > Practice Info > Closure Dates, and list any date that the practice will be closed (or that Conversations should be disabled) outside if your general availability.
- The Custom Dates section allows for further customization in the event that you ever need to override the general Conversation Business Hours settings for any specific date or date range. Example: Is your practice open one Saturday a month where you need to have Conversations enabled just for that Saturday?
These Custom Dates will override the dates listed in Settings > Practice Info > Closure Dates.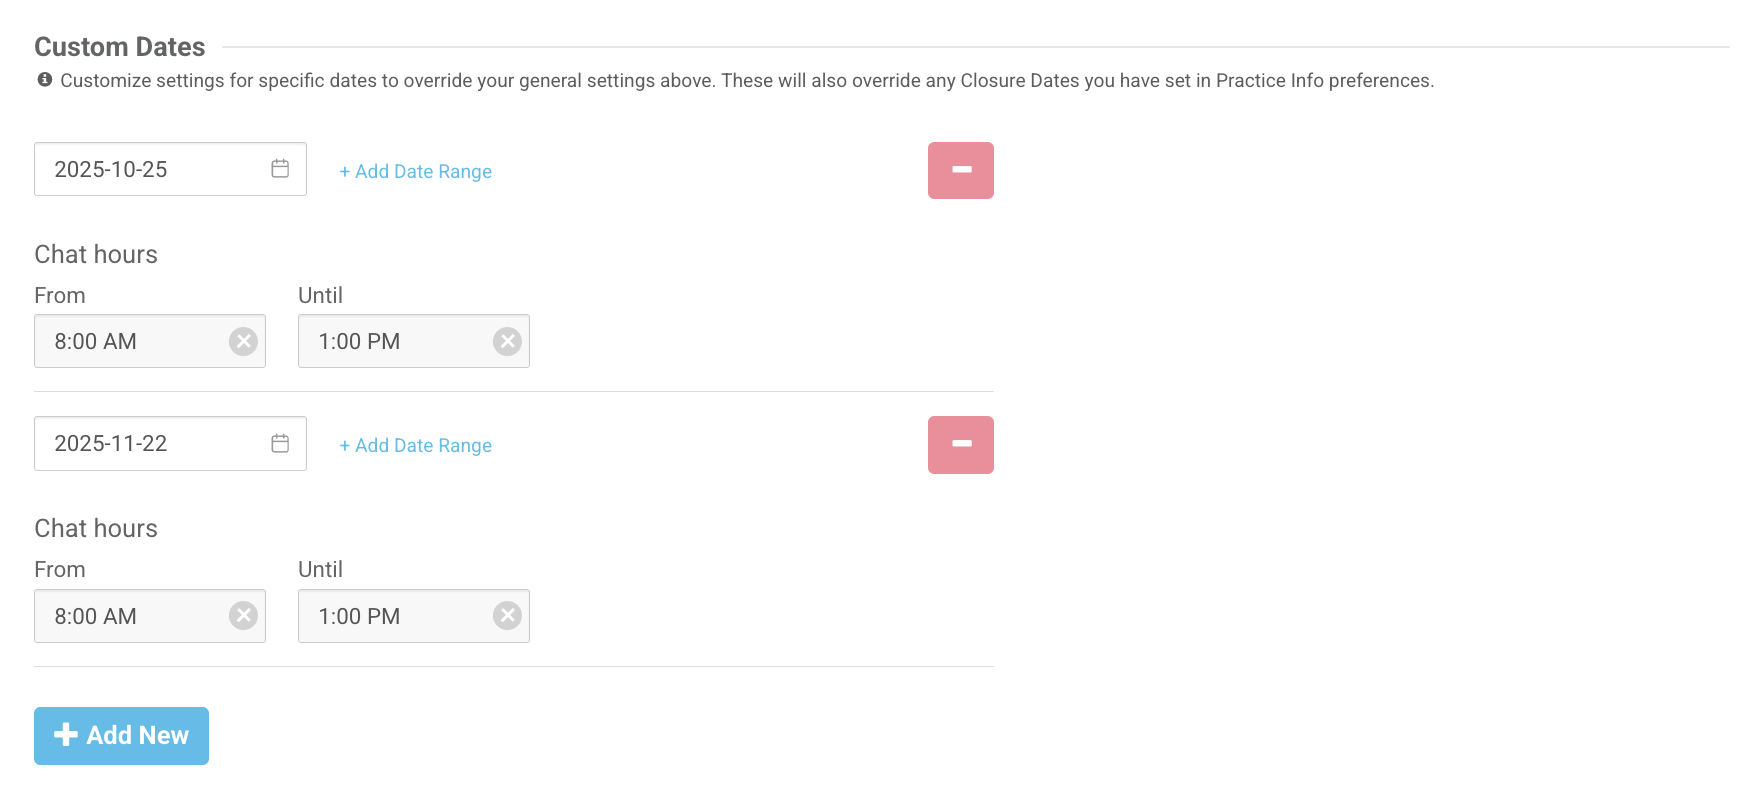
- Set your App Chat Preferences for additional chat features:
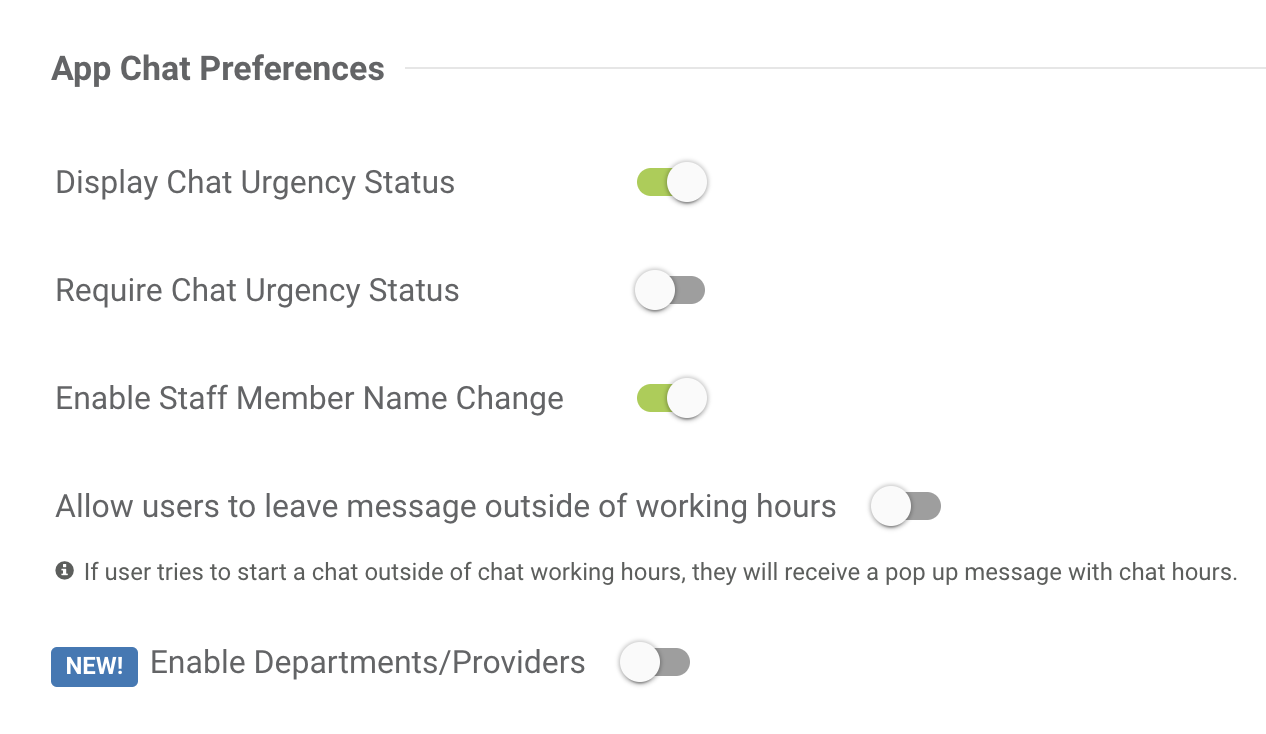
- Set your preferences for urgency ratings, which will display in the dashboard. Conversations will be sorted in the dashboard by urgency first, and then by date/time received.
- Display Chat Urgency Status: When enabled, this allows app and dashboard users to select an urgency rating when starting a conversation.
- Require Chat Urgency Status: When enabled, this requires app and dashboard users to select an urgency rating when starting a conversation.
- Decide whether or not to allow a staff member name change during an active app chat. If disabled, the client will see the practice name in responses.
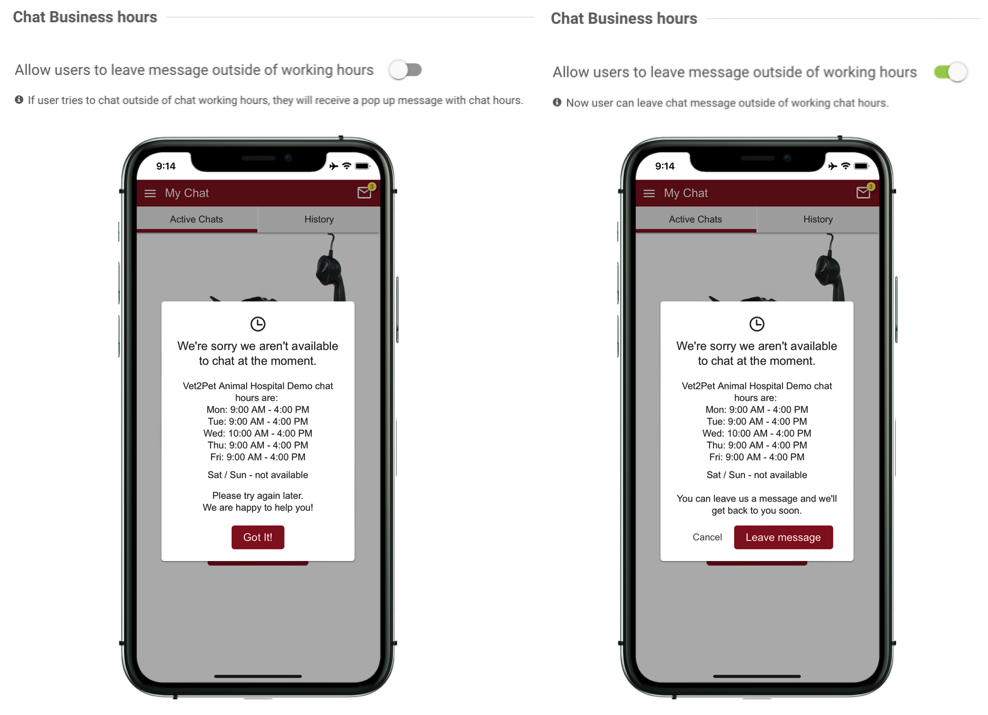
- Decide whether or not to allow app users to leave a message outside of chat hours. The message the app user sees will differ depending on whether or not you have this enabled.
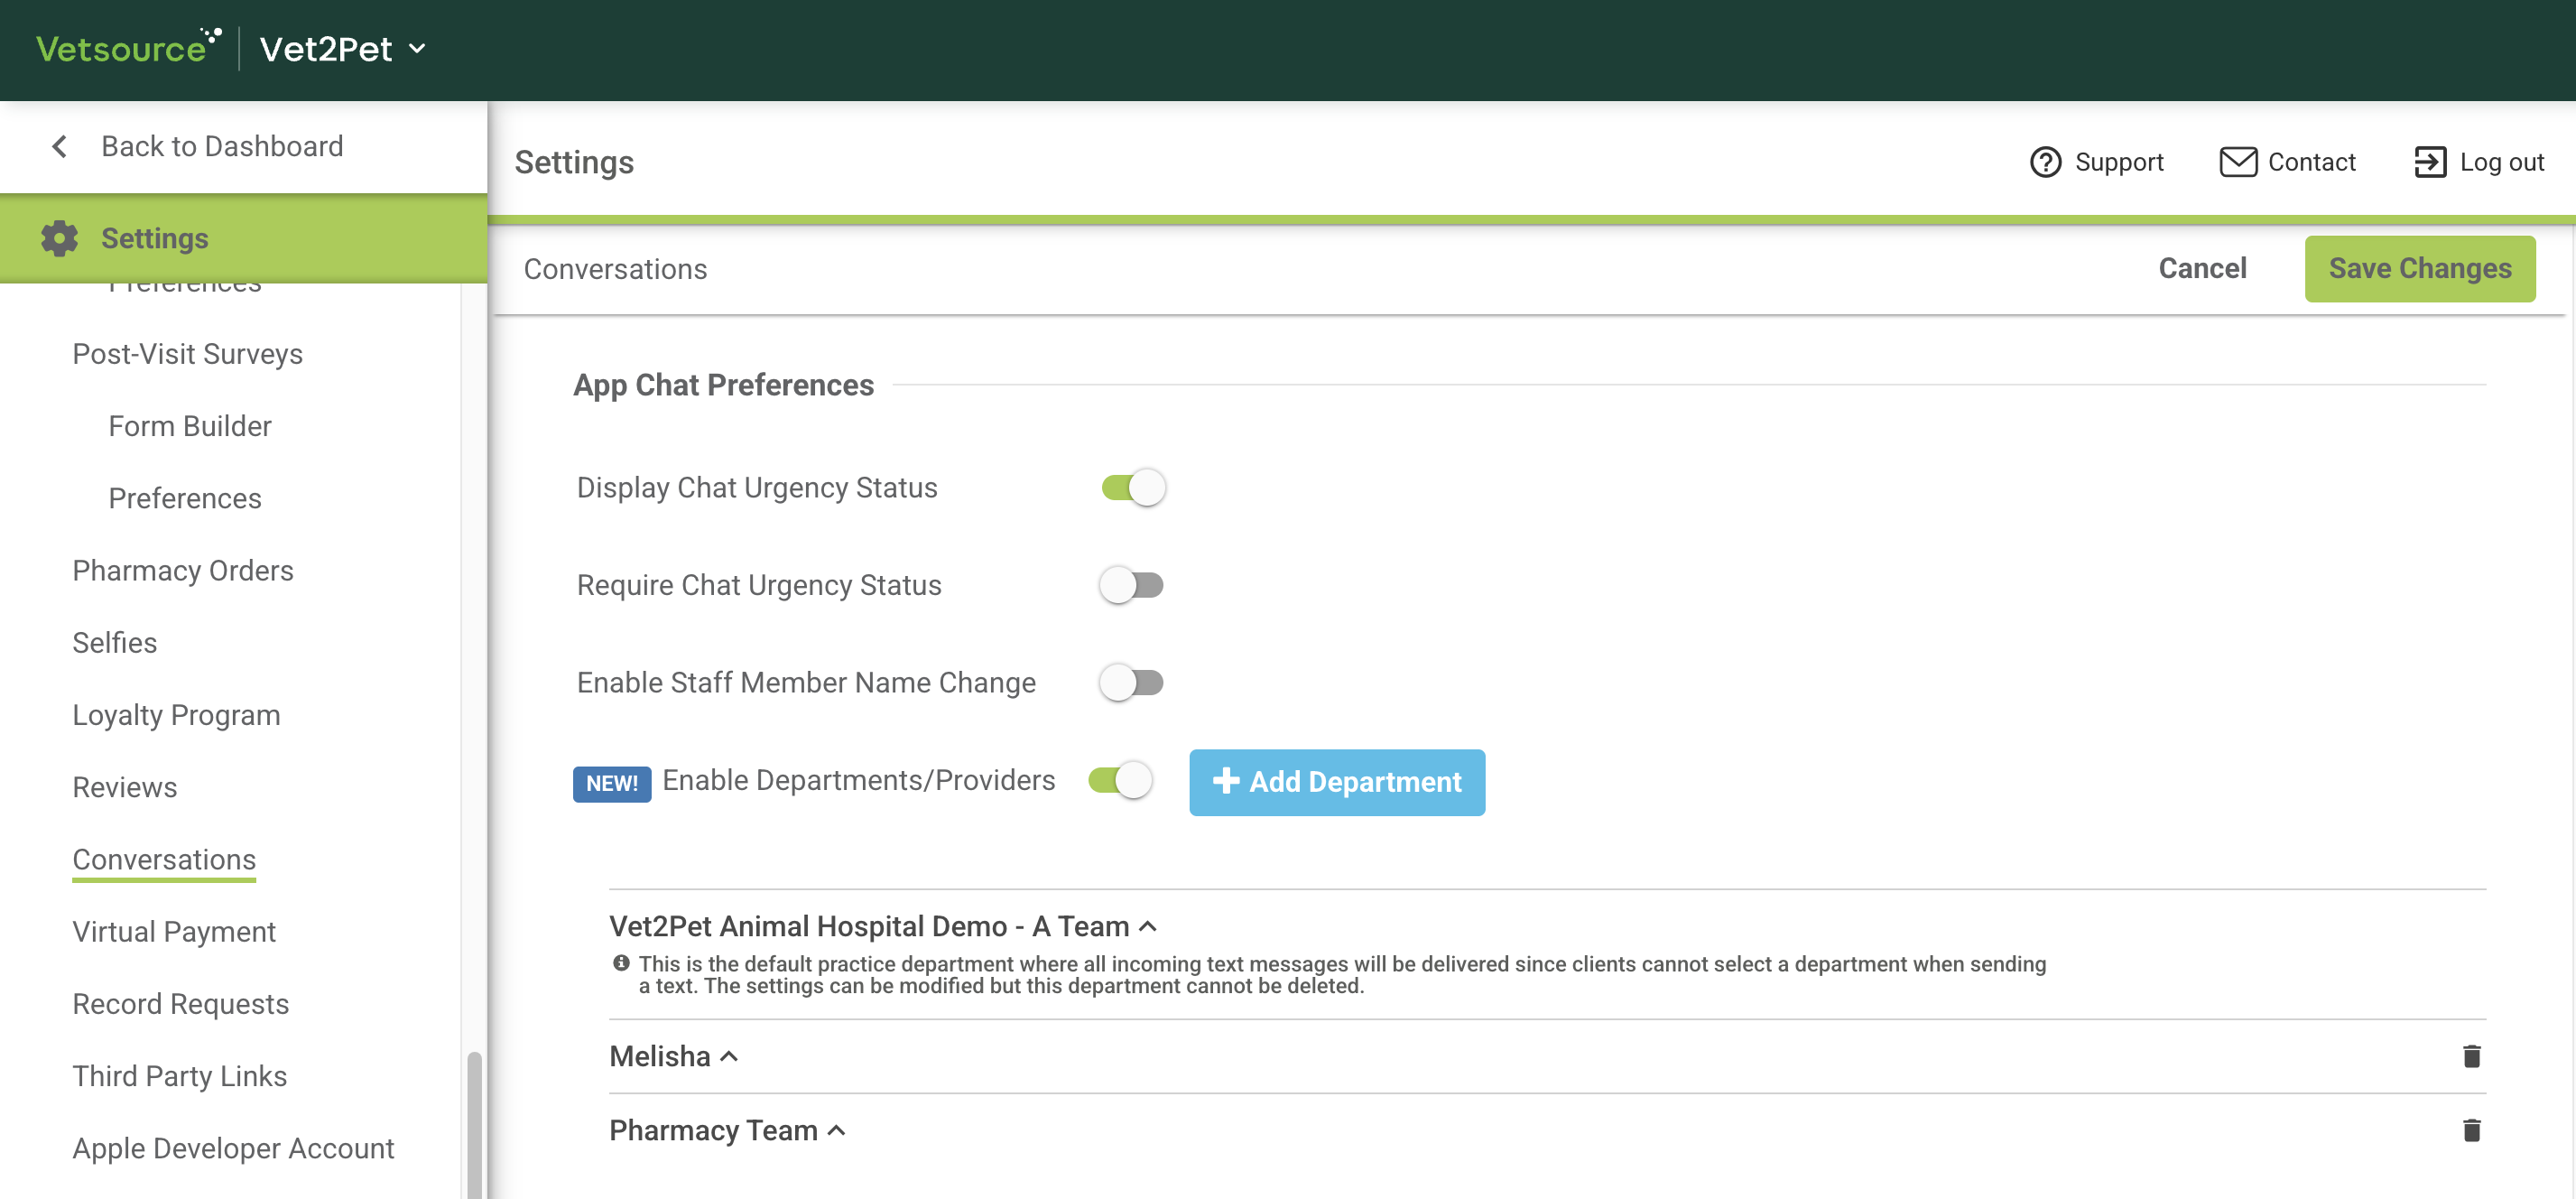
- To keep your feature more organized enable our Conversations by Departments/Providers tool. You can list by name or department, even add emojis to make things fun. You decide which channels are visible to your app user, or just use it as a internal communication tool. You can customize each channel with greeting message, chat hours, and more!
- Set your preferences for urgency ratings, which will display in the dashboard. Conversations will be sorted in the dashboard by urgency first, and then by date/time received.
What to Expect After Enabling App Chat:
Once App Chat is enabled, the system is ready to start sending and receiving messages with your app users. You can utilize App Chat in so many situations in practice. Have a clarifying question for that admit? Need to update a client on their lab results from yesterday? Need to ask additional questions on that appointment request?
To learn more about your dashboard and filtering options, review The Conversations Dashboard tour.
Initiating a App Chat within your Dashboard:
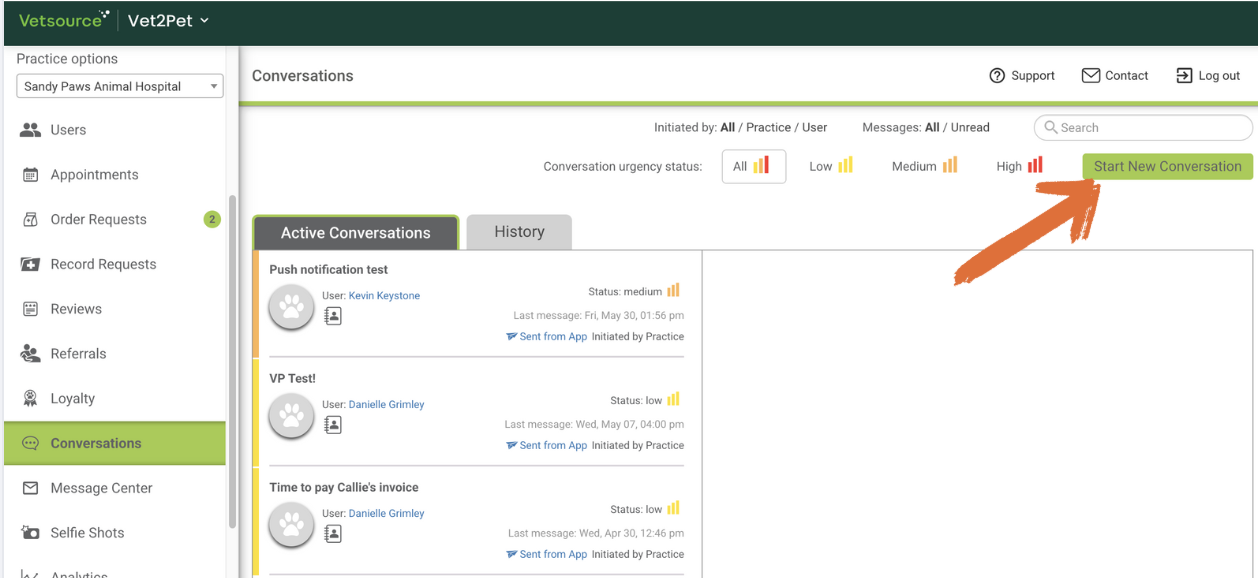
- Click Start New Conversation
- Enter the Title, and Body of your message.The Title of the chat can only be edited by closing the current conversation and starting a new one with a new title.
- Select your Communication Channel - This determines how your message will be delivered.
- App Chat - Sends to app users only. Searchable by client name
- Text Message - If enabled, sends to clients who may or may not be app users.
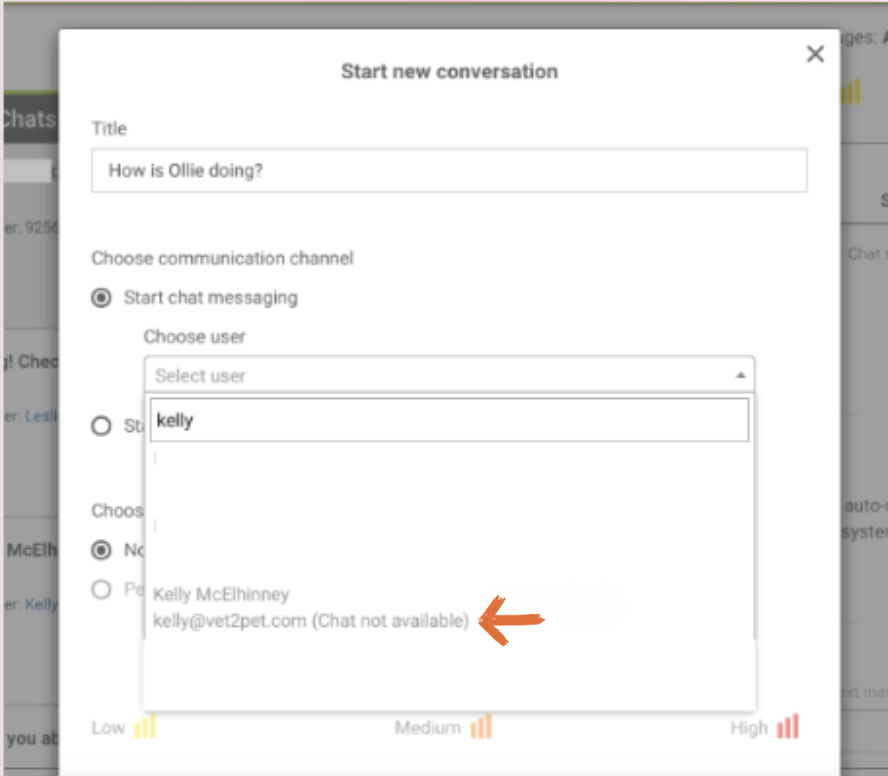
*If App Chat is unavailable to that particular user it will appear like the image below.
- Select which Pet you are discussing
- Based off your Settings you may also need to select an Urgency Status - START CHAT
Message Delivery Status:
For messages (App Chat or Text) sent from the dashboard, the following delivery indicators can appear:
- One gray check mark:
- If sent to app user: The message was sent to the app user and is unread
- If sent via text: The message was sent but not yet delivered
- Two gray check marks:
- If sent to app user: Indicates confirmation of receipt when the user opens the app
- If sent via text: The message has been delivered
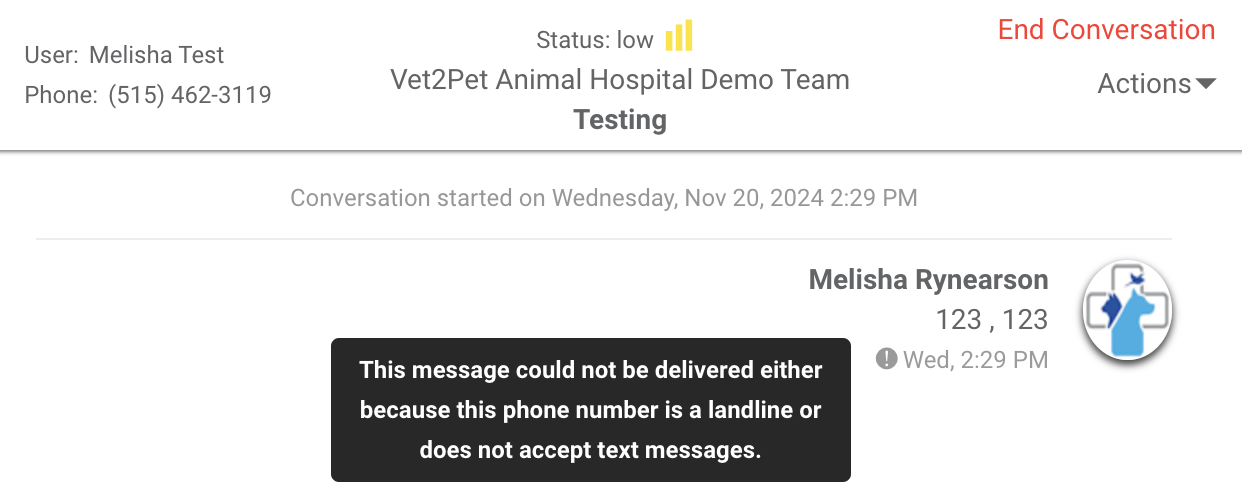
- No checkmarks, but a black information indicator - Indicates a deliverability issue with a text message. Hover over the indicator to learn more.
📷 Photos, Videos, and PDF Files:

Add a Photo or Video by simply clicking the camera with a plus sign. When a client sends a photo or video, it will display in the conversation window.
If a photo or video is sent via text from the dashboard to the client, the message will say, "You've got a new photo/video message! <Link>." The client must click the link to access the image or video file.
Add a PDF file to the Conversation by clicking the paper icon with a checkmark. They will be delivered with the name of the file and a link to access the file.
The Actions drop down is where your team can:
- Mark a message as unread
- Change the assigned staff member (depending on what’s enabled in your Settings)
- Transfer the conversation to another department (depending on what’s enabled in your Settings)
Ending the Conversation
We strongly recommend ending a conversation as soon as all client concerns have been fully addressed. Doing so keeps your dashboard organized and helps prevent missed communication touchpoints. Once you click End Conversation, you’ll see three options:
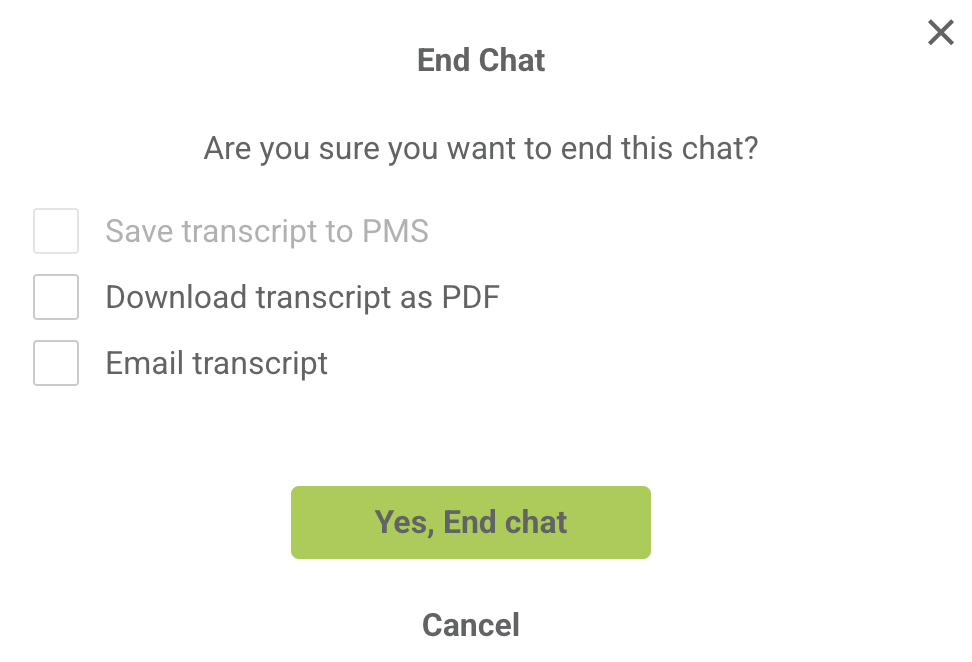
- Conversations Write-Back - Save transcript to PIMS
*It depends on your practice management software (PIMS.) - Download transcript as PDF
If write-back isn't available for you, this a great alternative. Simply download the transcript and save it to a specific line item or directly to the patient’s file within your PIMS. - Email transcript
Use this option if a client requests a copy of the conversation.

