Digital Forms
Getting started with Digital Forms
The Digital Forms feature allows your practice to create custom forms, share them with pet owners via a simple link, and manage all submissions directly from your dashboard. This tool is designed to streamline patient intake, consent forms, and record requests.
This guide covers:
- Navigating the Forms Dashboard
- Building a New Form
- Building Forms Manually
- NEW: Building Forms With AI
- Managing Your Forms Library
- Viewing & Managing Client Responses
- NEW: Smart Form Pre-Population
- NEW: PIMS Writeback
- NEW: Feature Interconnection
- Archiving & Restoring Forms
Navigating the Forms Dashboard
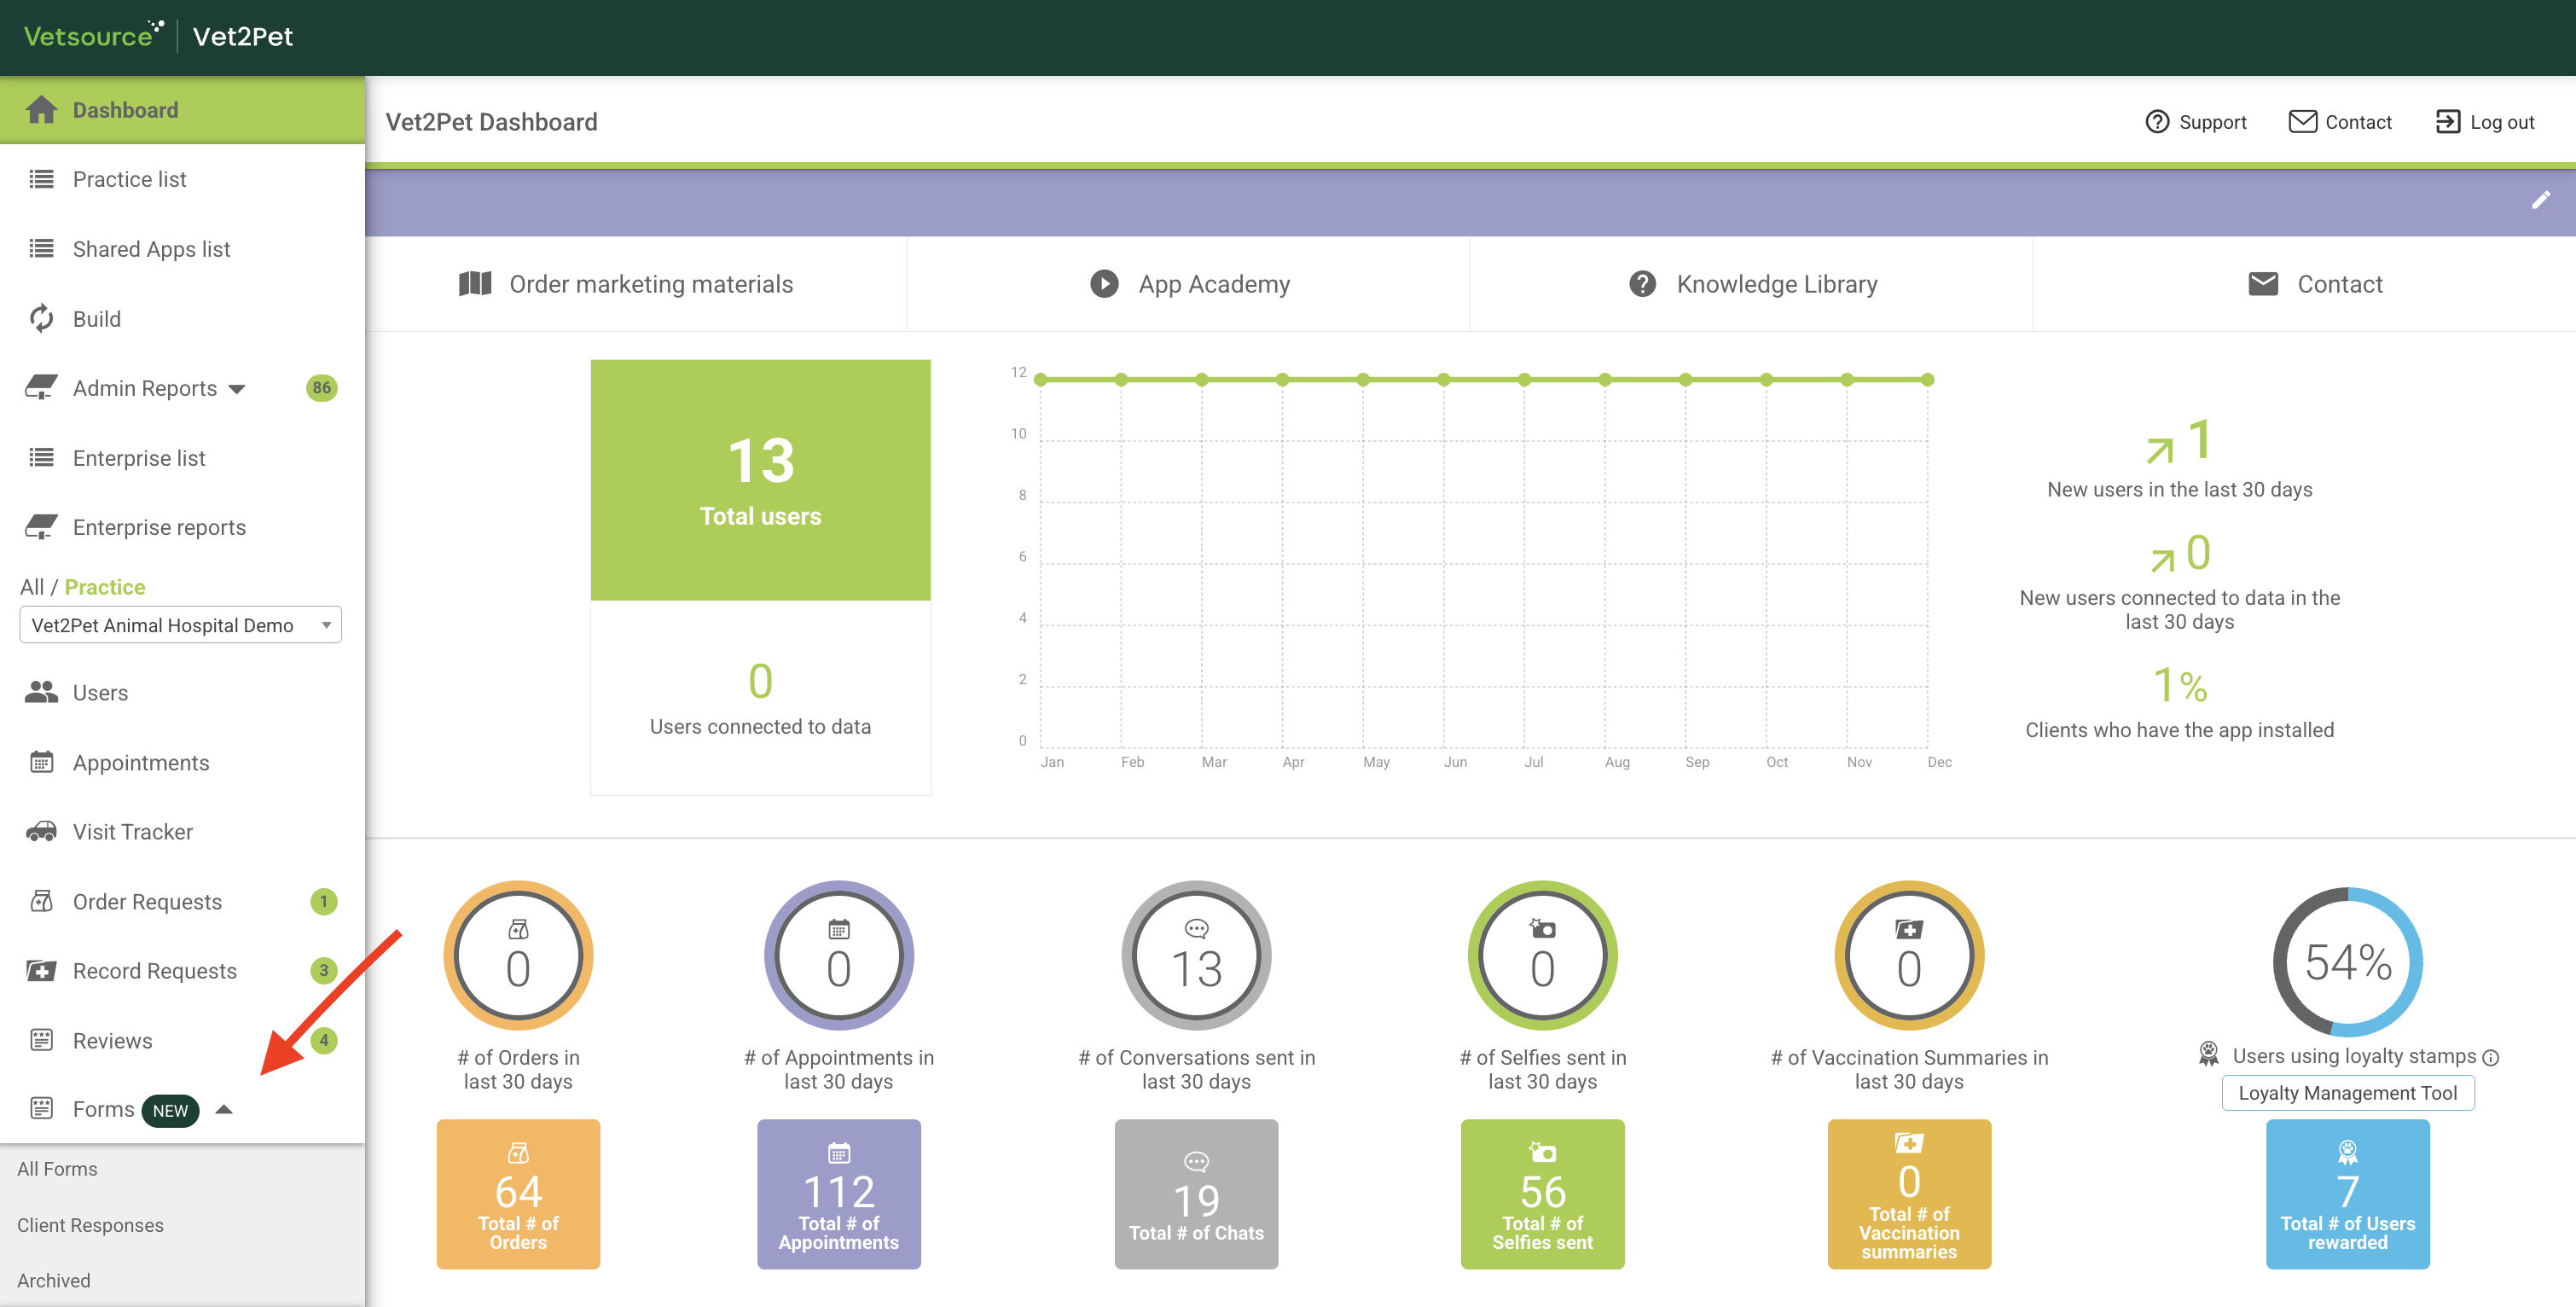
To access the feature, click the Forms tab on the left-hand menu. This will open a sub-menu where you can navigate to All Forms to manage your templates and access the builder, Client Responses to view submissions from pet owners, or Archive to view historical data.
Building a New Form
Please be aware that creating and editing forms is restricted to users with the Dashboard Manager role. Users with any other role can still perform all other actions for forms and form submissions, such as viewing, downloading, printing, archiving, and many more.
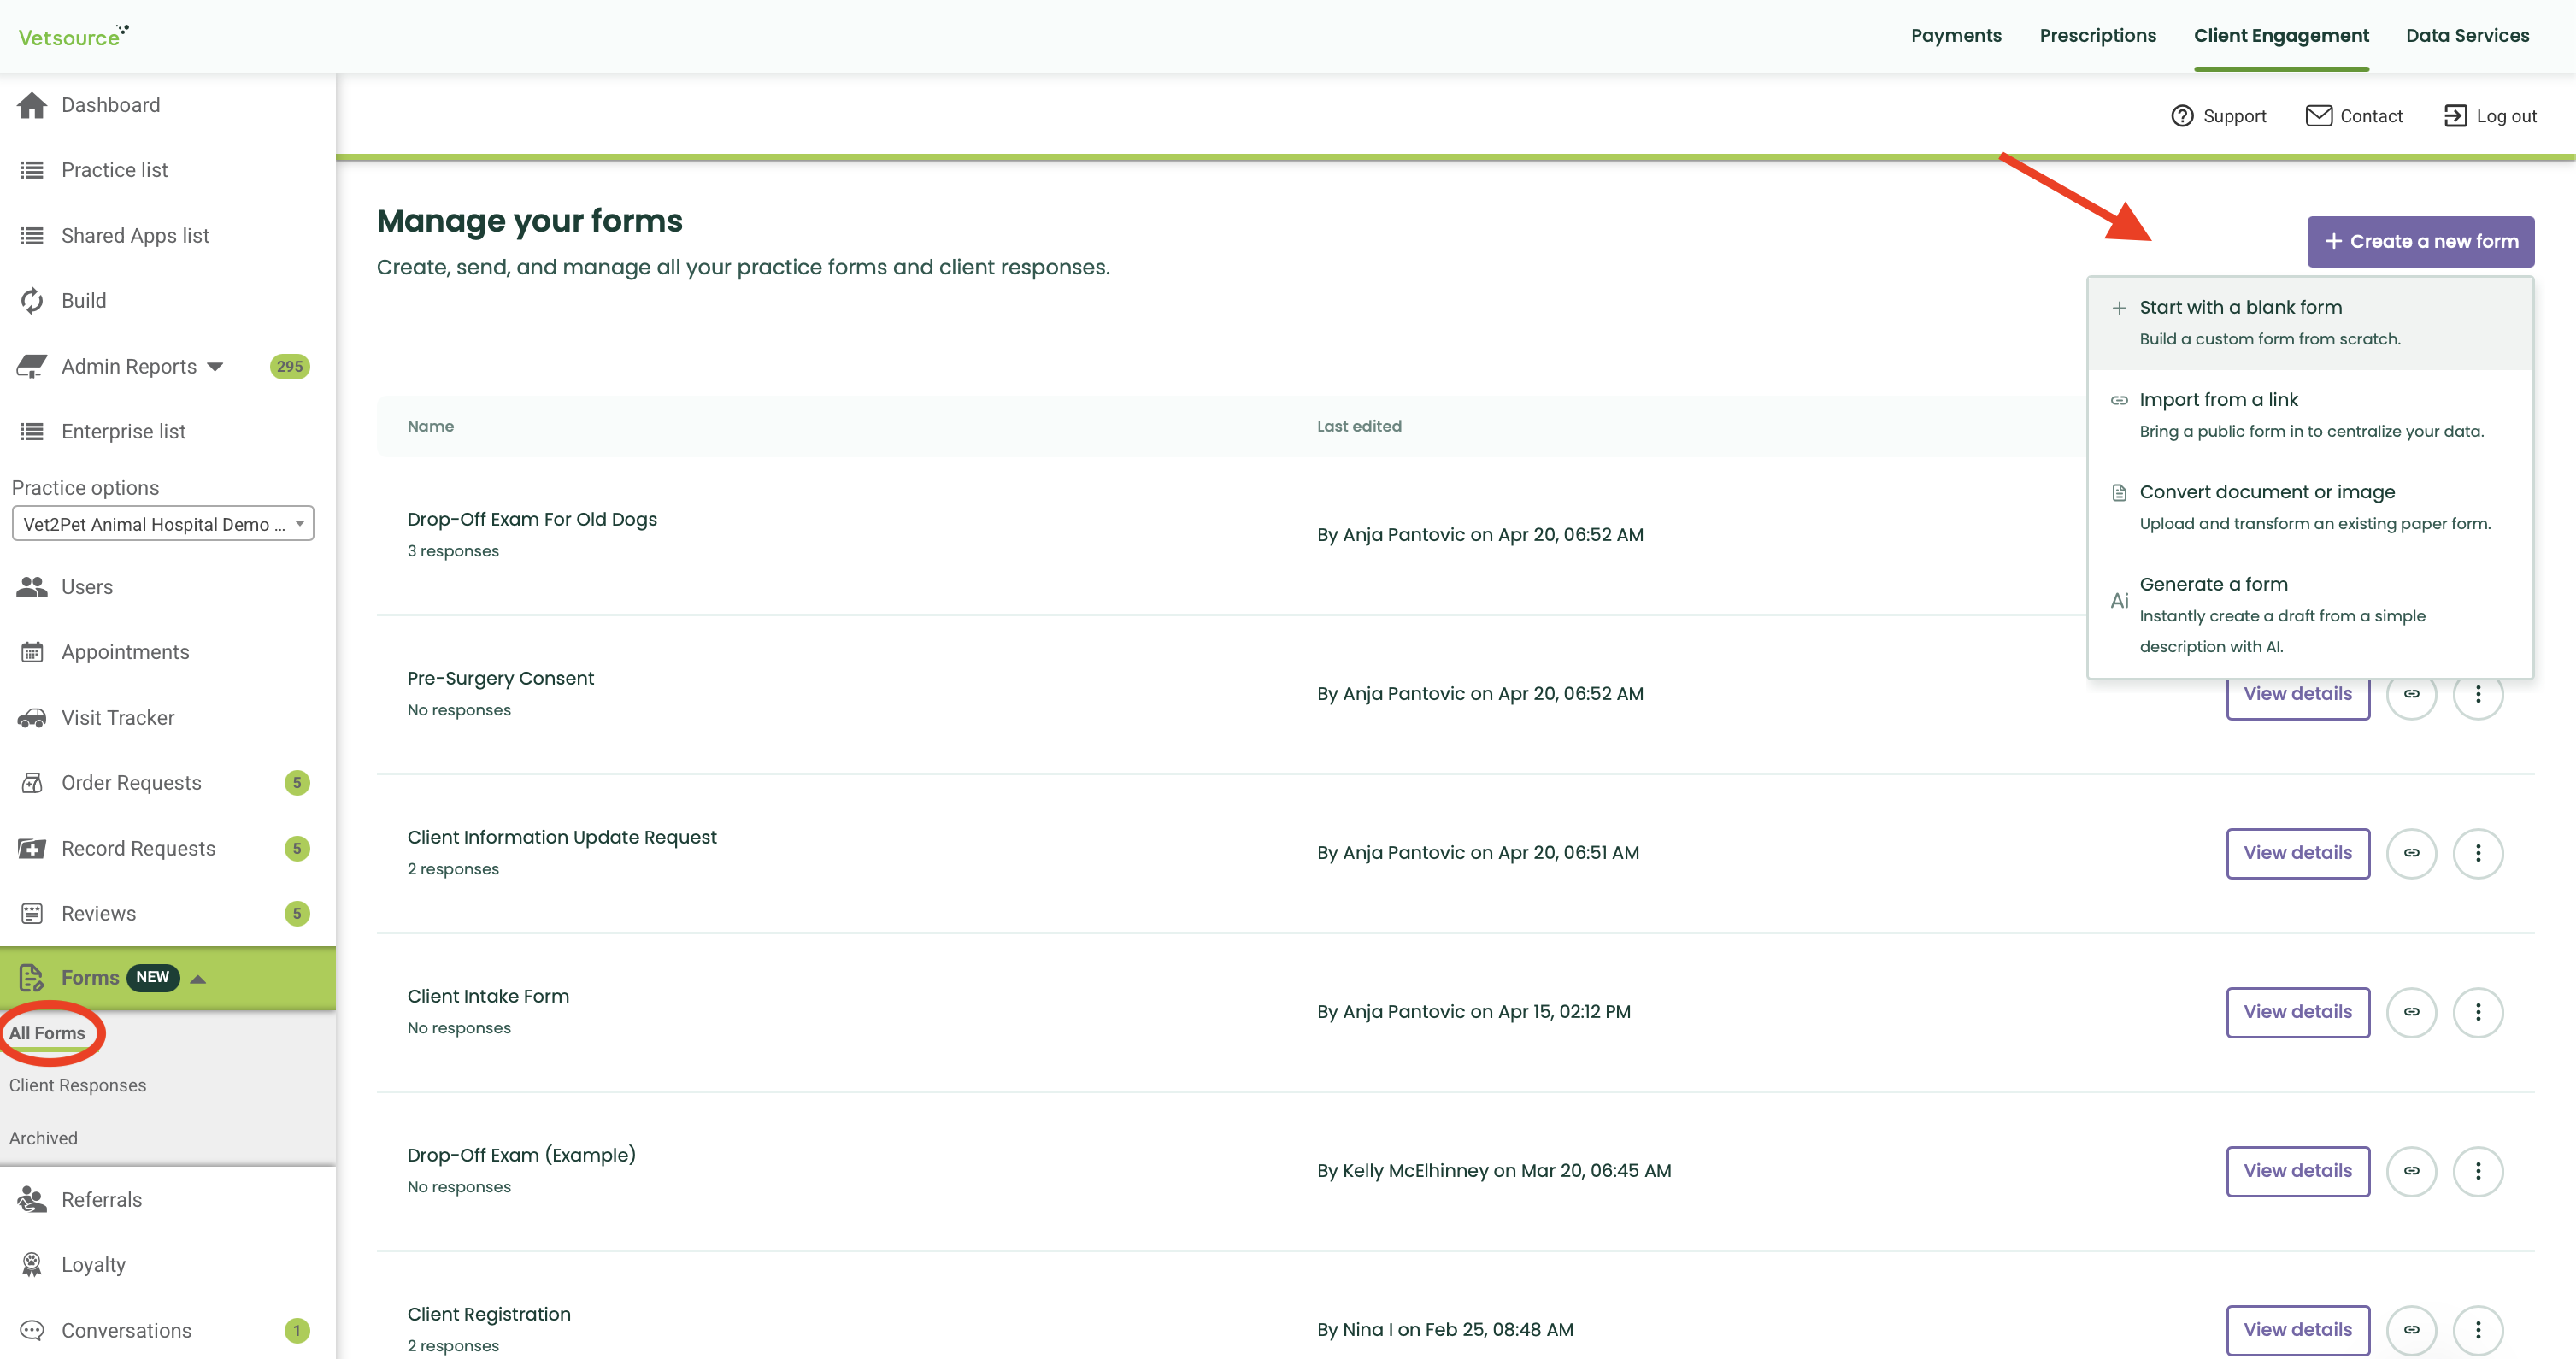
To start from scratch, click the + Create a new form button in the top right corner of the All Forms page. This will open the menu where you can choose how you want to build your form.
- Building Form Manually
To build forms manually from scratch, choose Start with a blank form option.
- Adding Questions and Sections
The Form Builder allows you to customize different elements to customize your form.
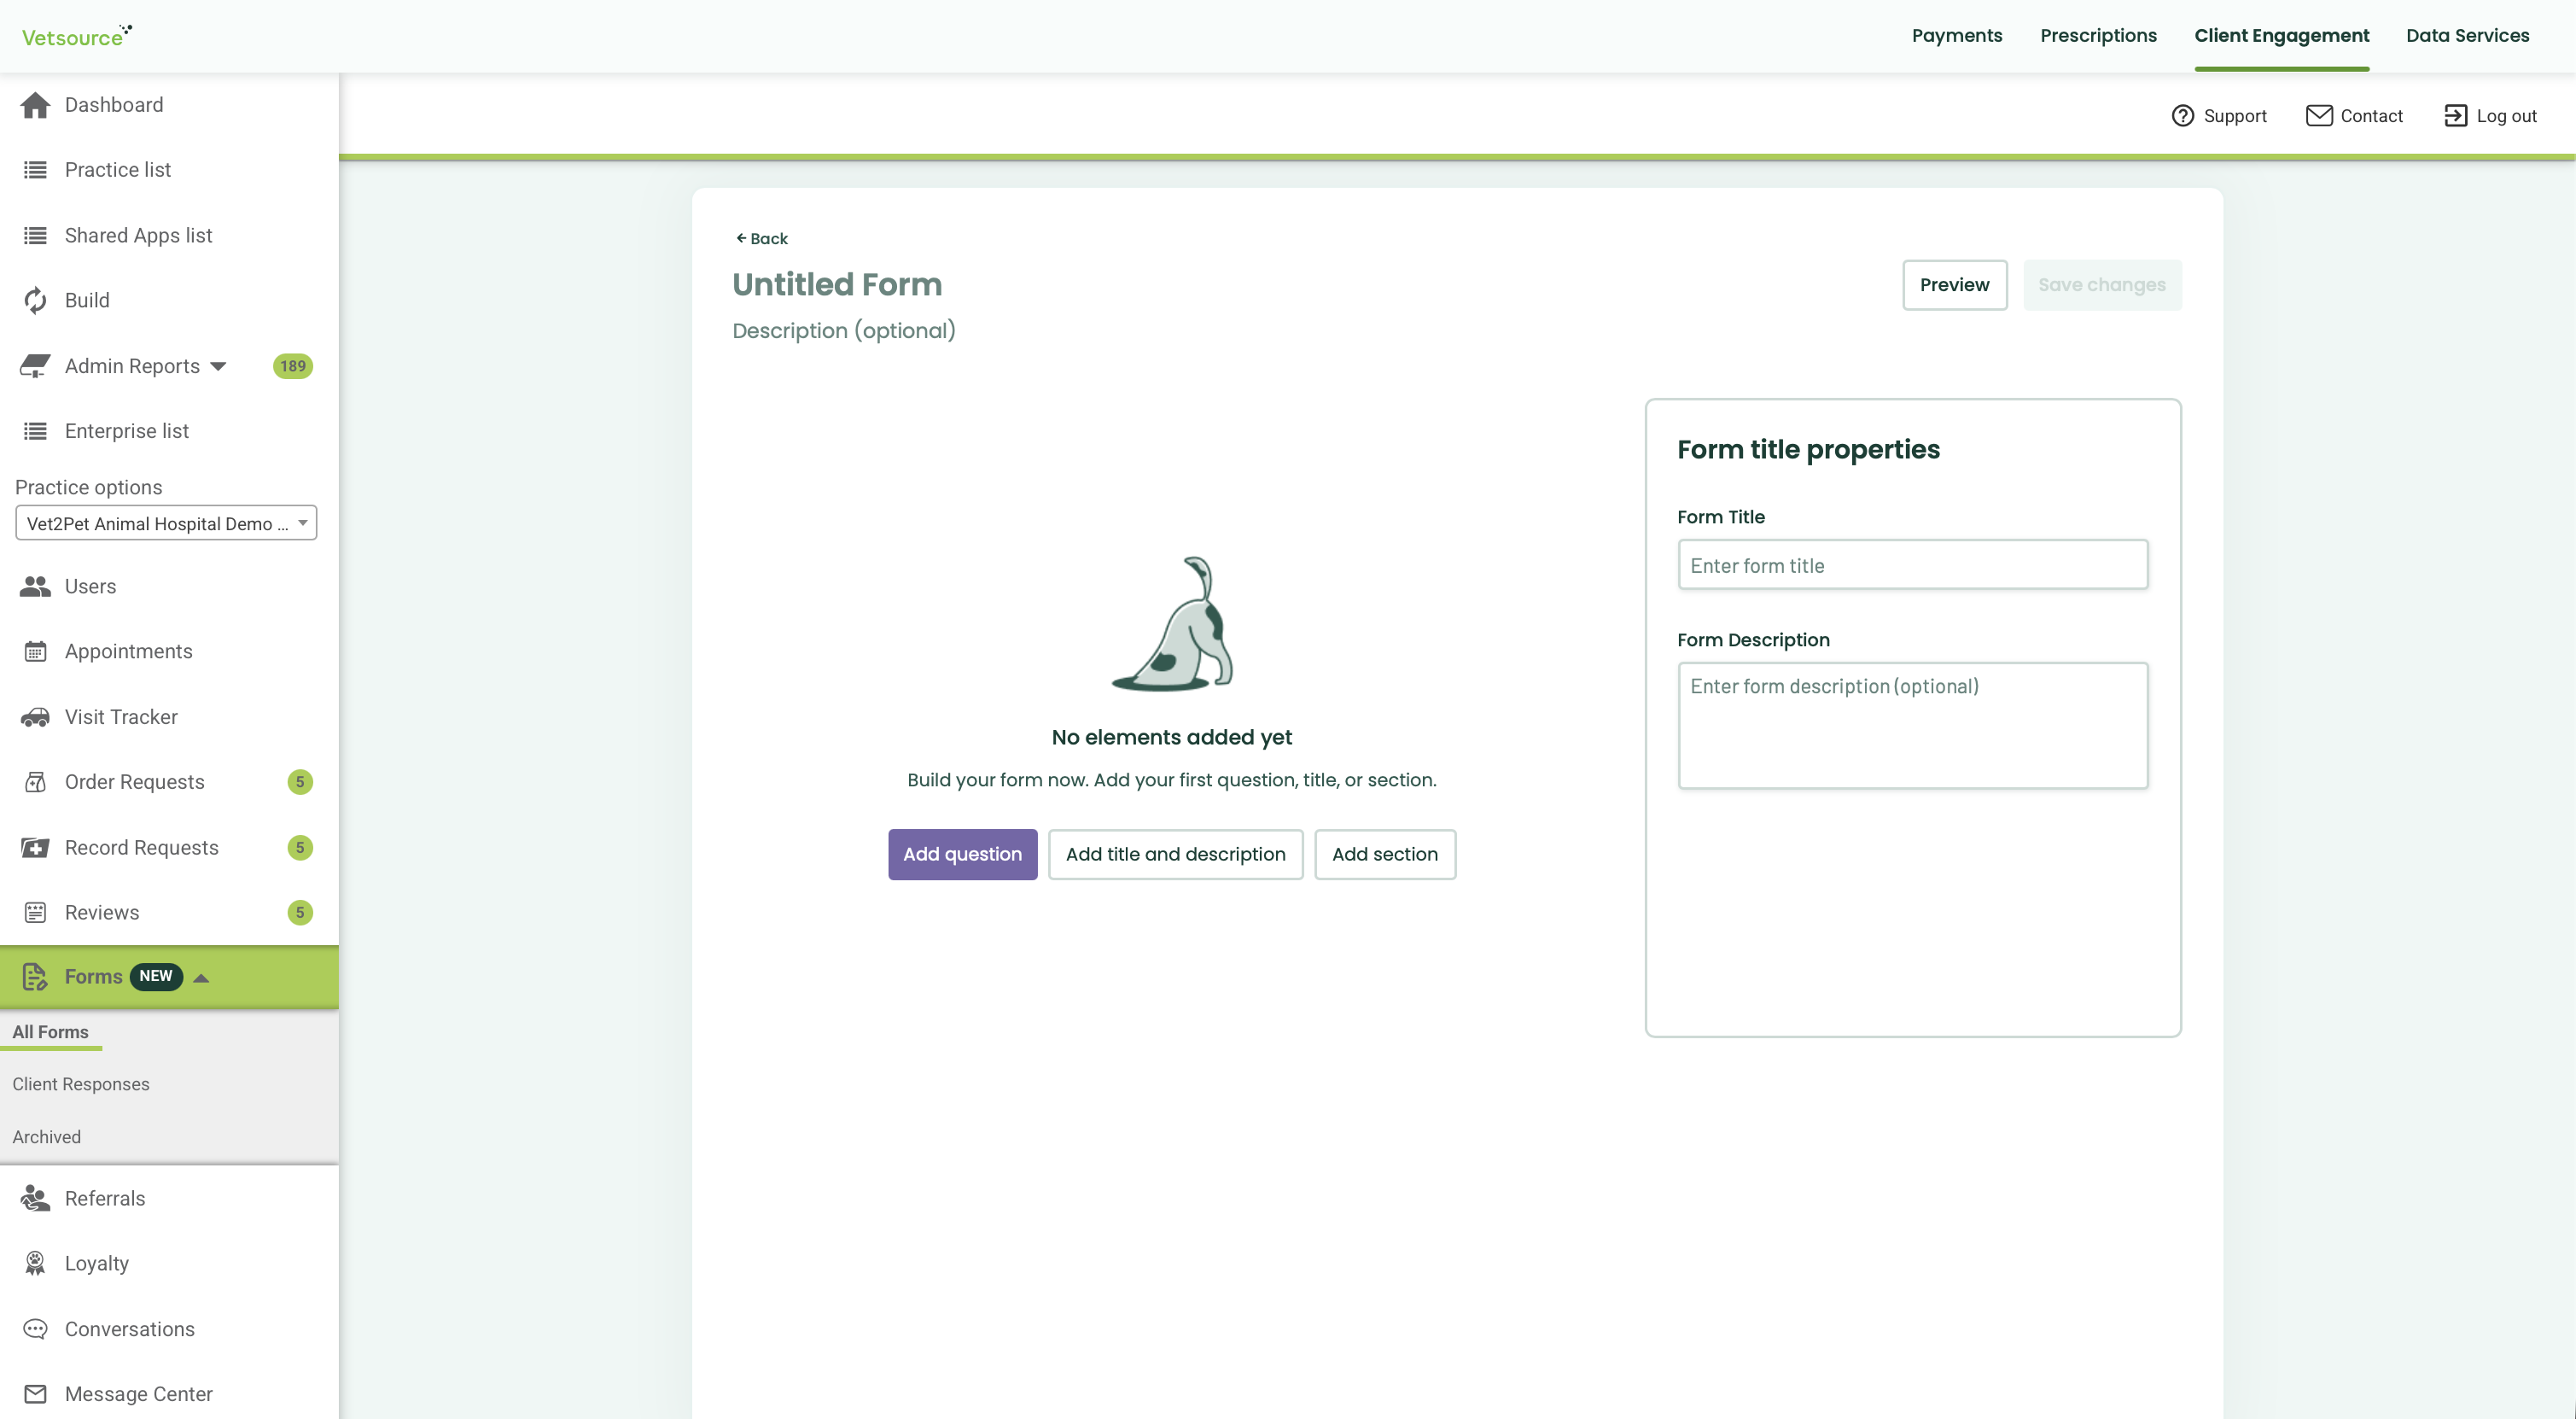
You can:
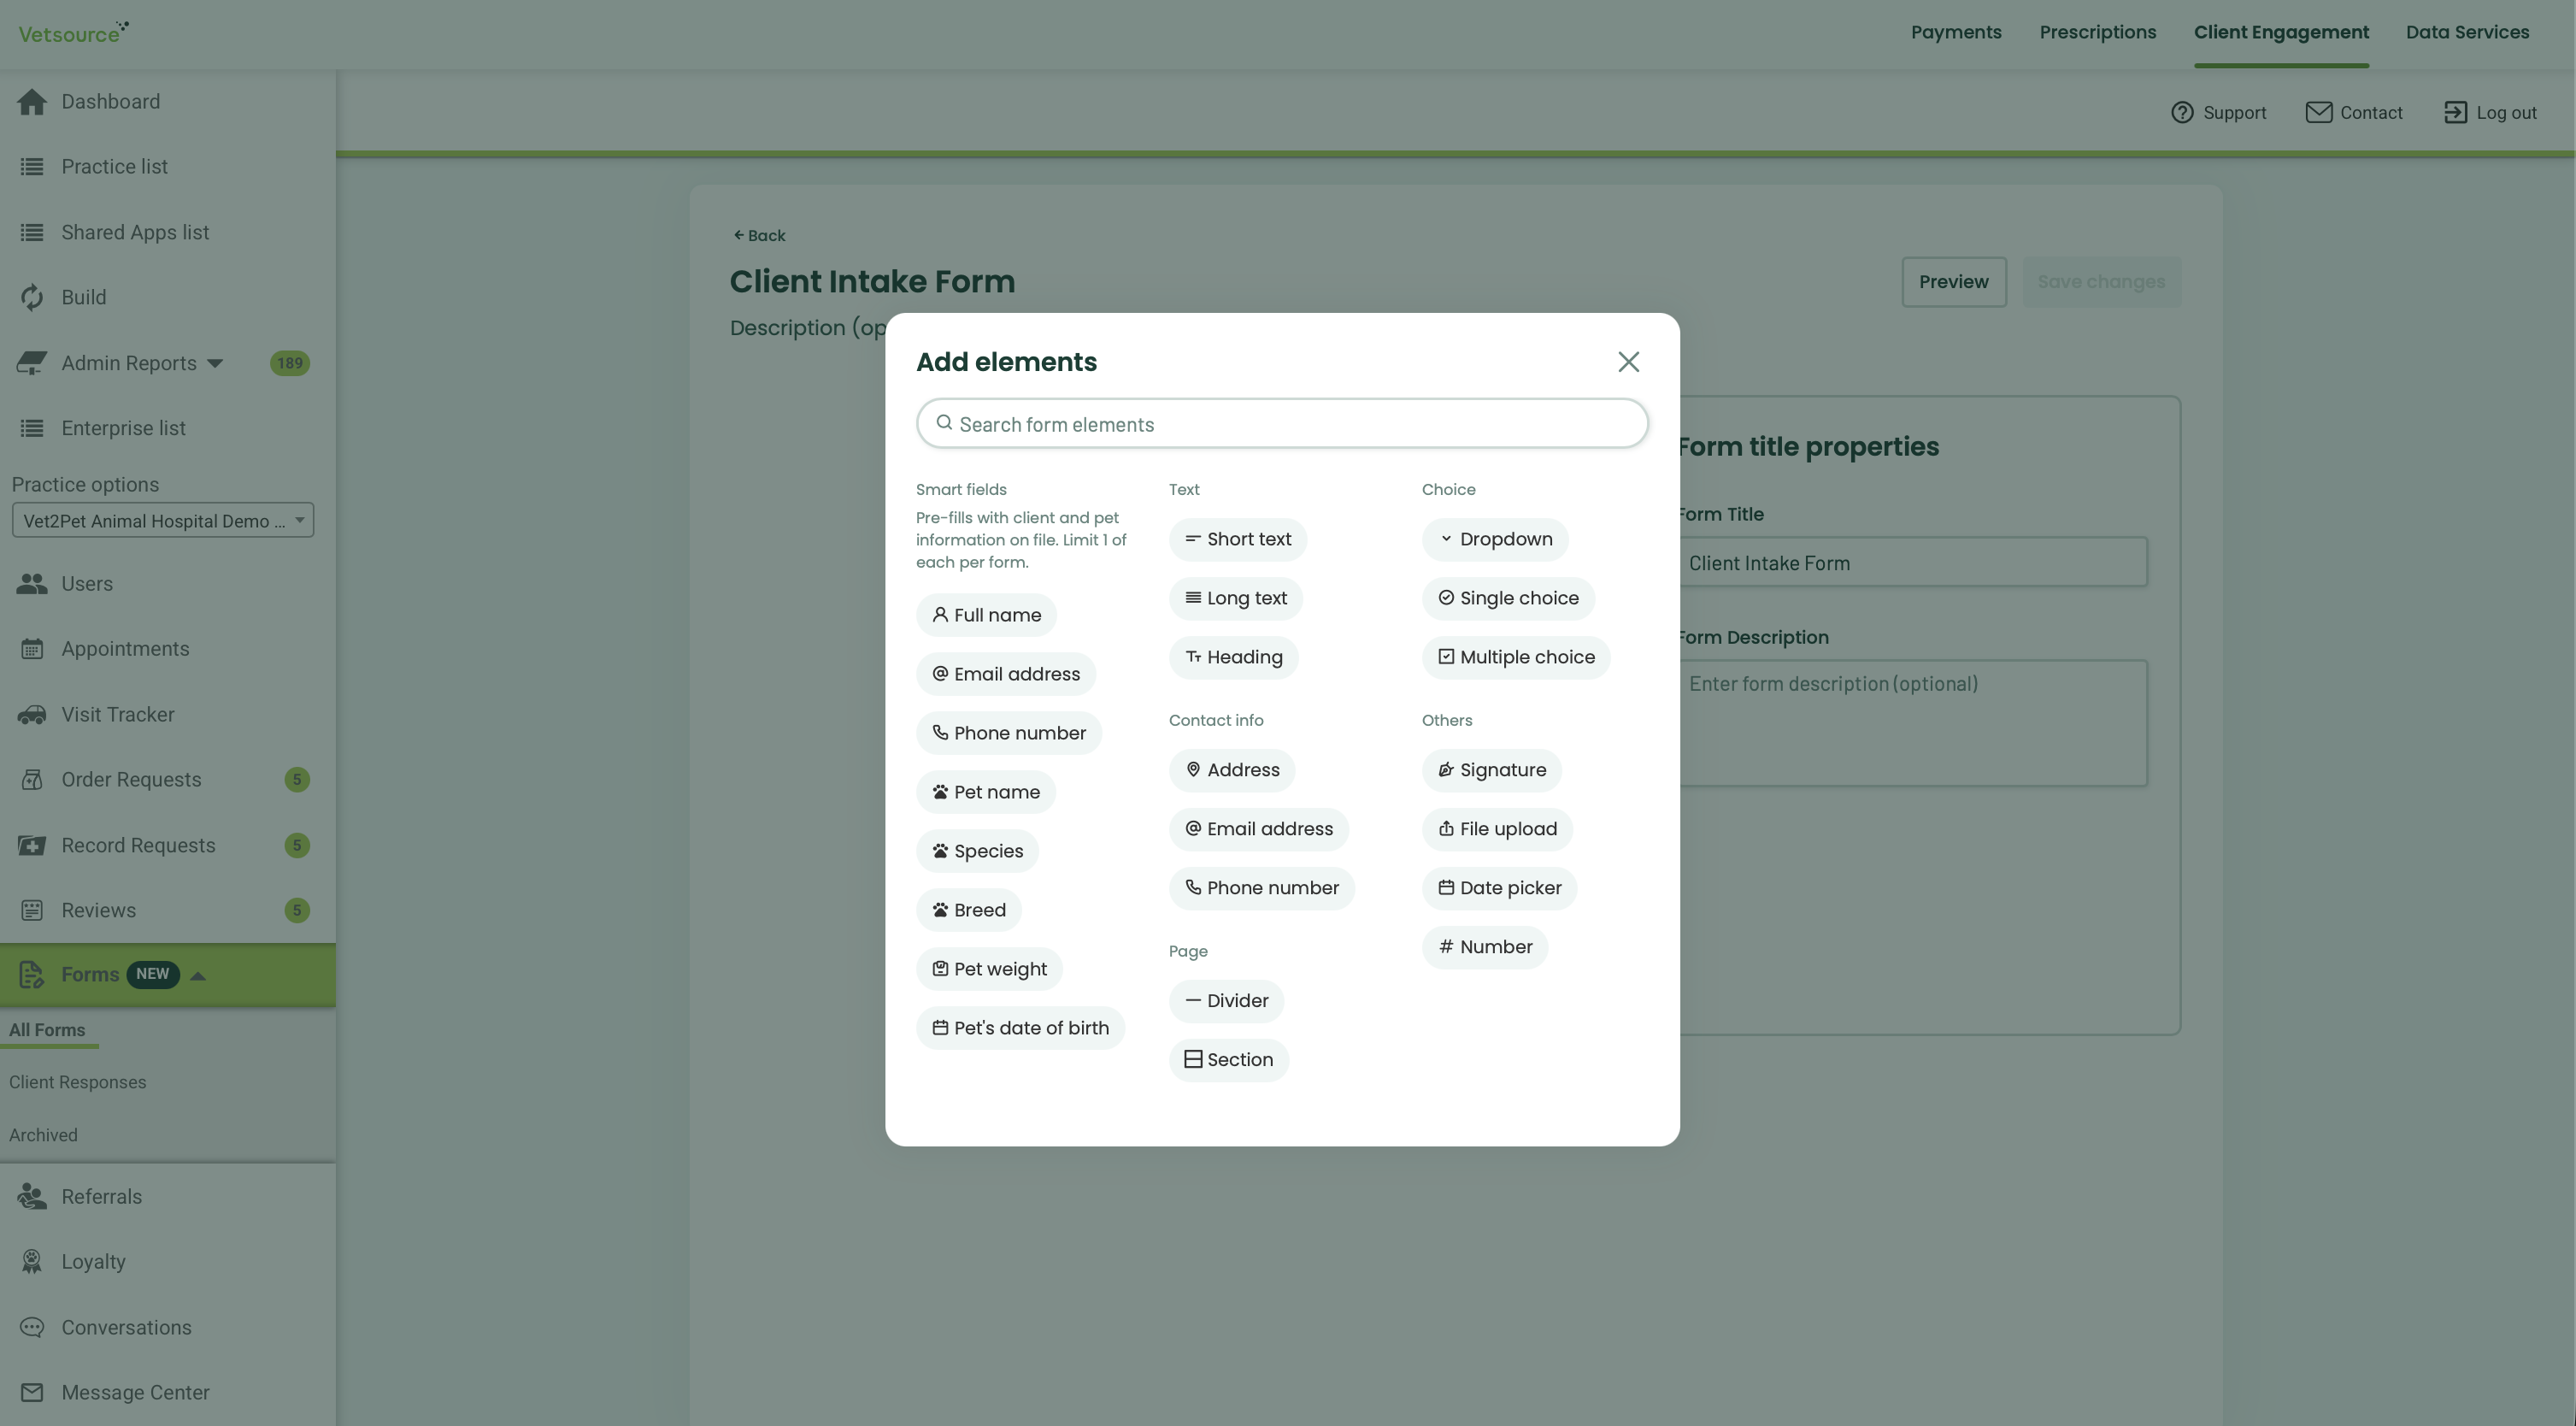
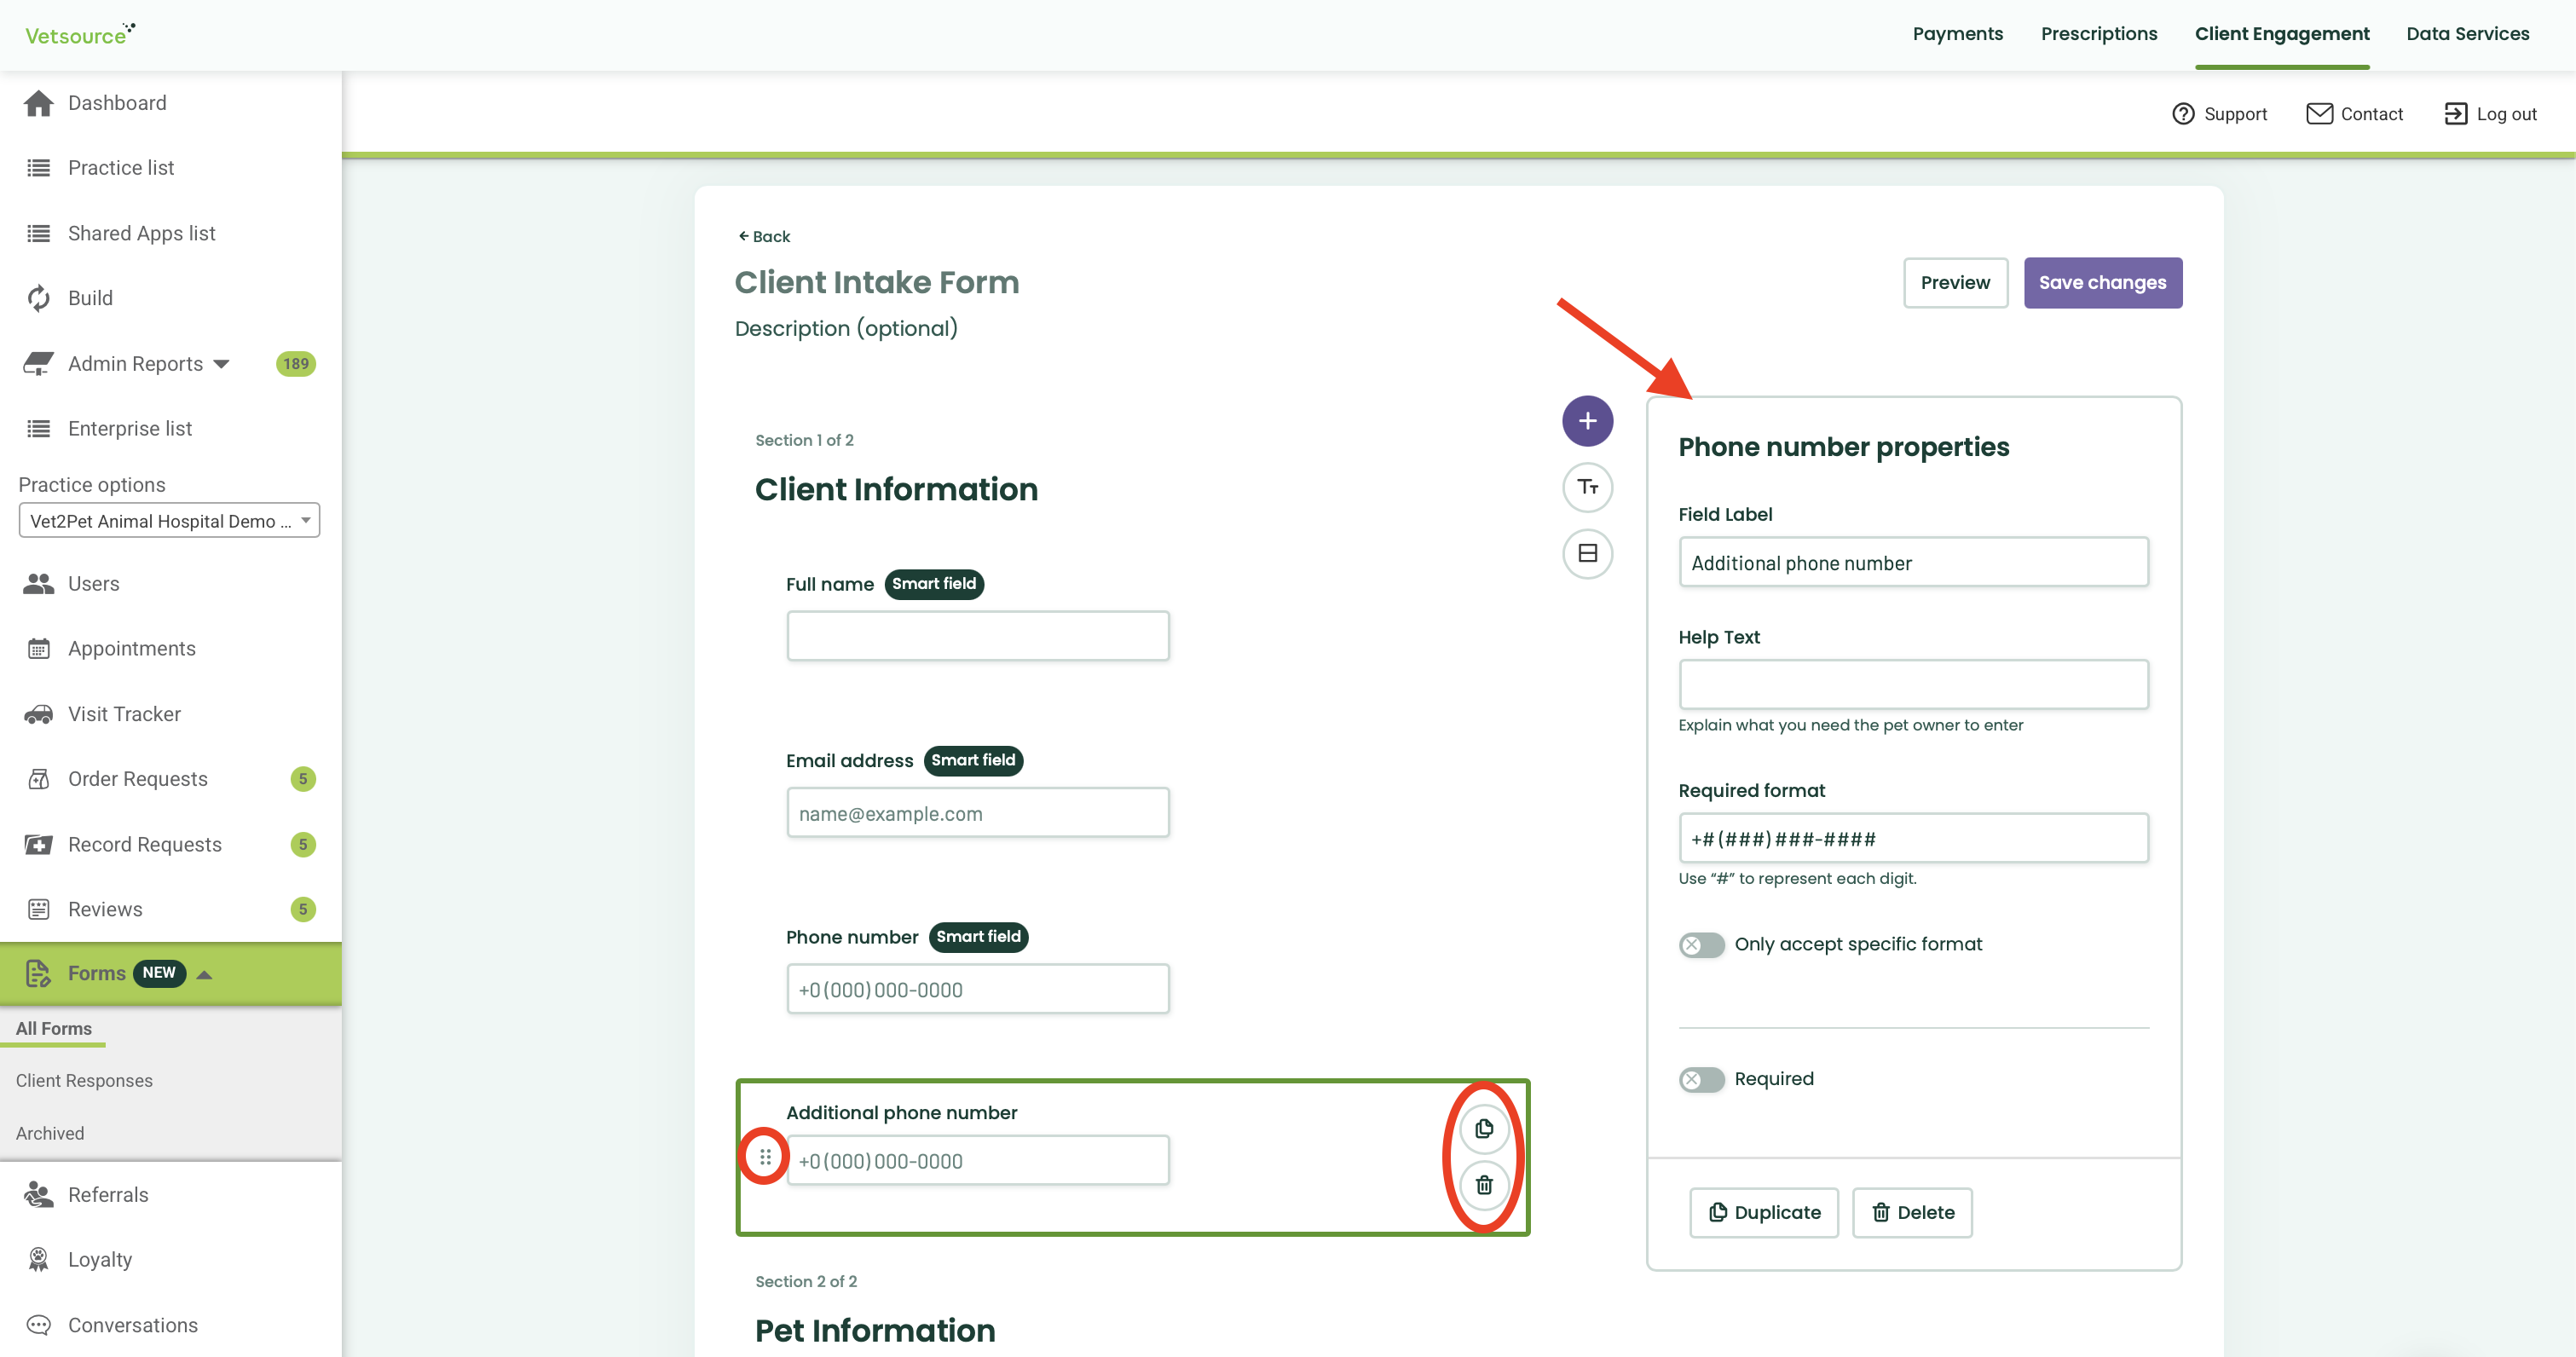
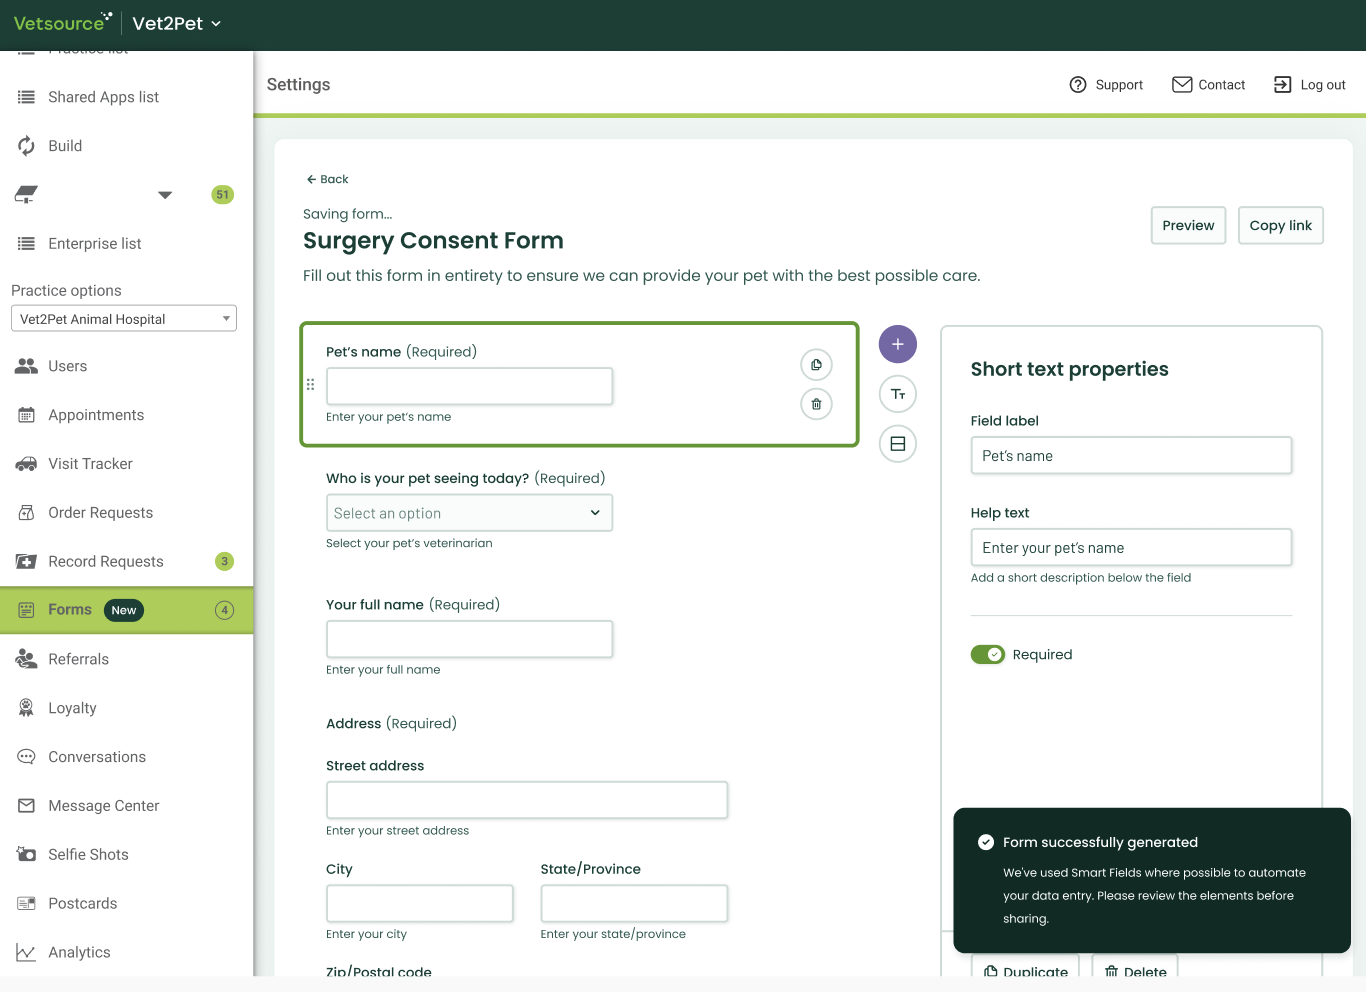
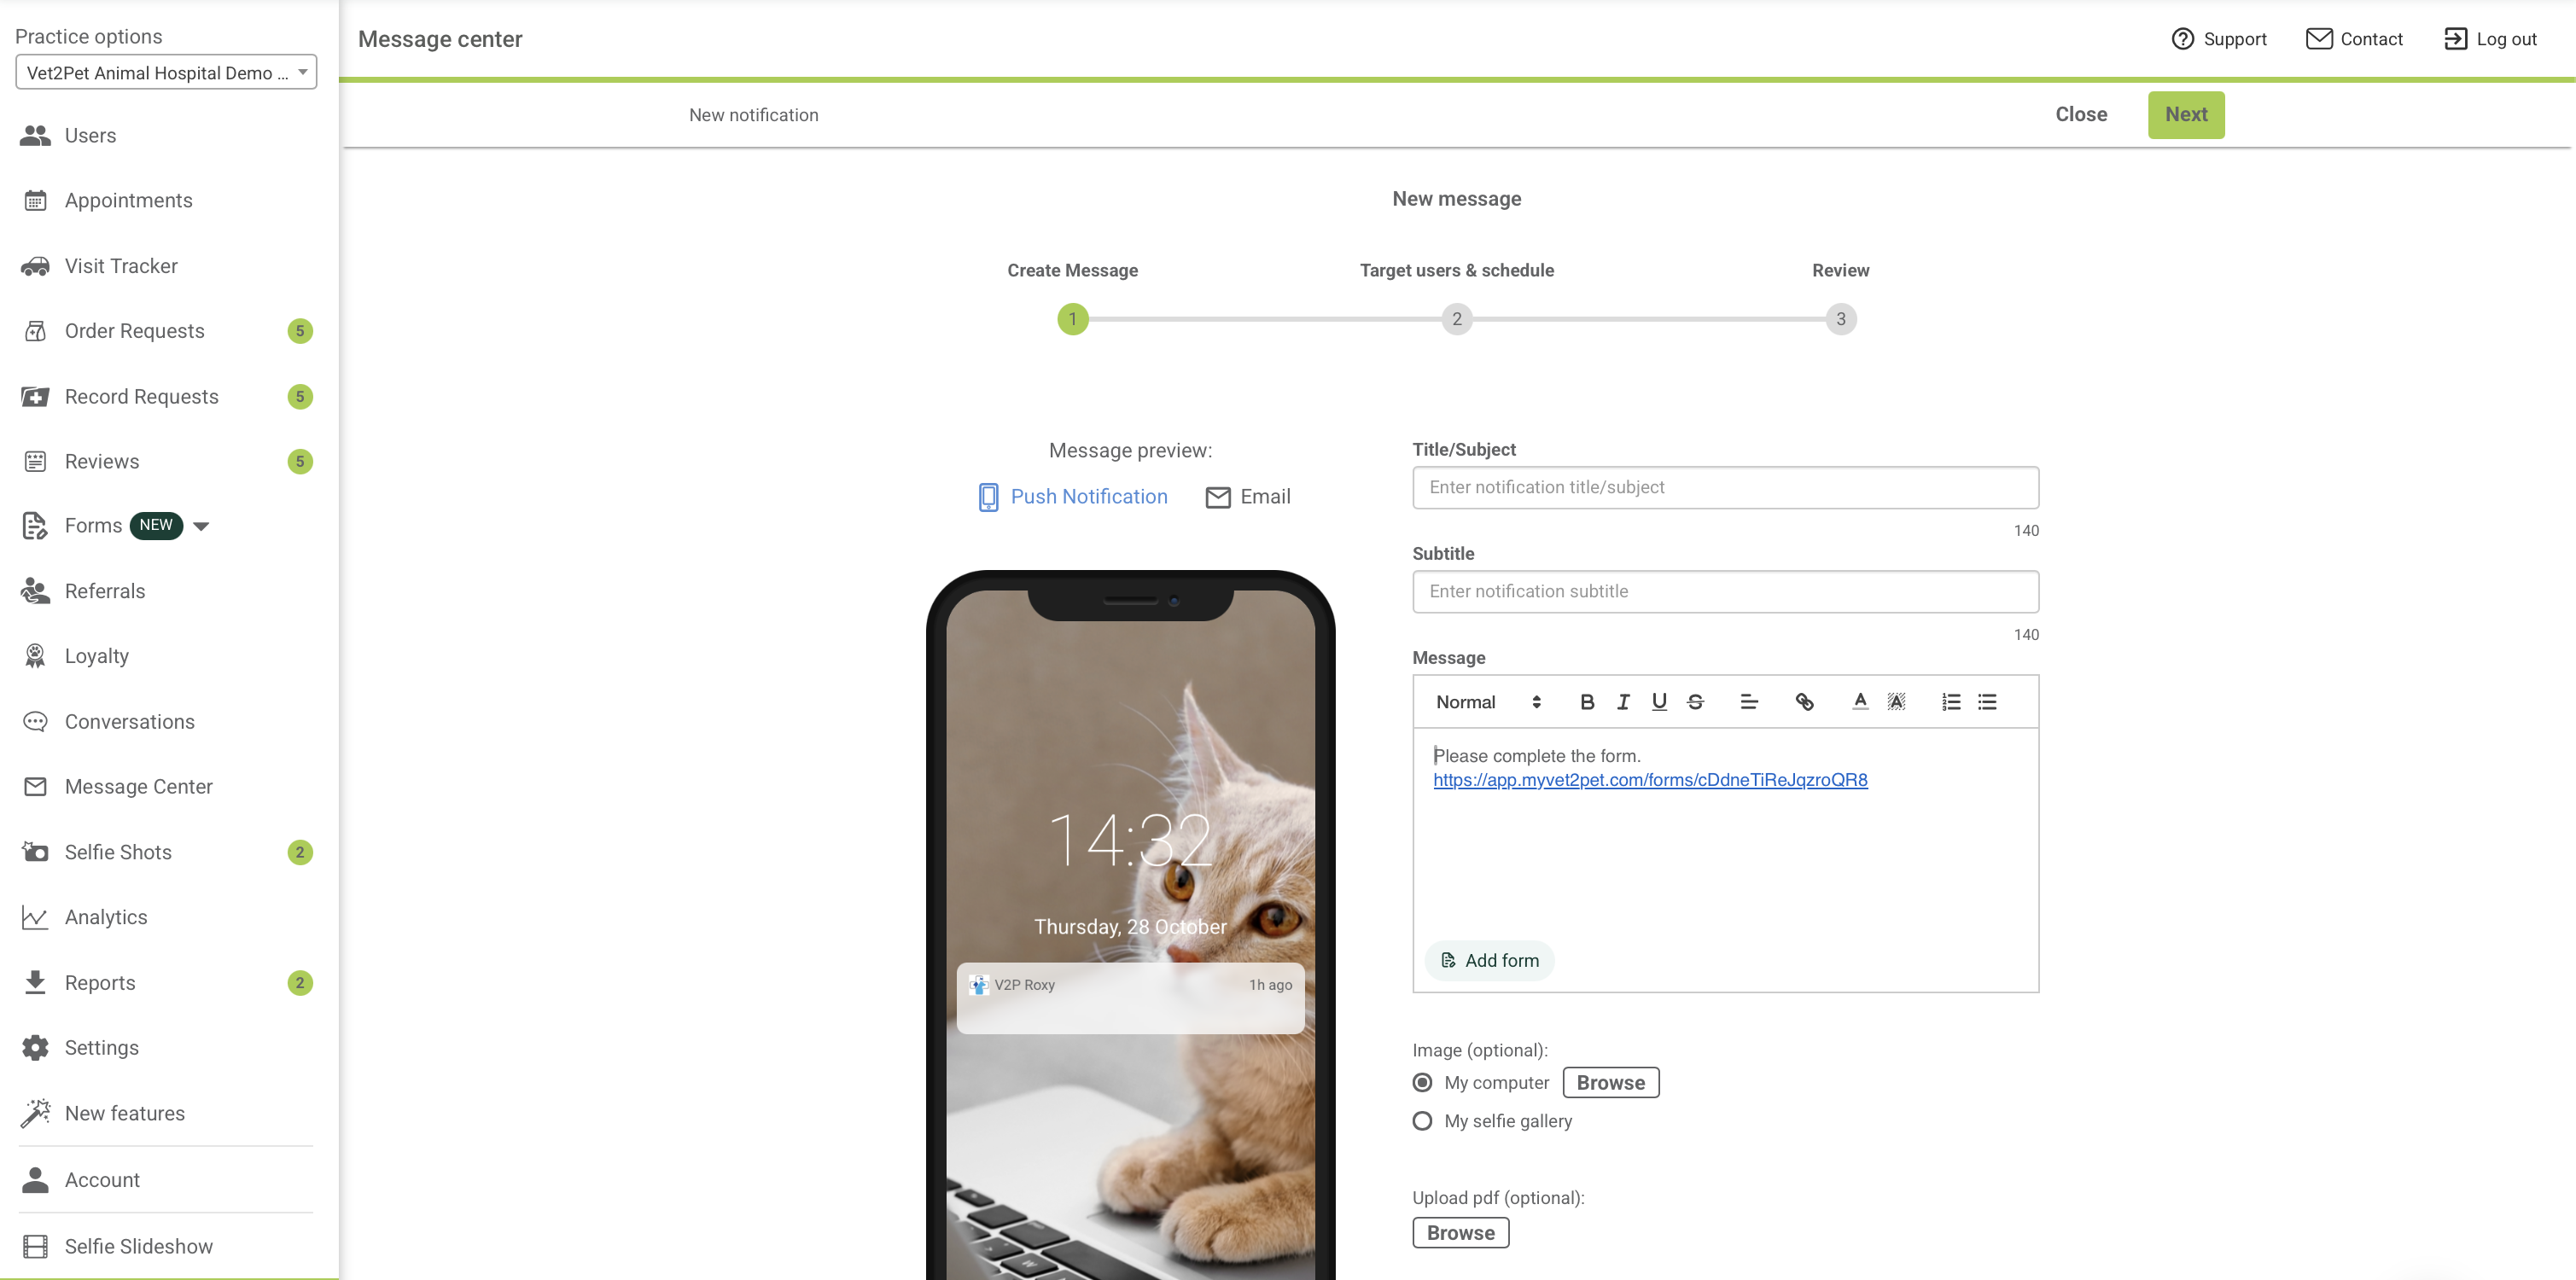
- Add a Question: Choose from various input types such as Smart Fields, Short Text, Long Text, Multiple Choice, Checkboxes, Date, Phone Number, and Signature.
- Add title and description: Add any title and/or description that would show as a header on you form. This does not change title nor the description of the actual form.
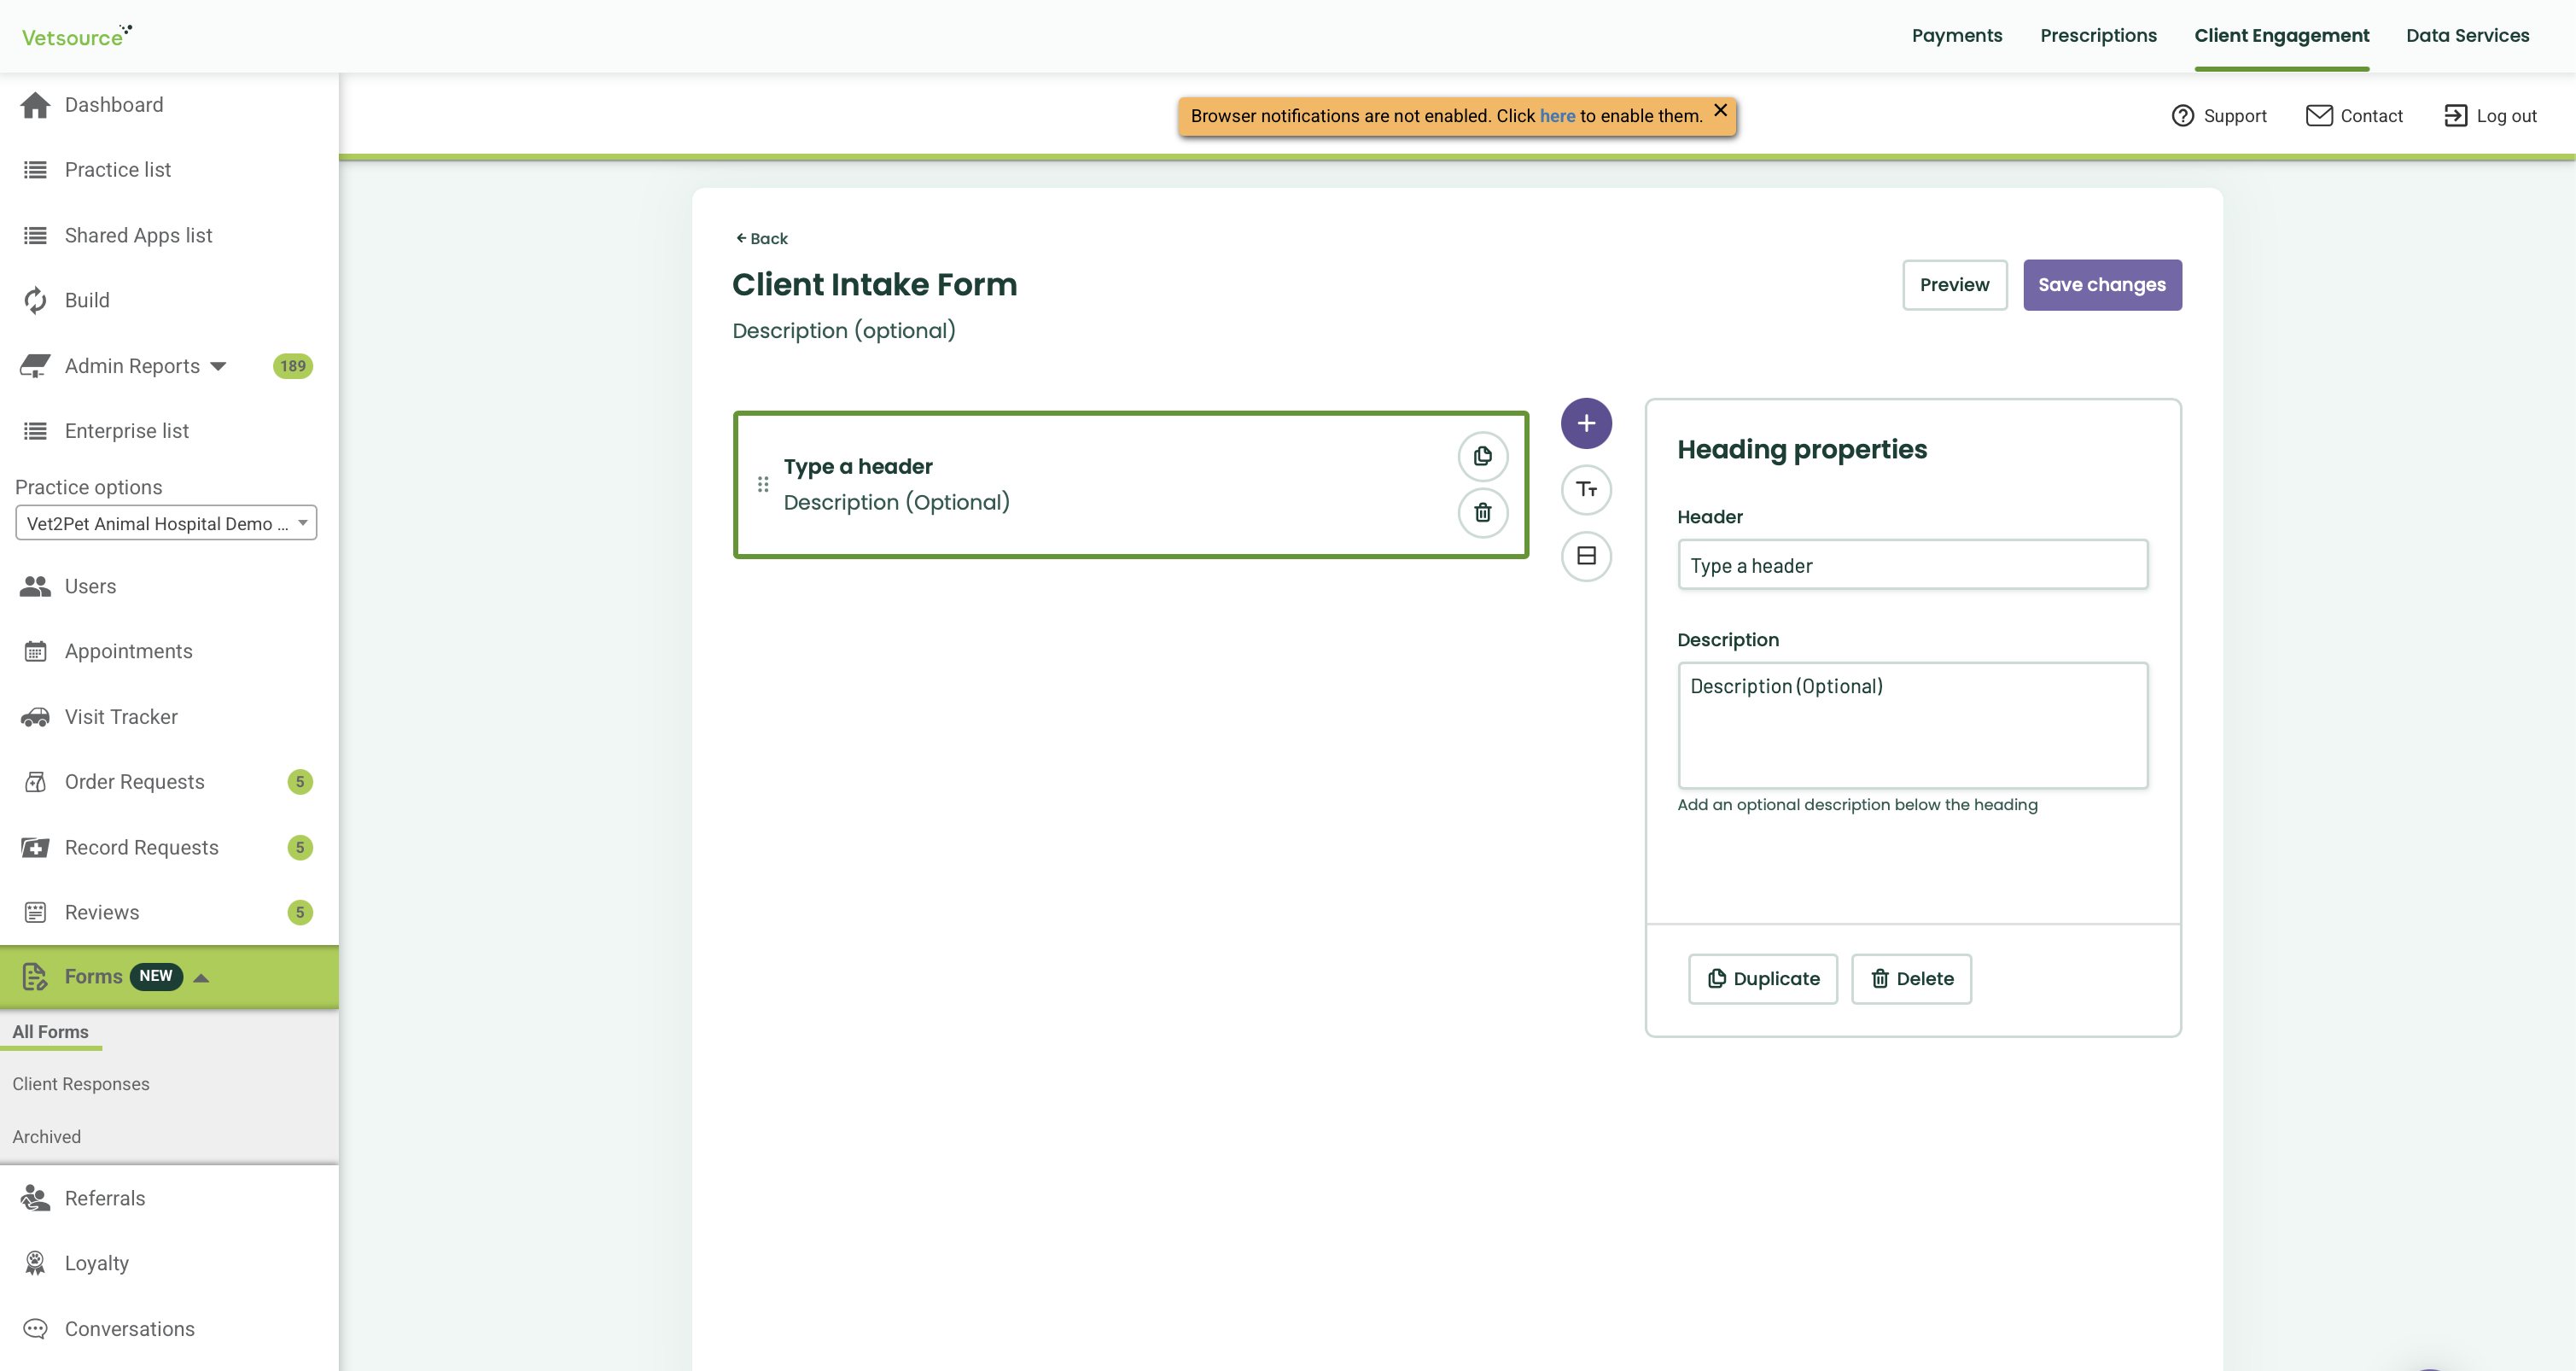
- Add Section: Organize long forms into manageable parts by adding new Sections. Each section can have its own Title and Description.
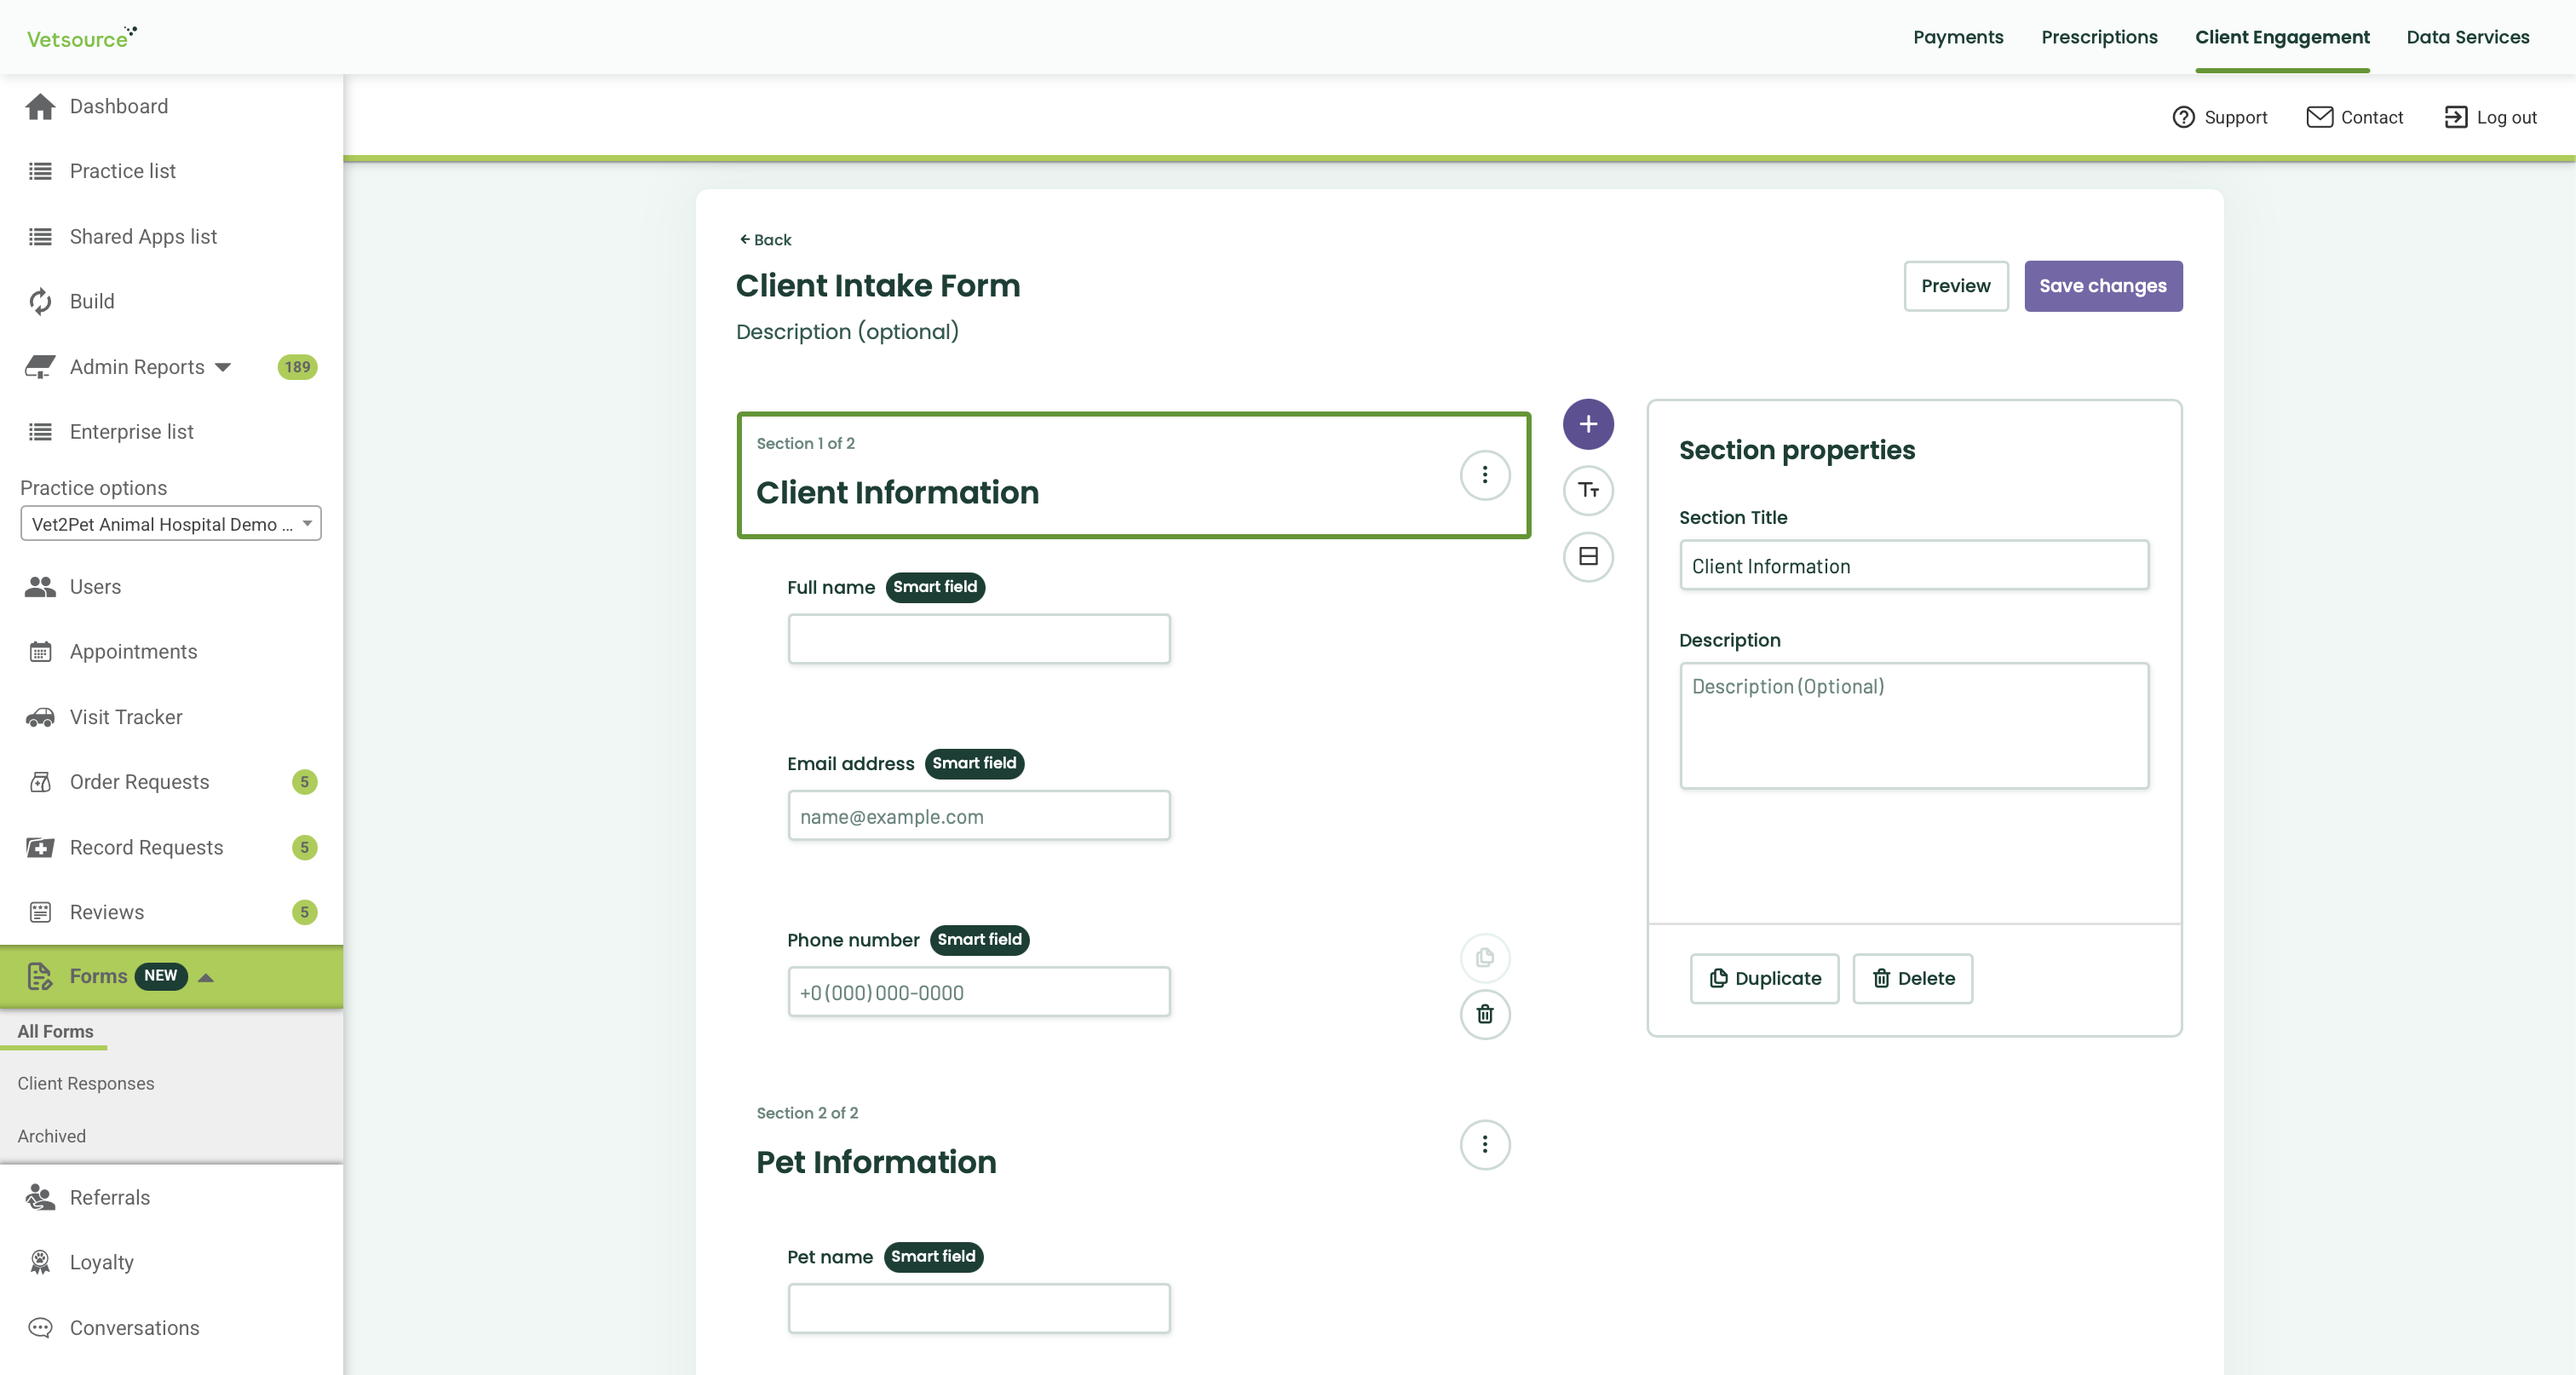
- Editing and Reordering
When you select a component, you can perform the following actions:
- Reorder: Click and drag elements to change their order on the page.
- Duplicate: Click the copy icon to duplicate a question or an entire section.
- Delete: Remove unwanted elements using the trash bin icon.
- Edit: Depending on the component, you can edit different attributes on the right-side panel, such as label, description, min and max characters, required format, and many more.
- Finalizing Your Form
When you are done with editing or creating the form, you can use the buttons at the top right to:
- Preview: See exactly what the form will look like for the pet owner.
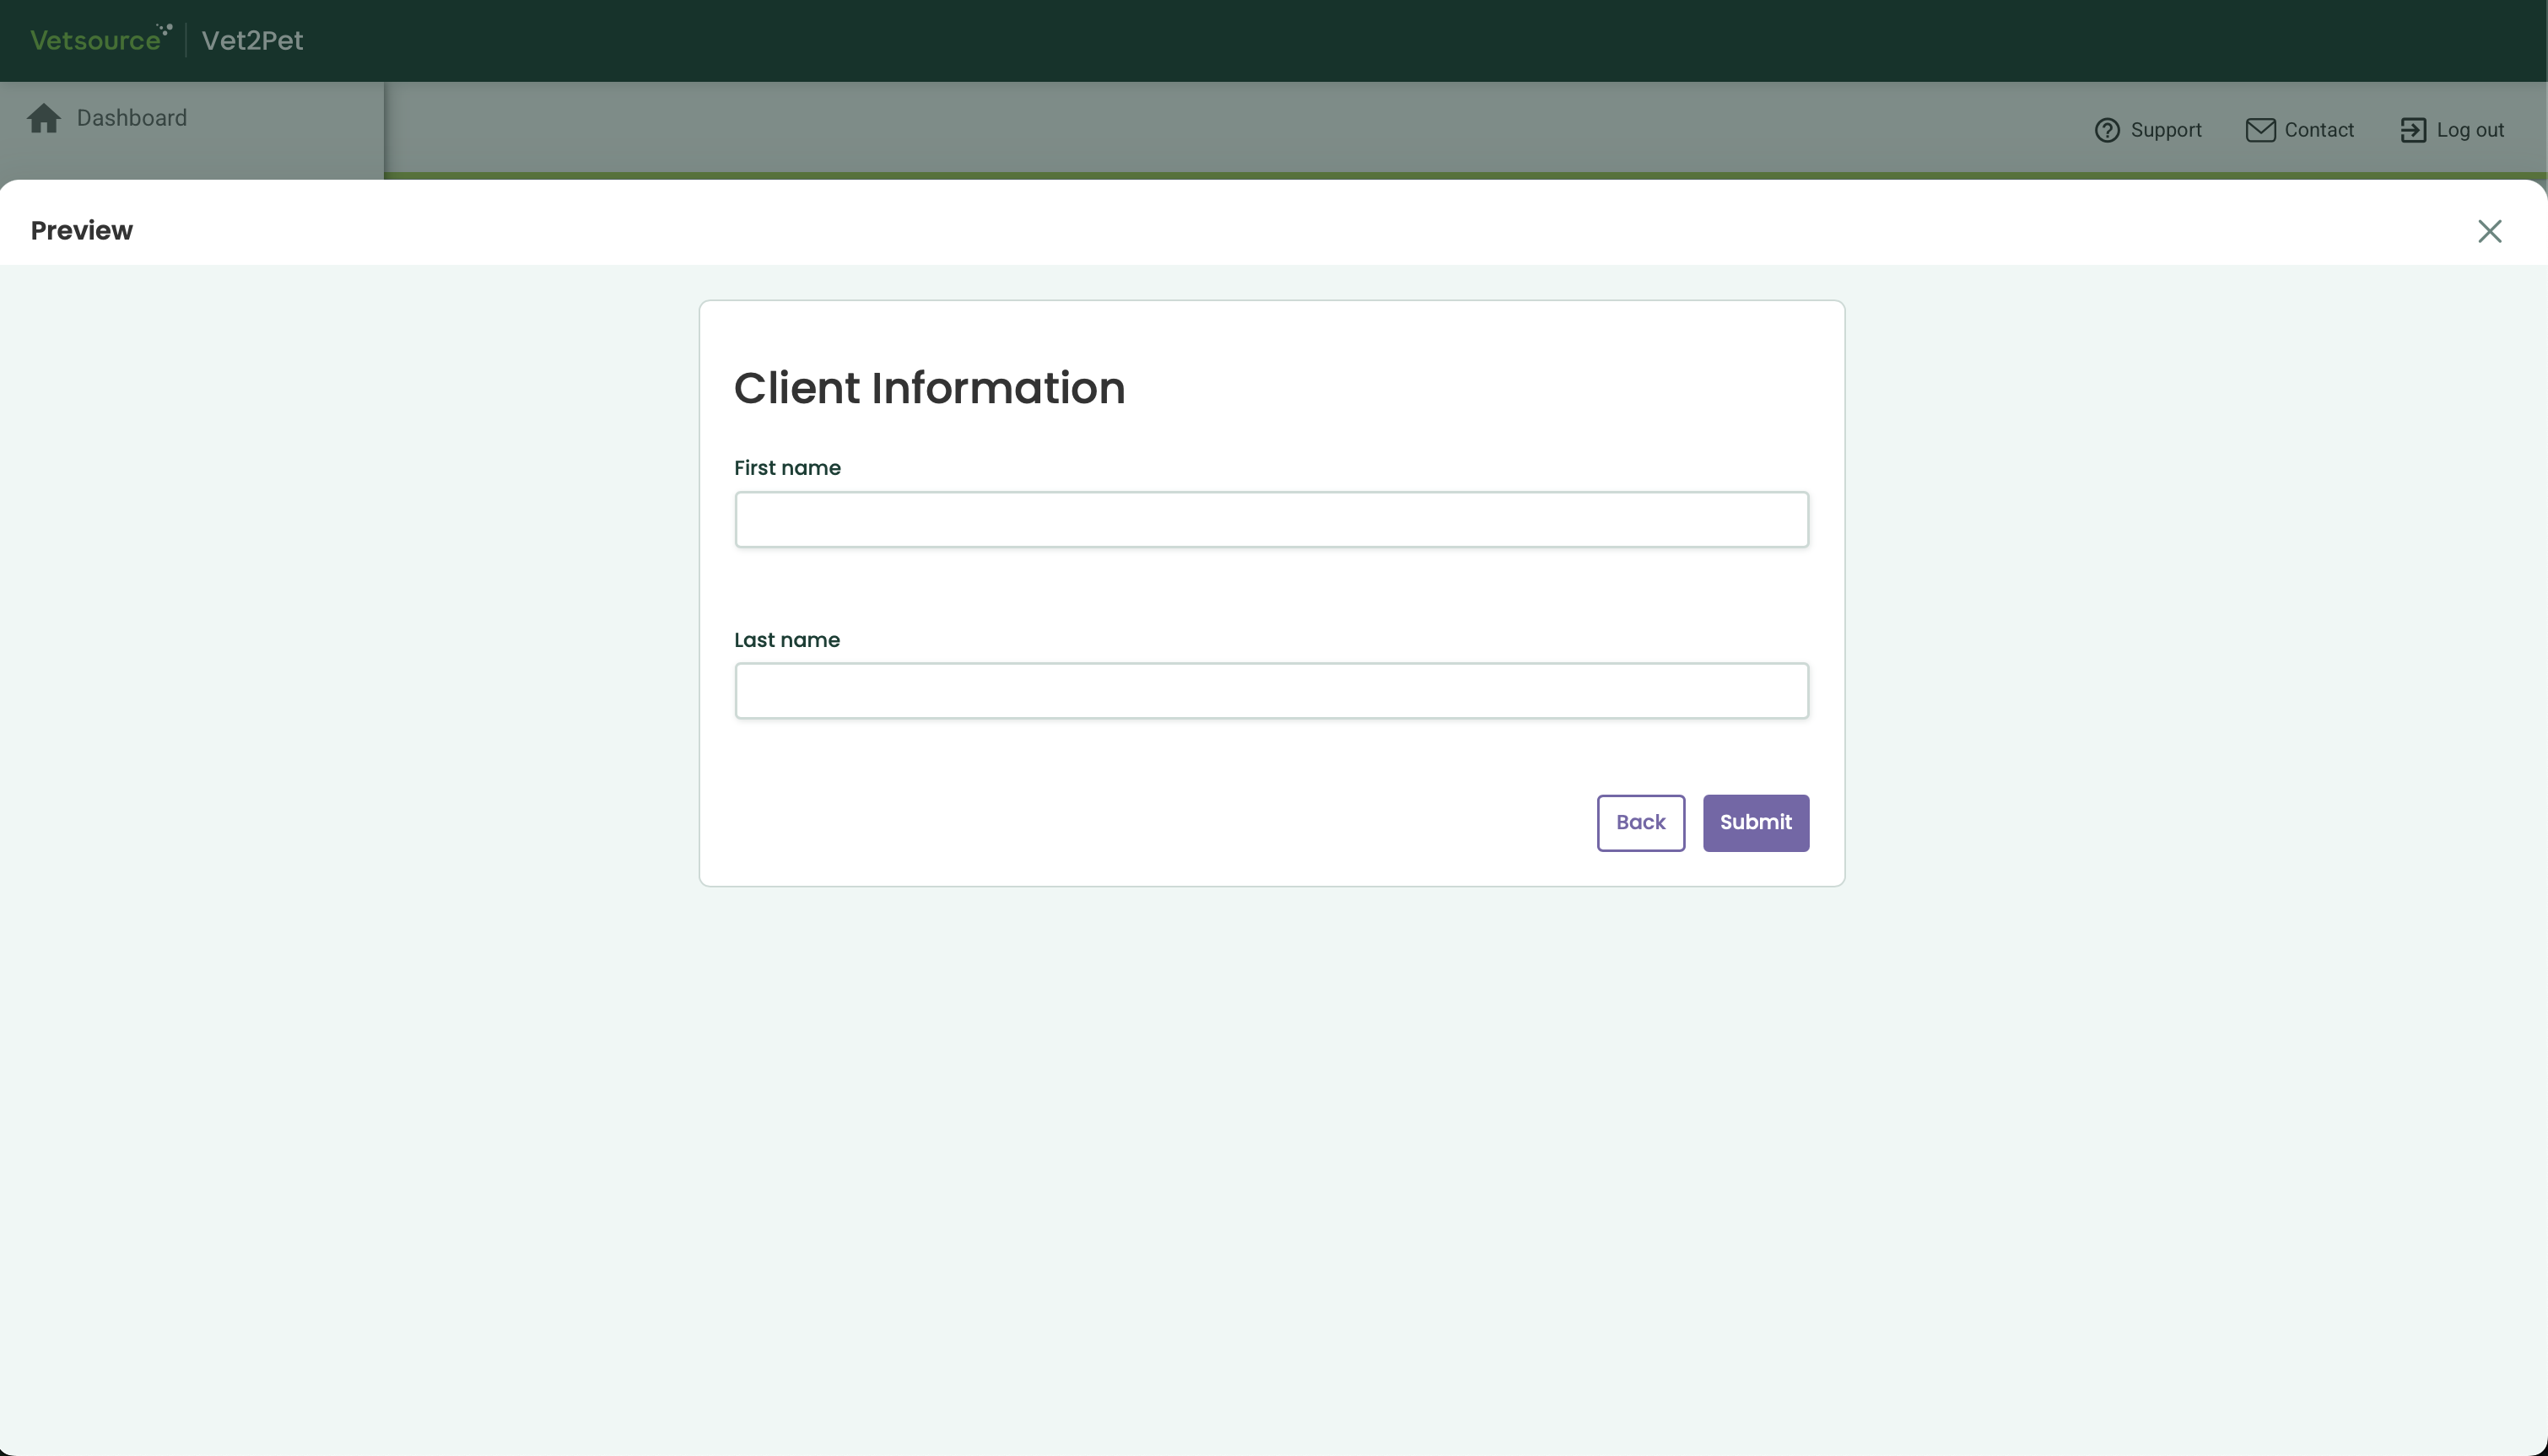
- Save Changes: Ensure your progress is saved.
When building your form, ensure you add the dedicated Full Name and Pet Name fields from the component list, rather than creating your own custom text questions.
Why is this important?
Using these fields tells the system to display the answers in the Client & pet column of your submission list. Without these fields, your submission list will show "-" in Client & pet column, making it hard to search for specific submissions later.
Please note that this feature is used strictly to label the submission in your dashboard list. It does not create a link to the clients's or patient's profile on your dashboard.
- NEW: Building Forms With AI
Building digital forms no longer requires manual setup. Our AI Quick Start suite acts as an intelligent assistant, instantly transforming your paper documents, existing links, or simple ideas into fully functional, professional forms ready for your clinic.
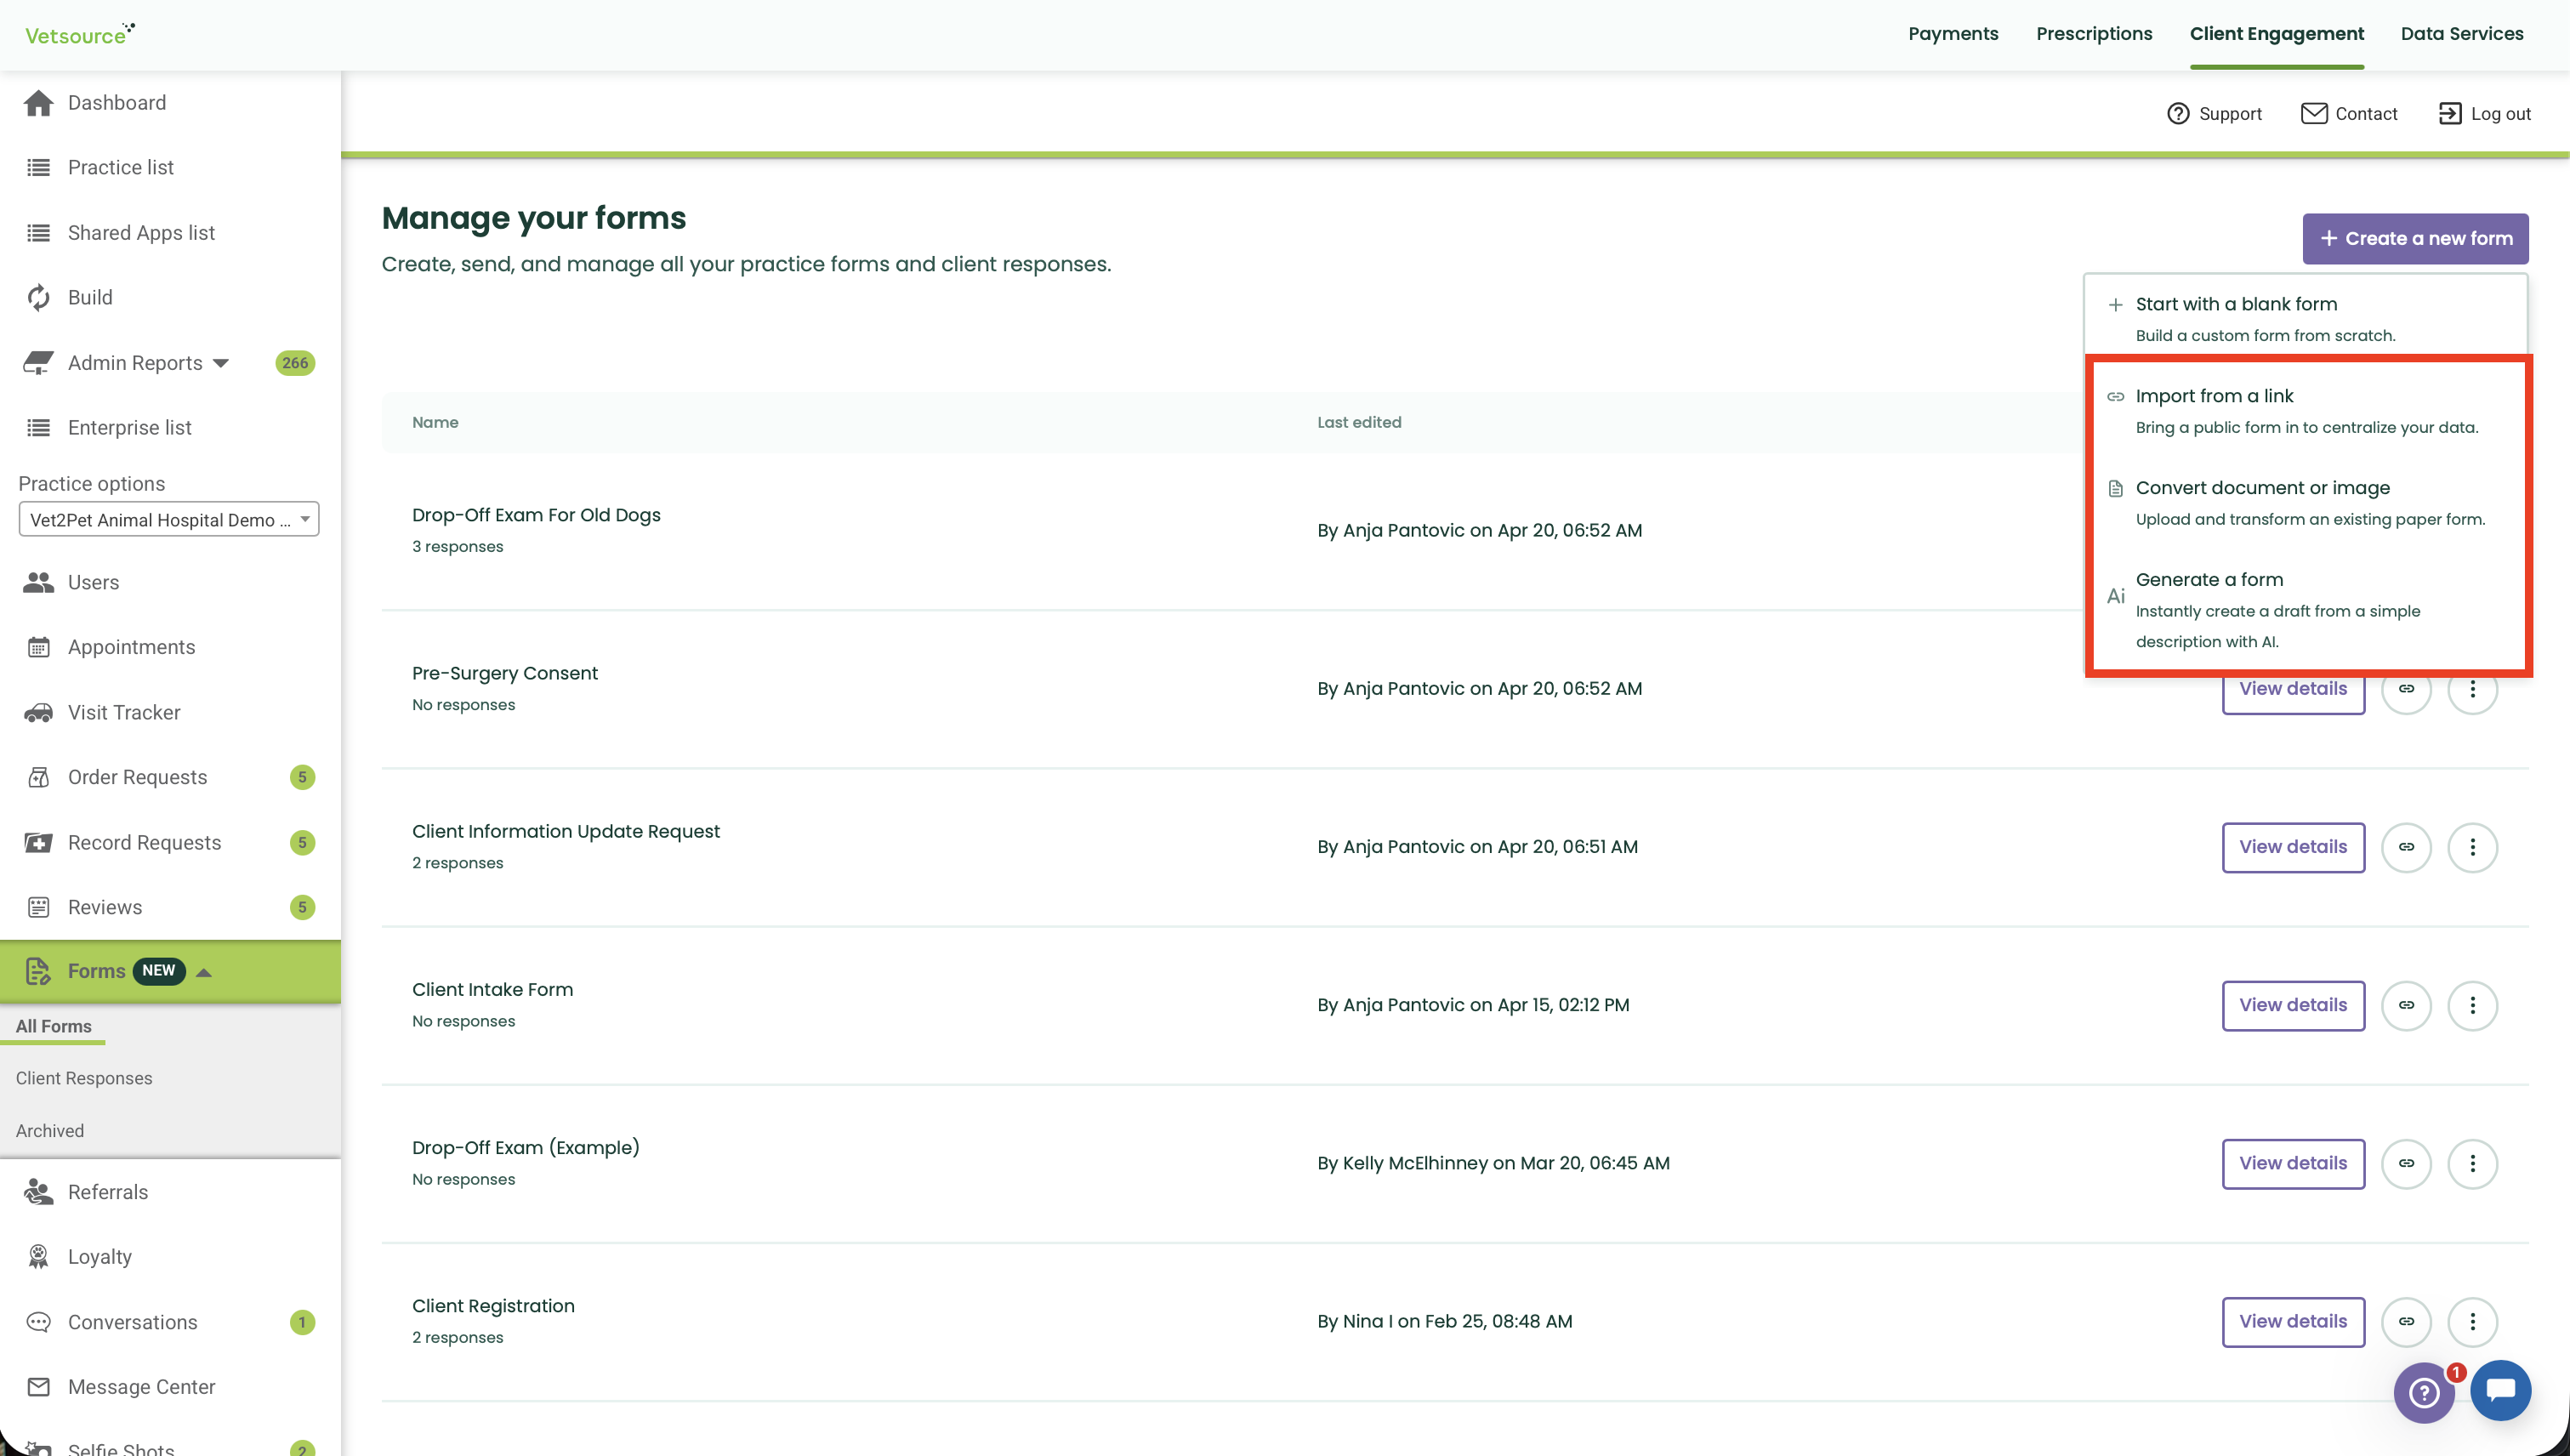
Choose Your Creation Method
When you start a new form, you can choose from three entry methods:
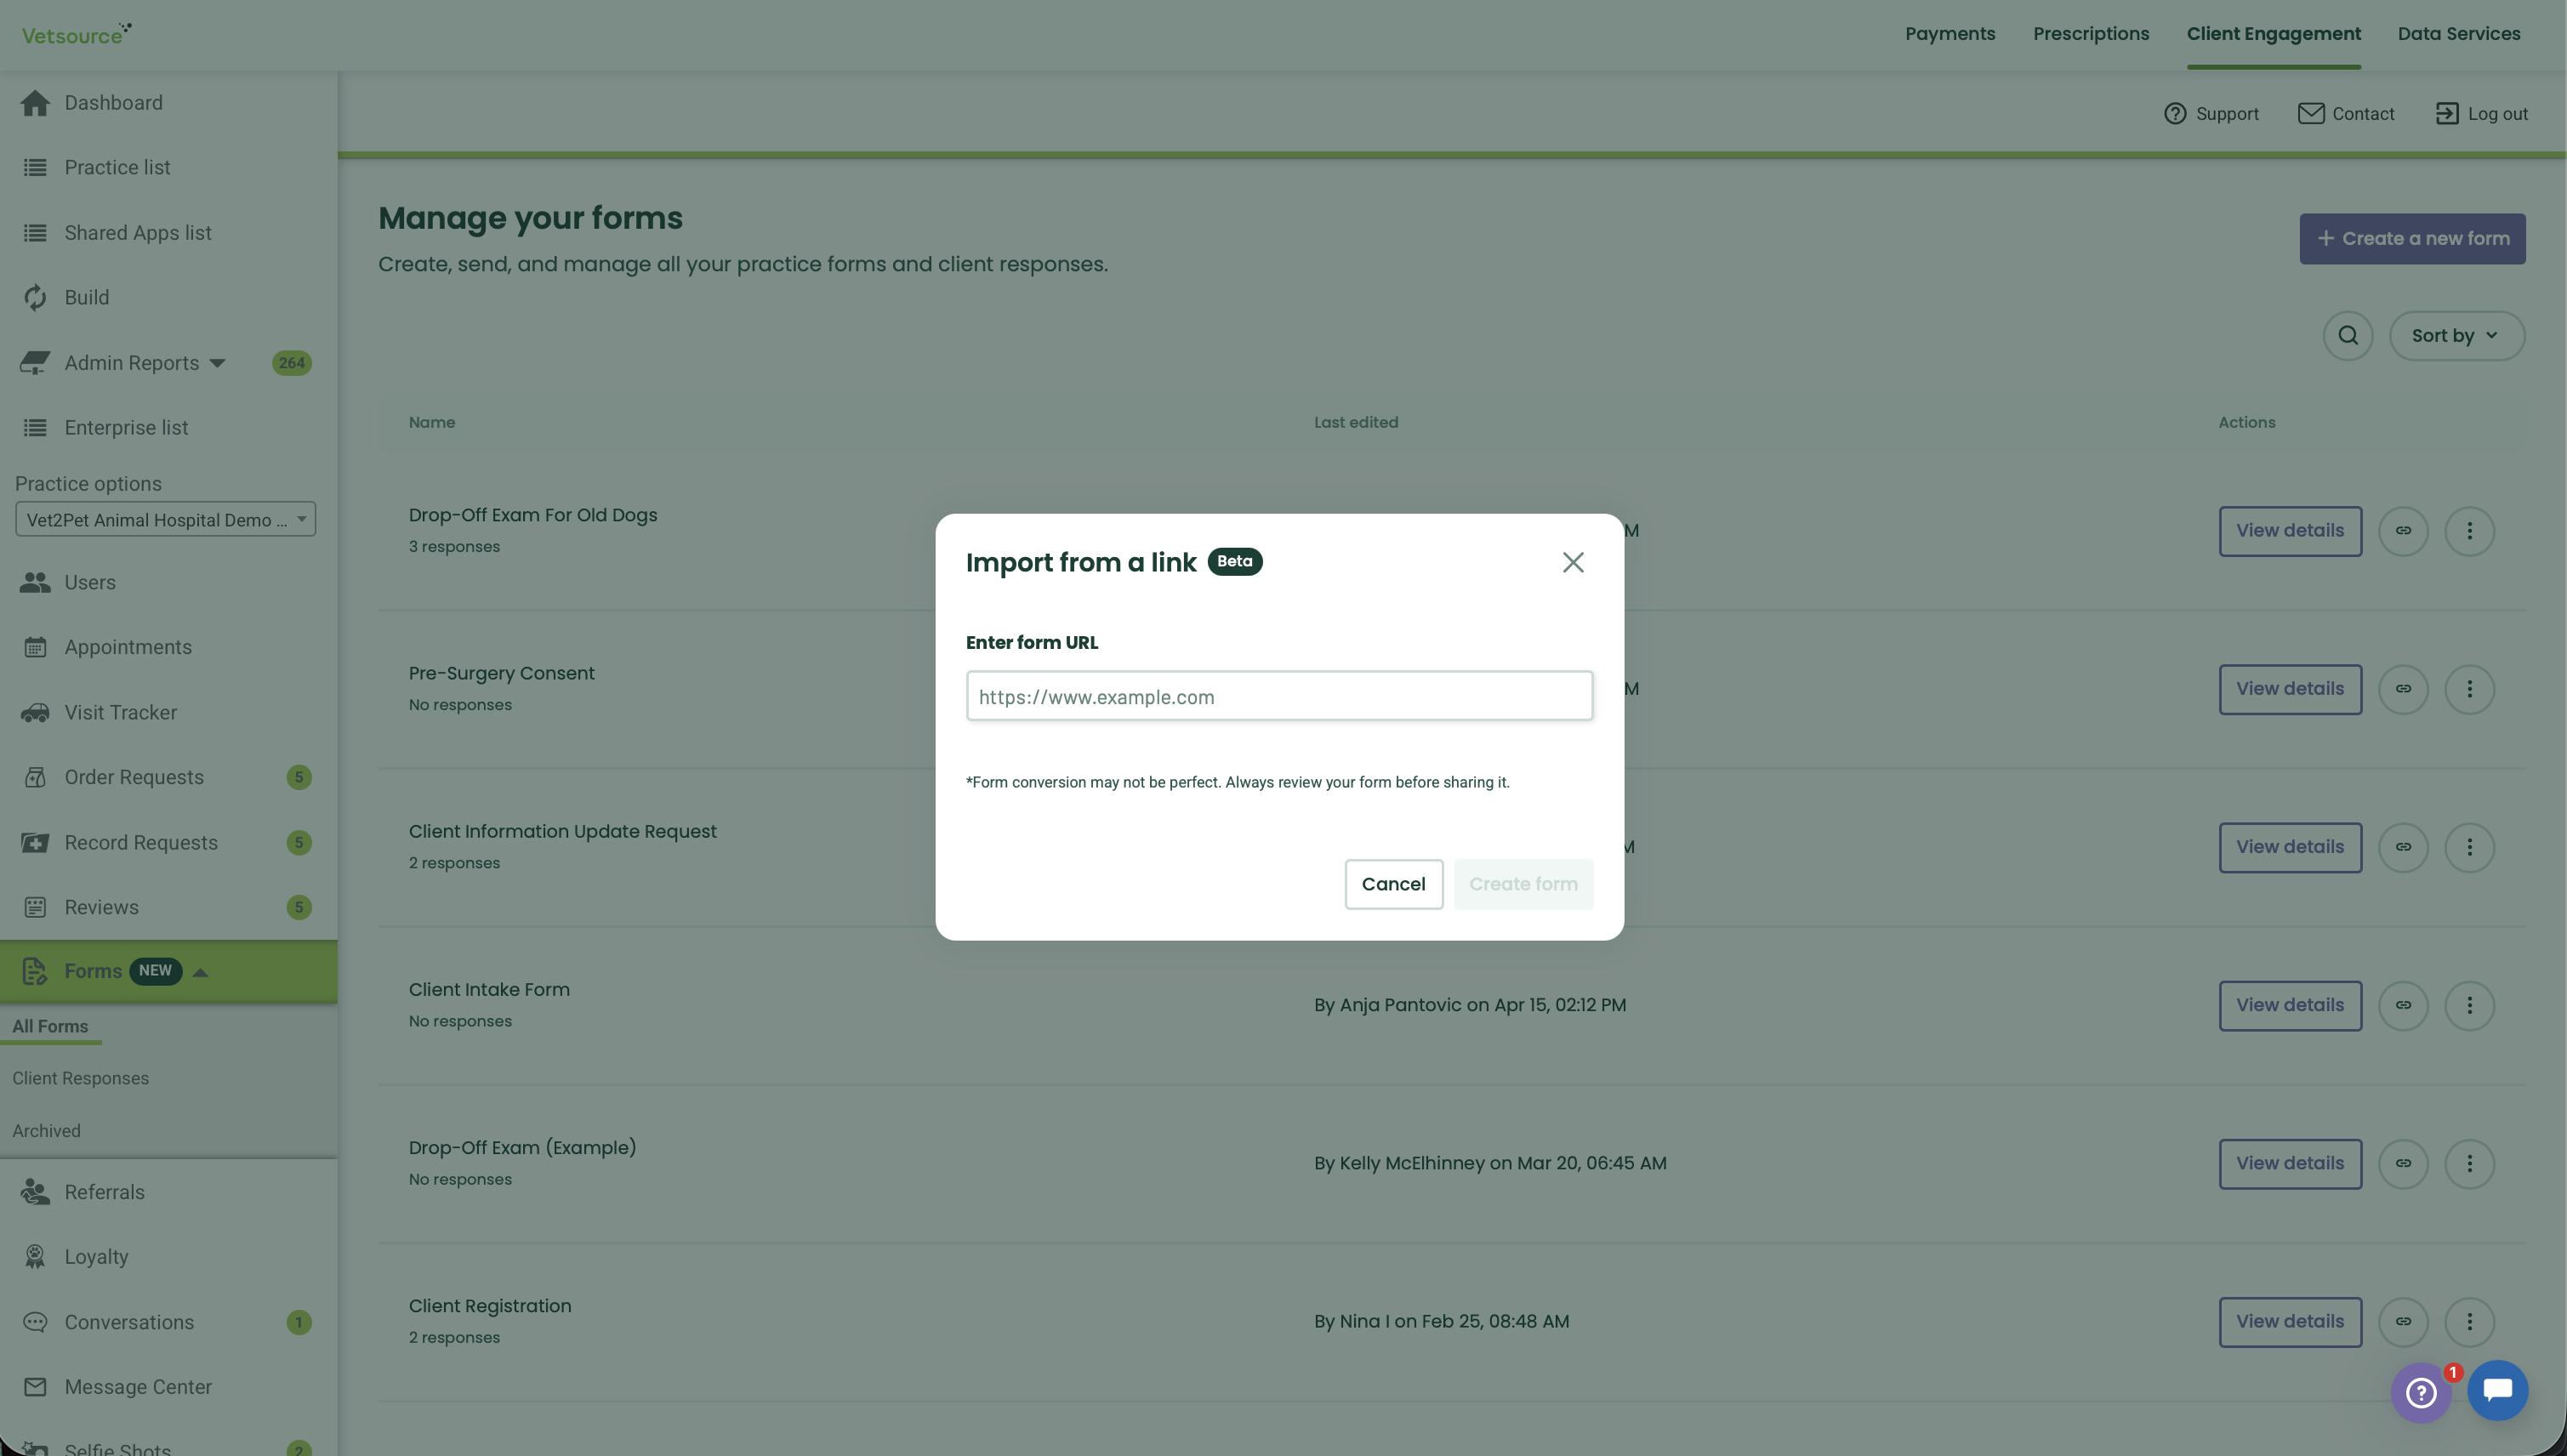
- Import from a Link: Simply paste a URL from a third-party form (like Google Forms or Jotform). Our system verifies the link, and the AI reconstructs the structure natively in our builder.
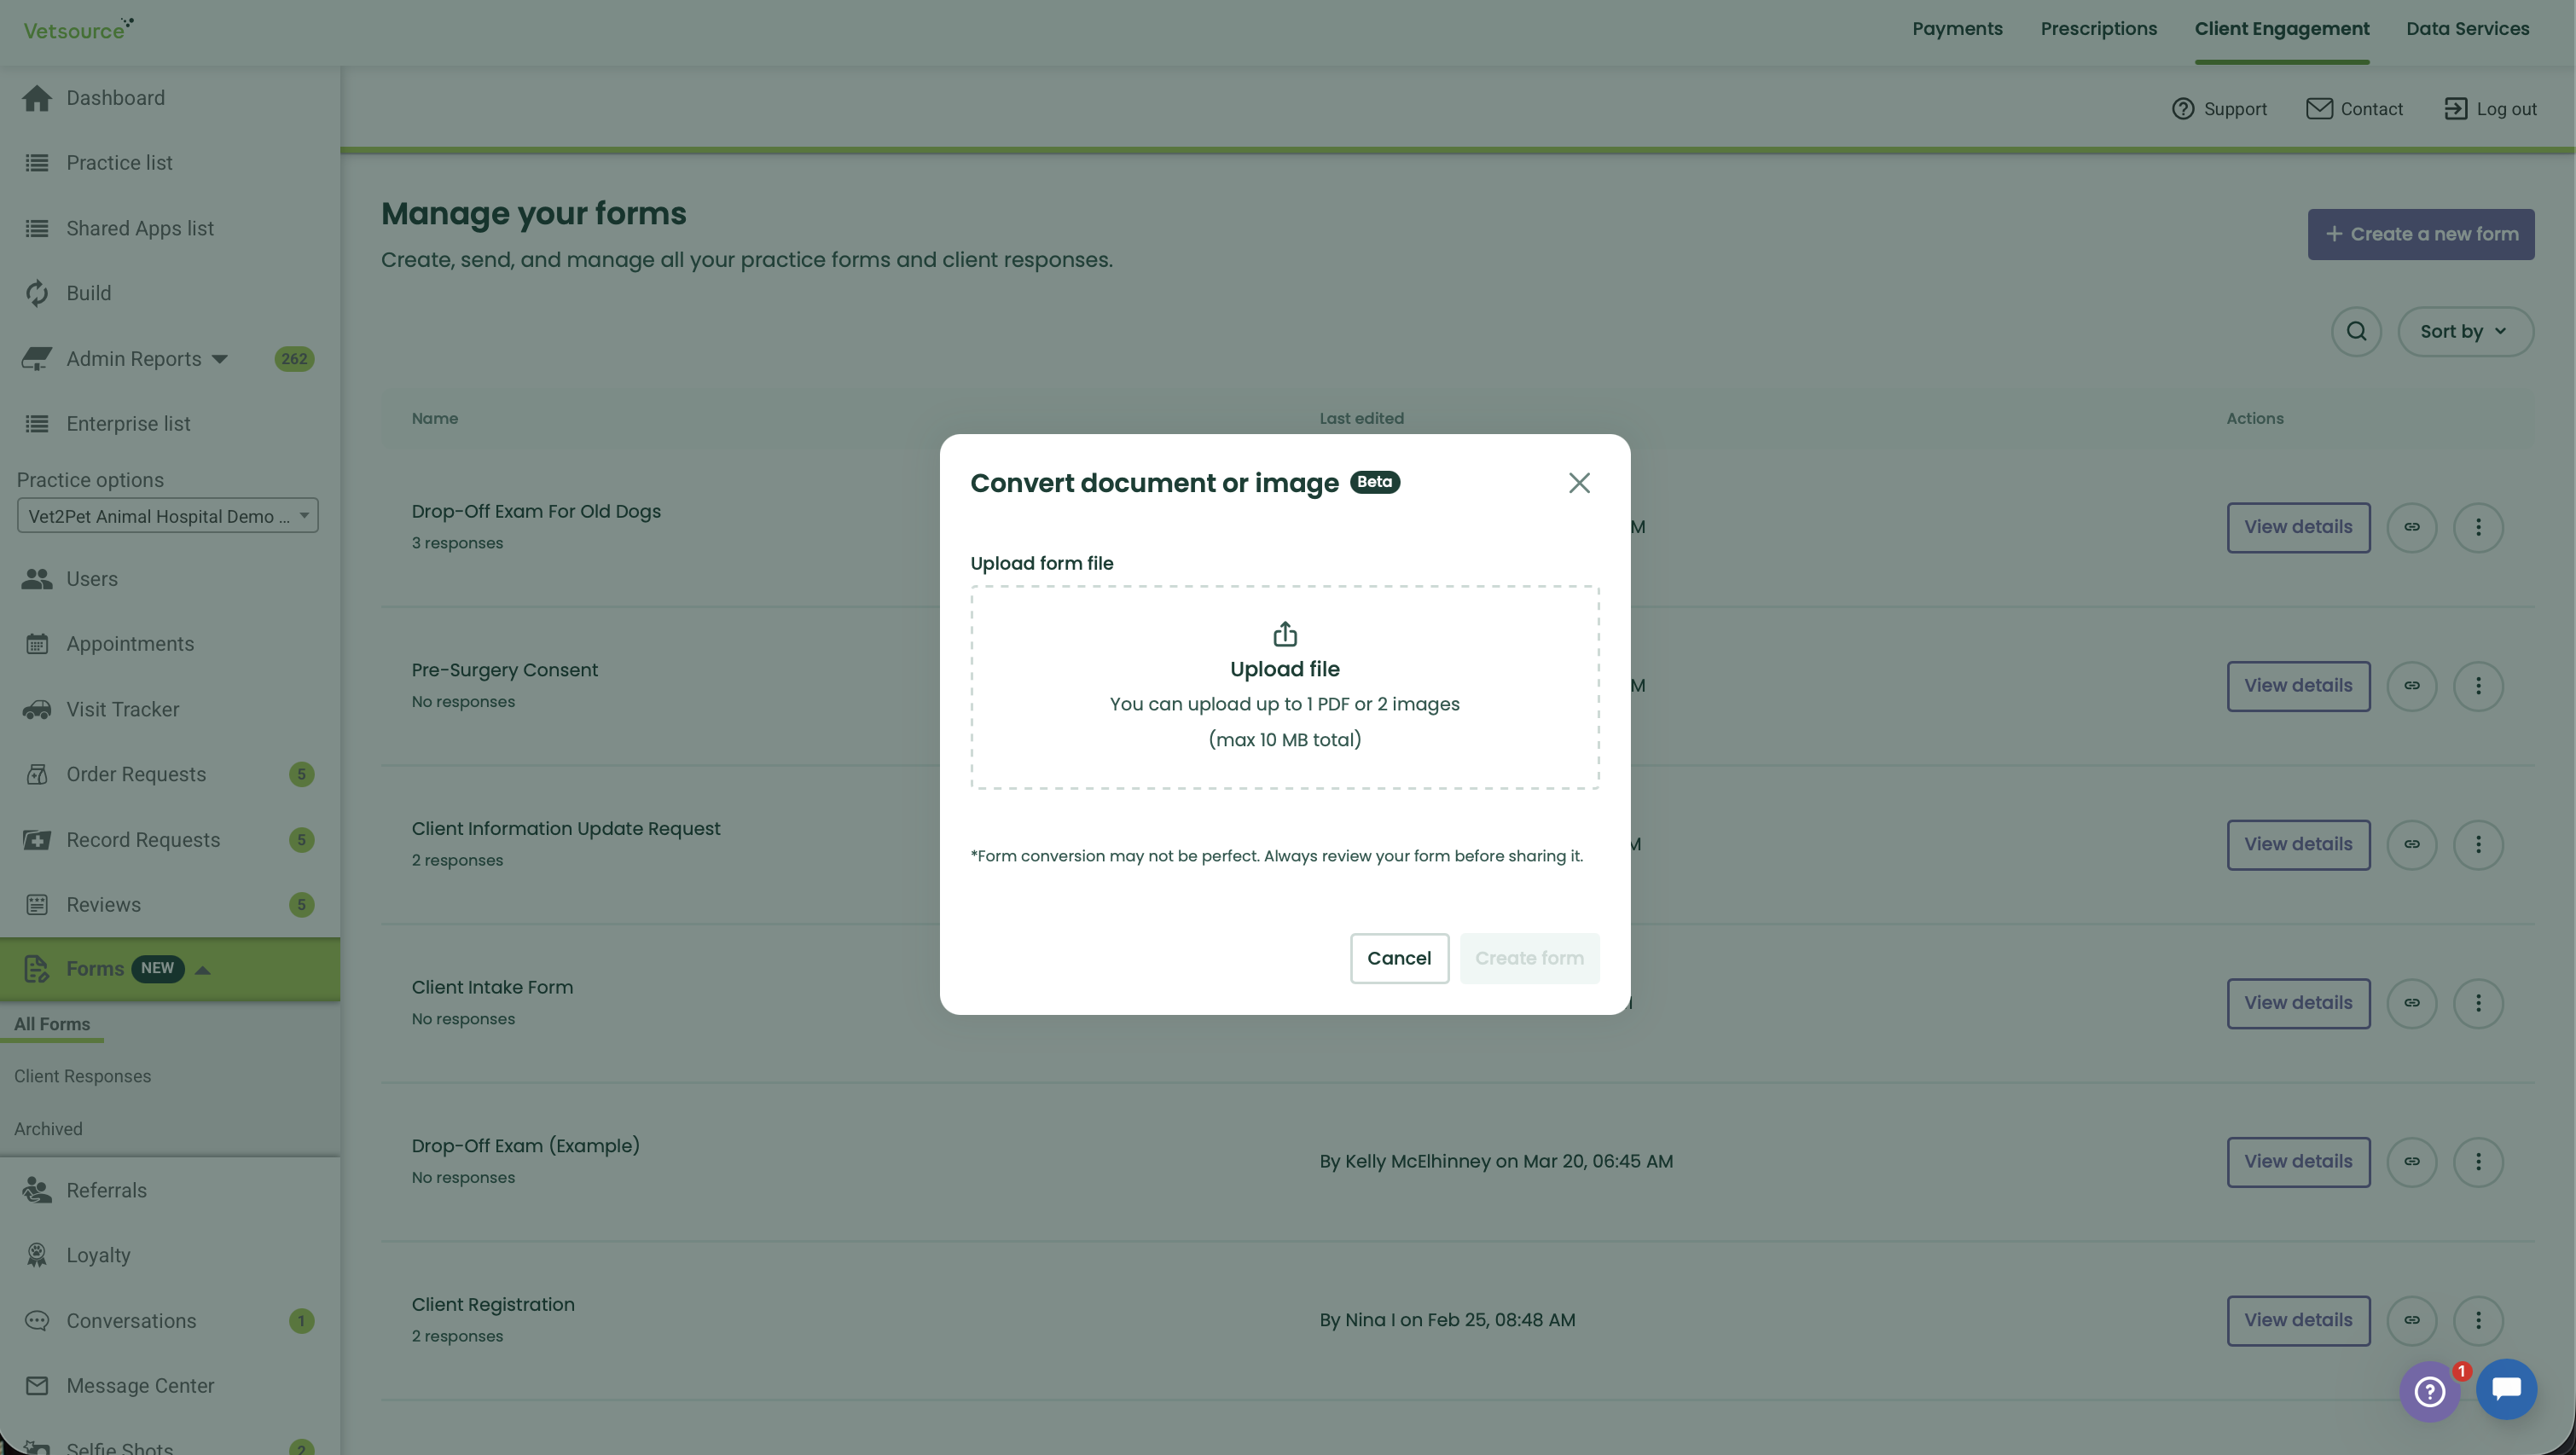
- Convert a Document or Image: Upload an existing PDF, JPG, or PNG of your current paper forms. The AI reads the document and converts it into a digital version.
- Create from a Prompt: Type a simple description (e.g., "Create a surgical consent form") or choose from our suggested prompts. The AI will generate a complete clinical schema based on your request.

The AI doesn't just create text boxes - it understands veterinary context. It automatically identifies when to use a Smart Field versus a standard field. Because the AI prioritizes smart fields during the build, your forms are natively ready for Smart Pre-Population the moment they are generated.
The Build & Review Process
Once you click "Create Form", the AI analyzes your input and builds the form's structure, including descriptions, help texts, required field settings, and any other available customization.
- The Preview: For prompt-based forms, you’ll see a preview of the AI’s logic. You can always click Try Again to generate a new version.
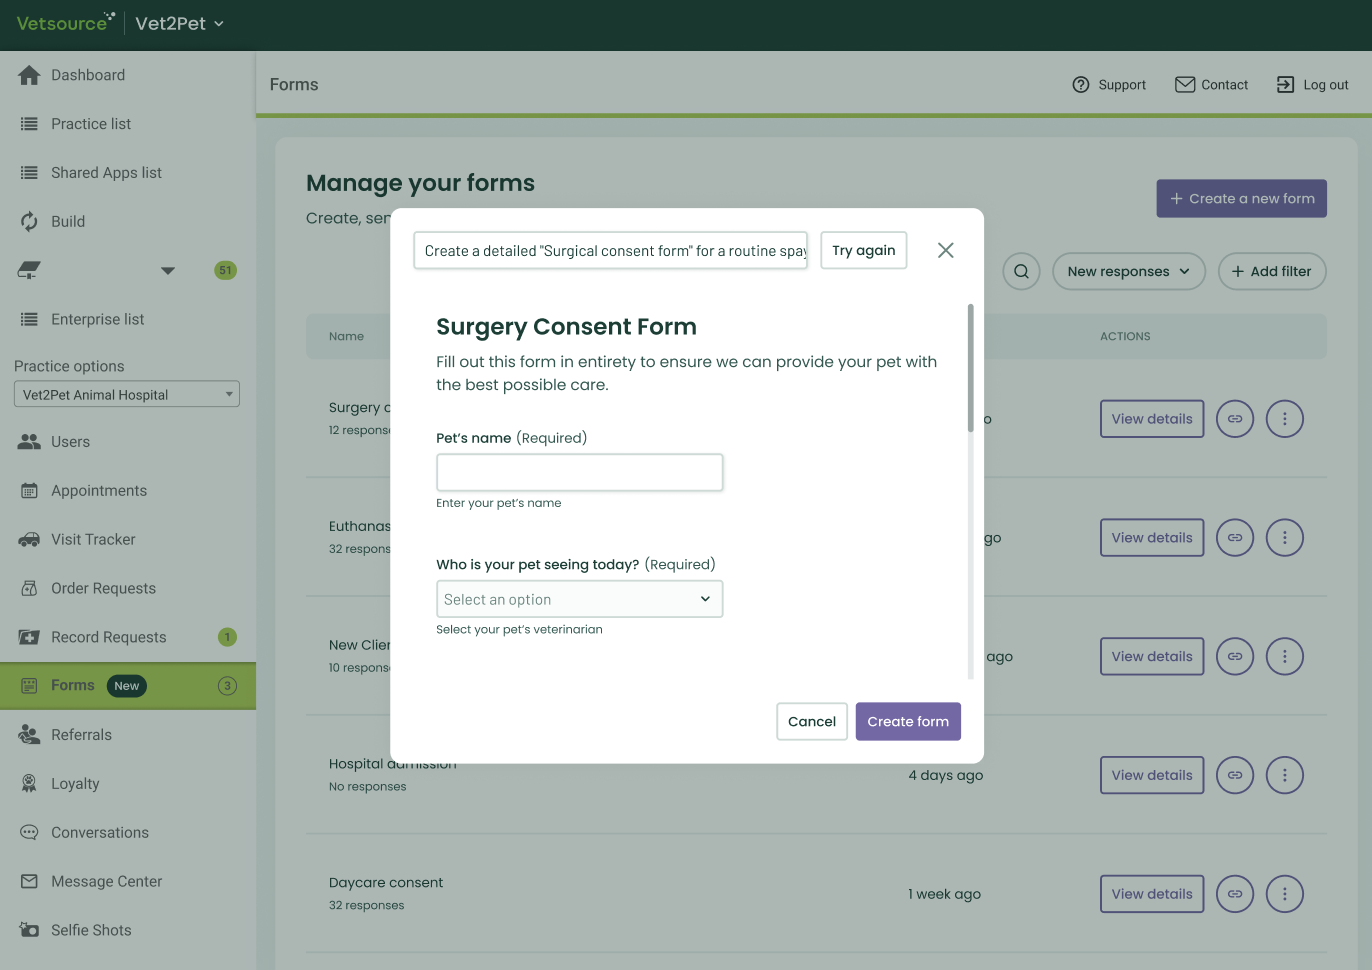
- Canvas Injection: Once confirmed, the AI injects the entire form into the builder. This is now a fully editable draft.
- Final Polish: You have 100% control. You can move fields, change wording, or add your clinic’s branding before hitting publish.
While our AI is highly sophisticated and designed for clinical accuracy, it is a tool to assist your workflow, not a replacement for professional review.
Always review your forms
AI can occasionally make mistakes or misinterpret a complex layout. Please carefully check all fields, required settings, and logic before saving an AI-generated form to ensure it meets your practice's specific medical and legal requirements.
Managing Your Forms Library
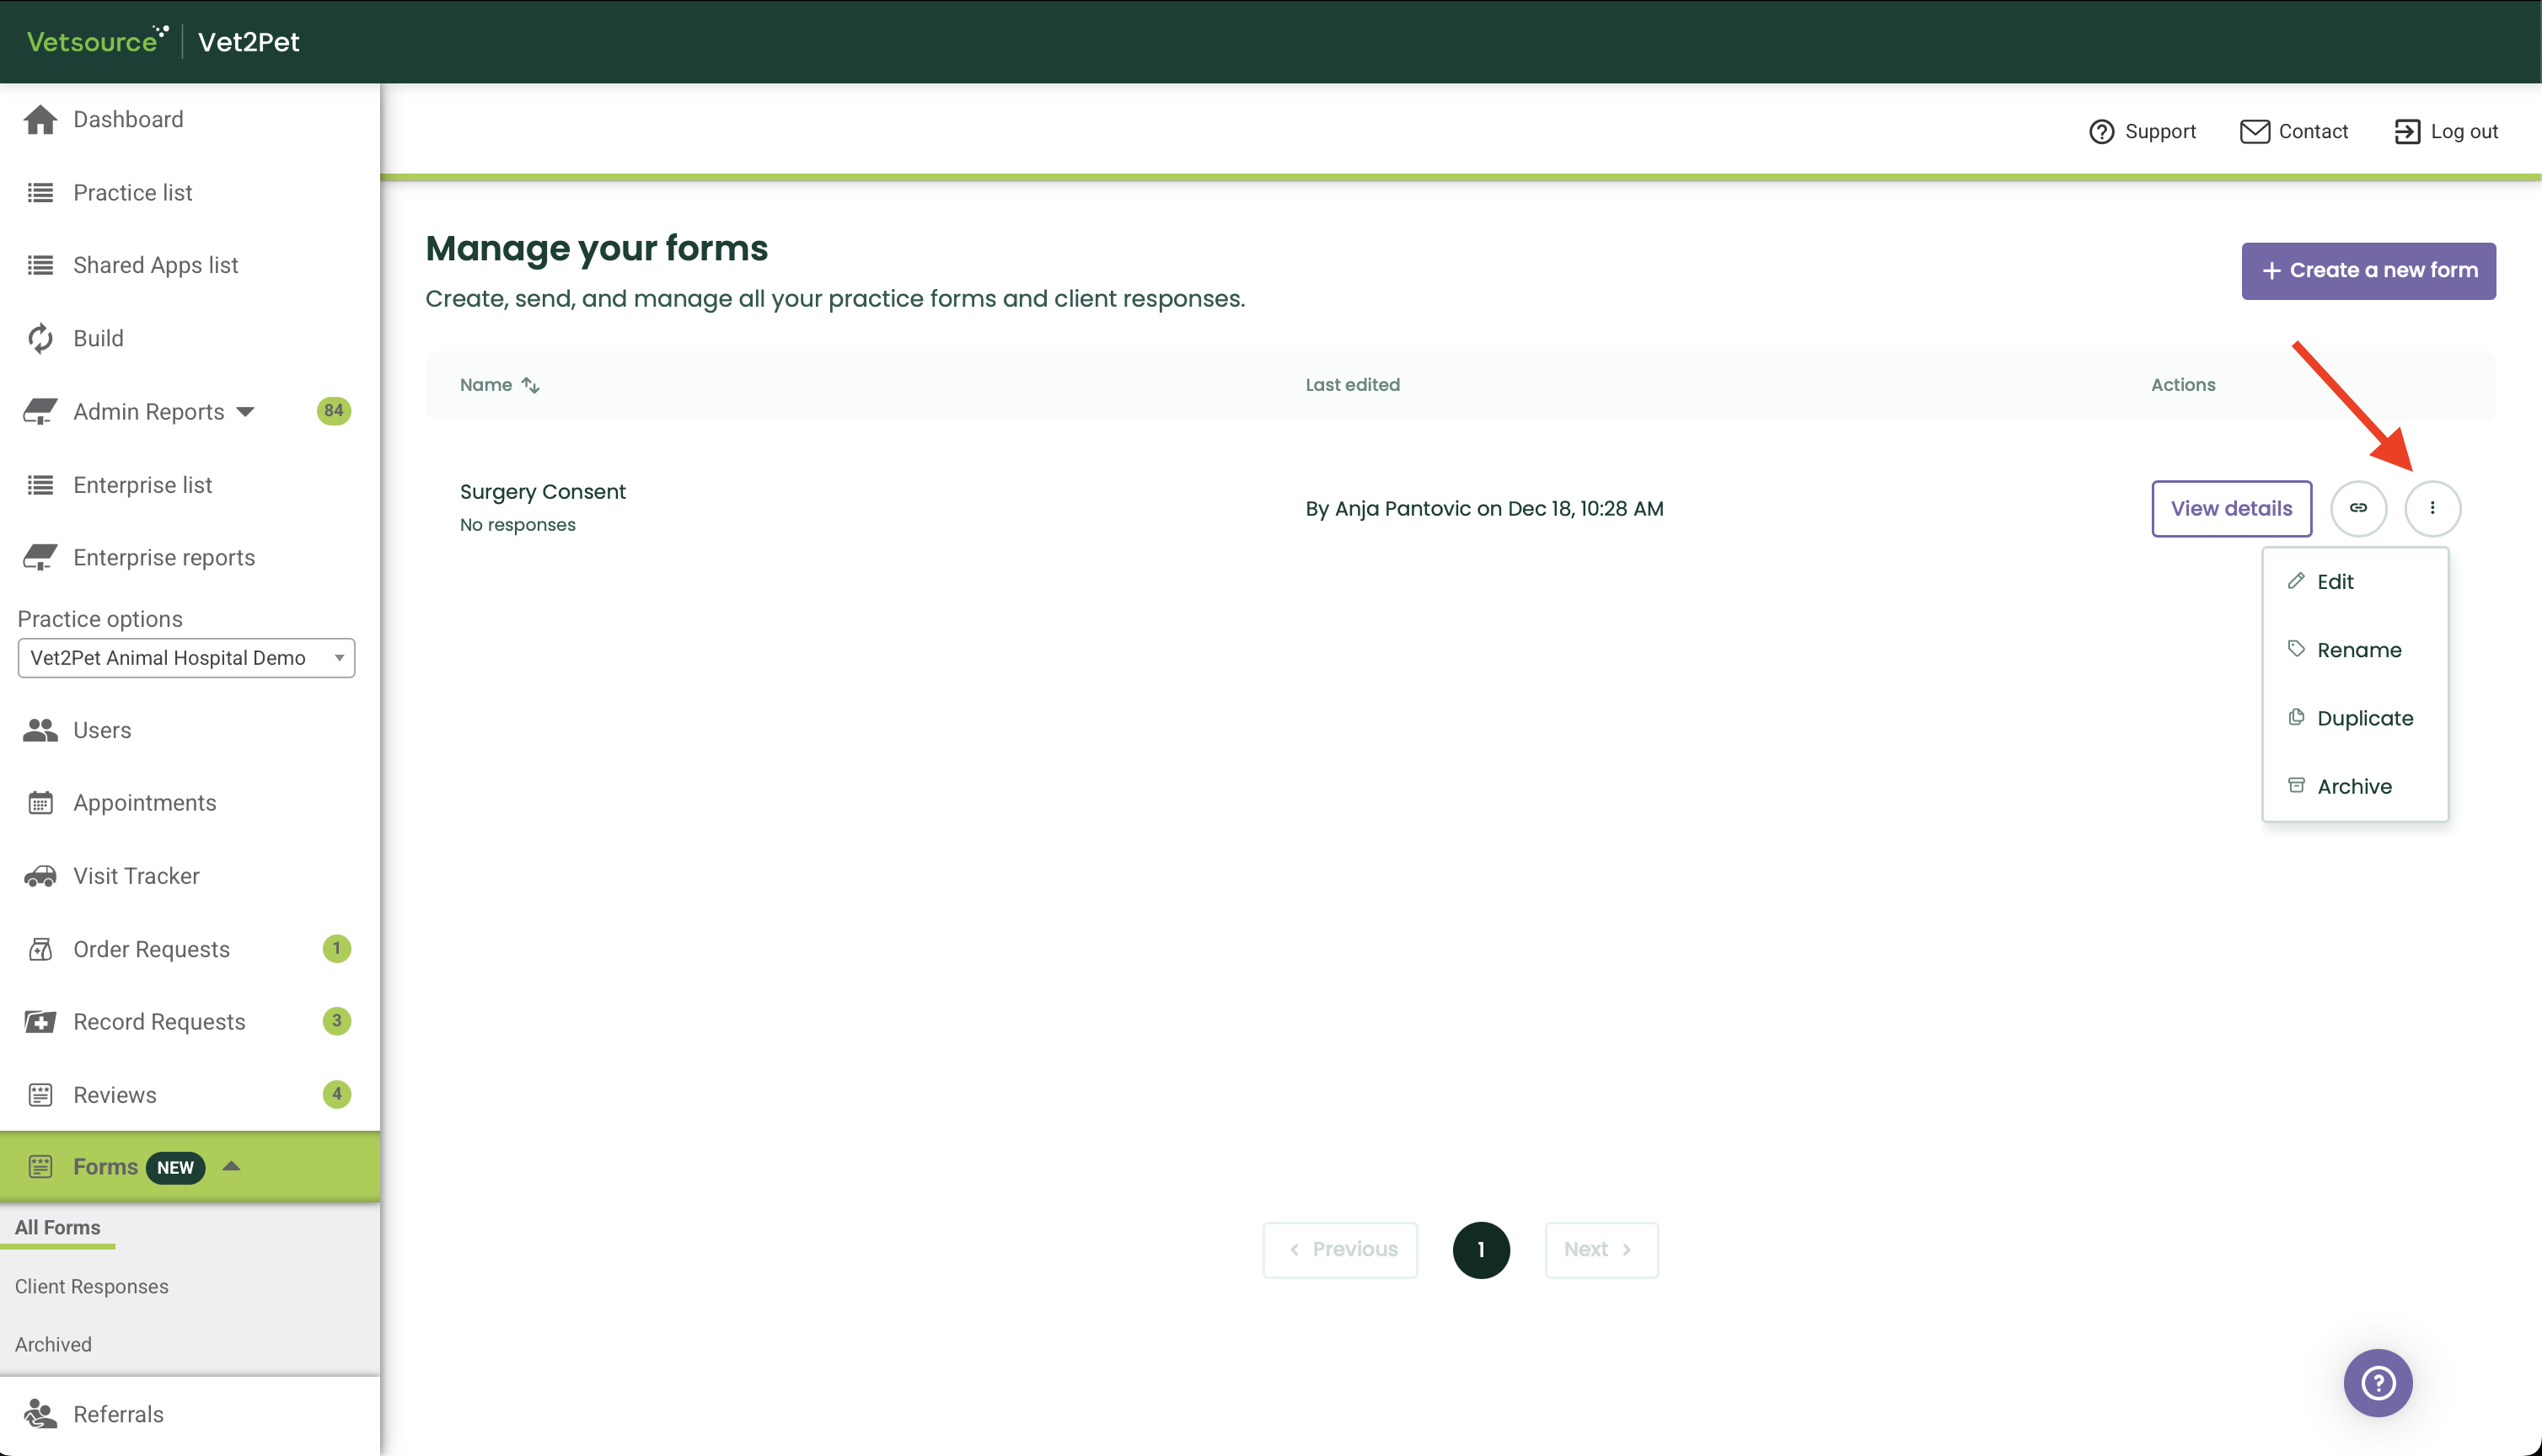
Back on the All Forms page, each form in your list has button to:
- View details: Opens a page with a list of all pet owner's submission for that form.
- Copy link: Click the link icon to copy the public URL. You can paste this link to set to your pet owner.
- Vertical menu (three dots): Opens a menu with additional management options.
- Edit: Re-open the builder to make changes to the form structure.
- Rename: Change the internal display name of the form.
- Duplicate: Create an exact copy of an existing form.
- Archive: Move old or unused forms to the Archive tab to declutter your view
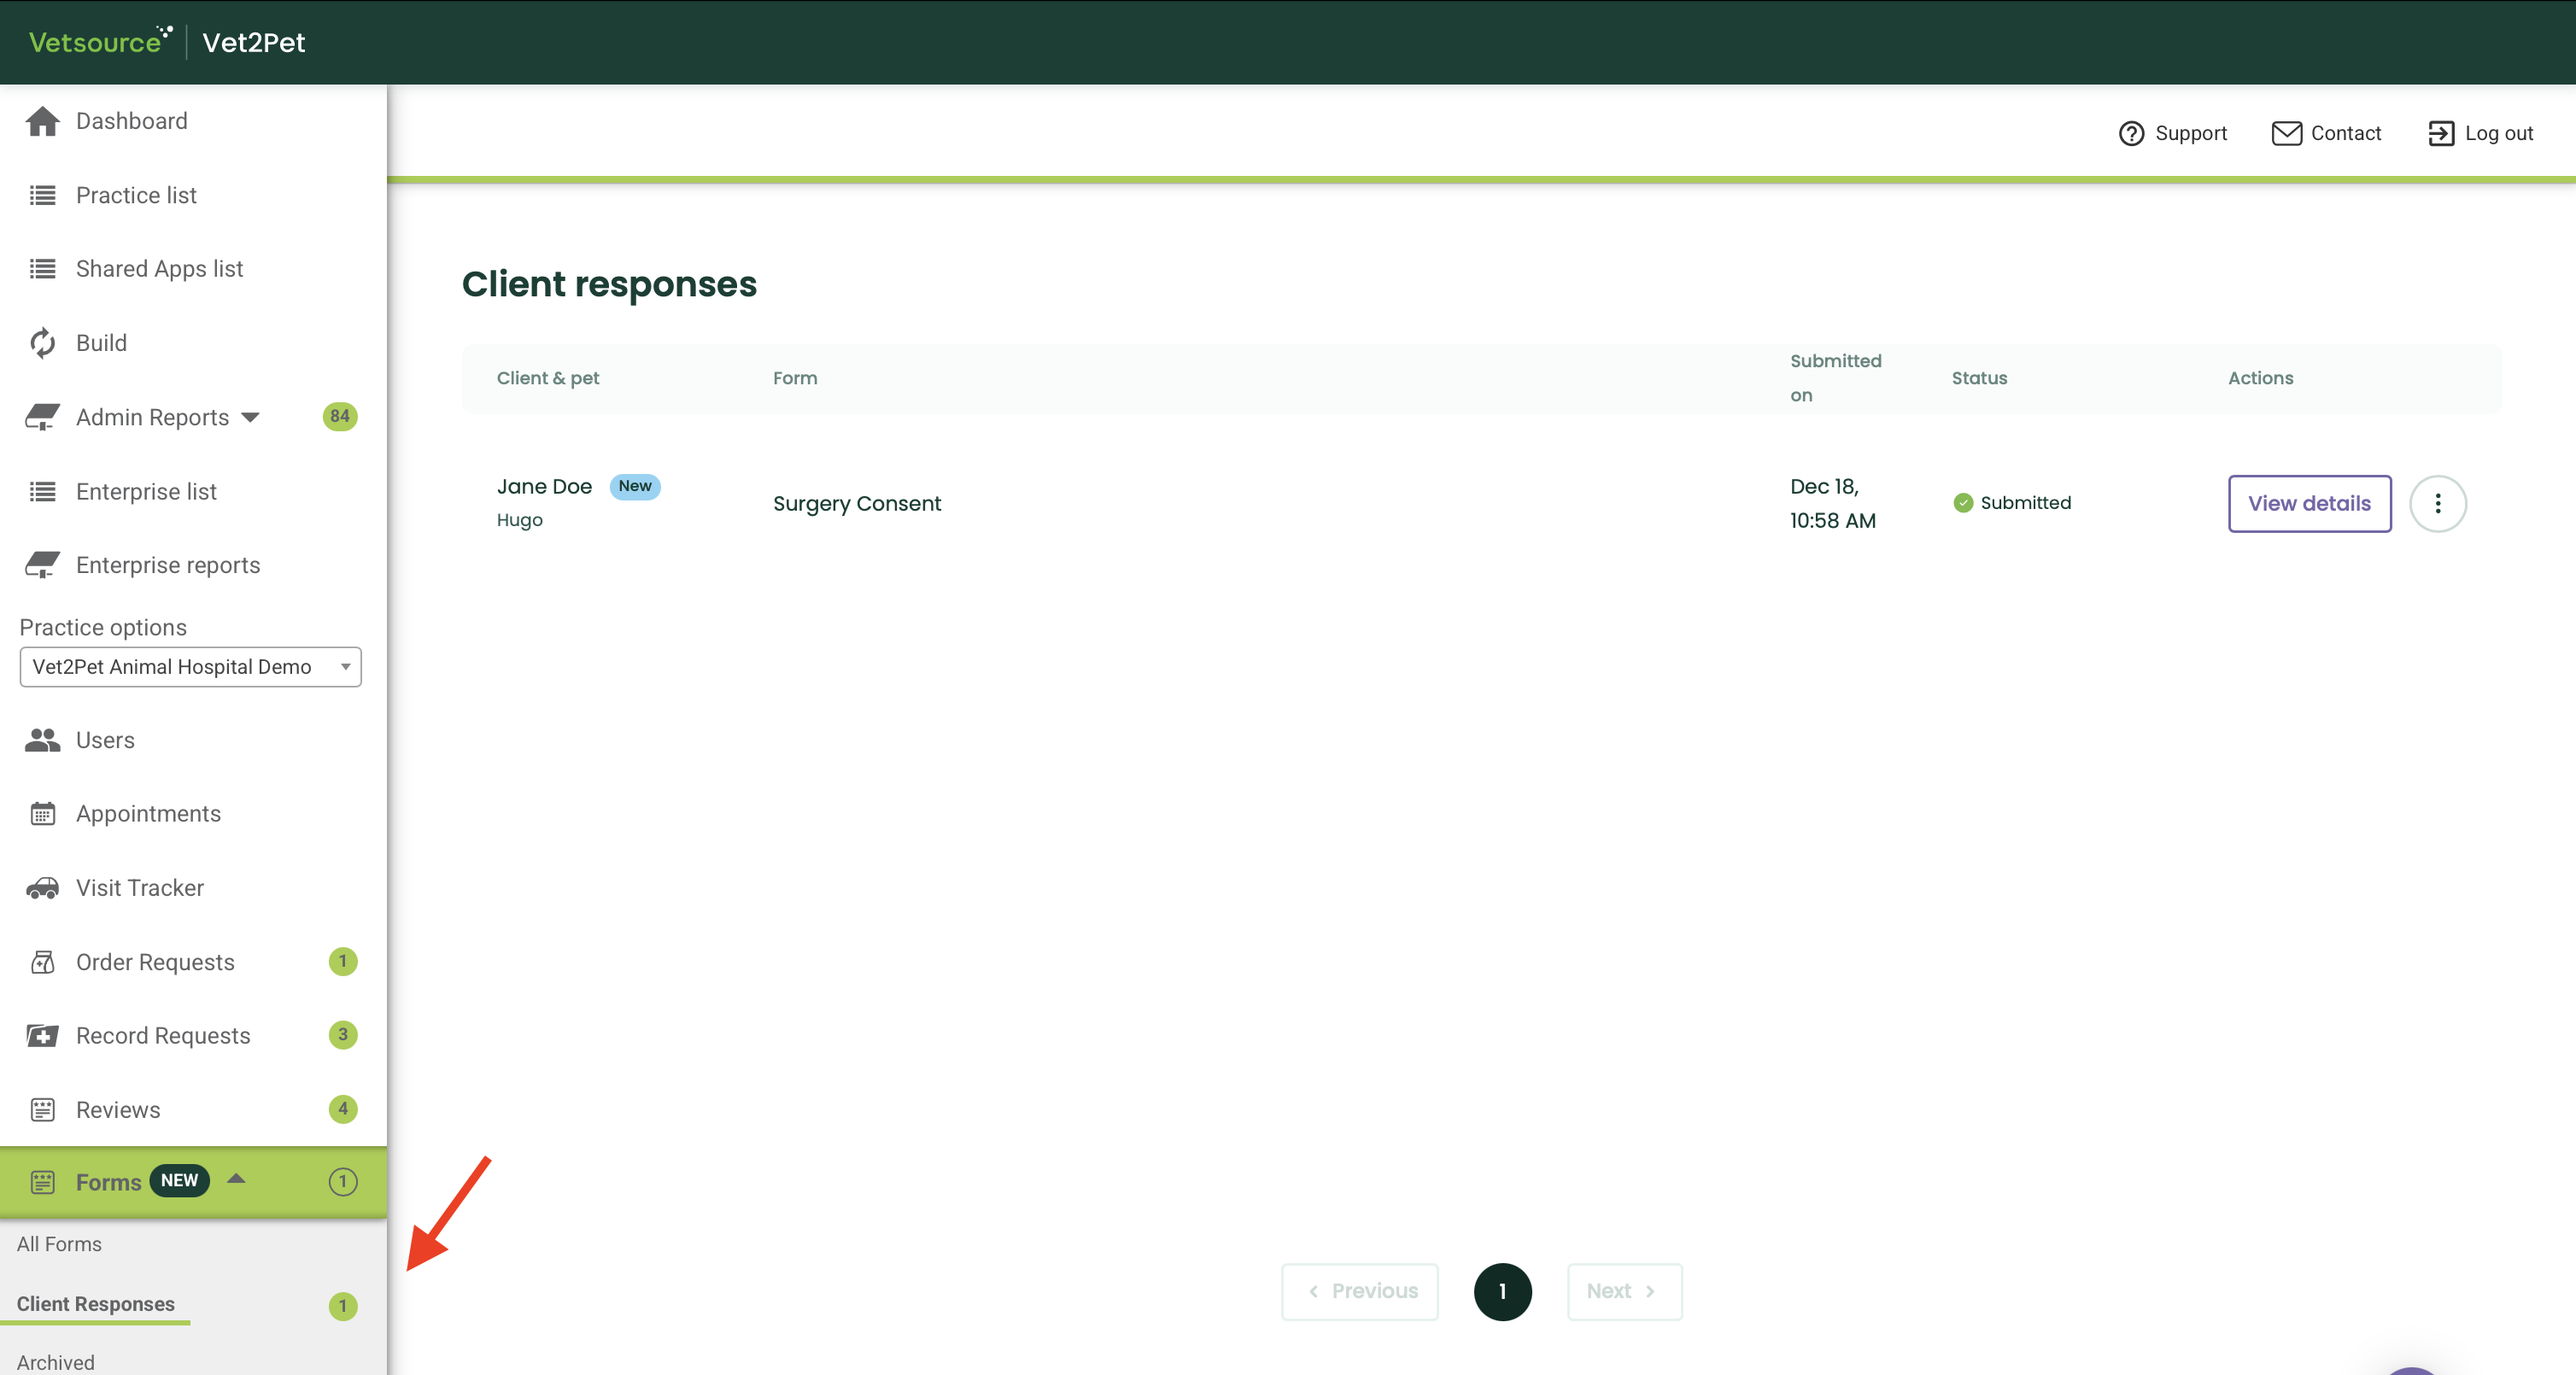
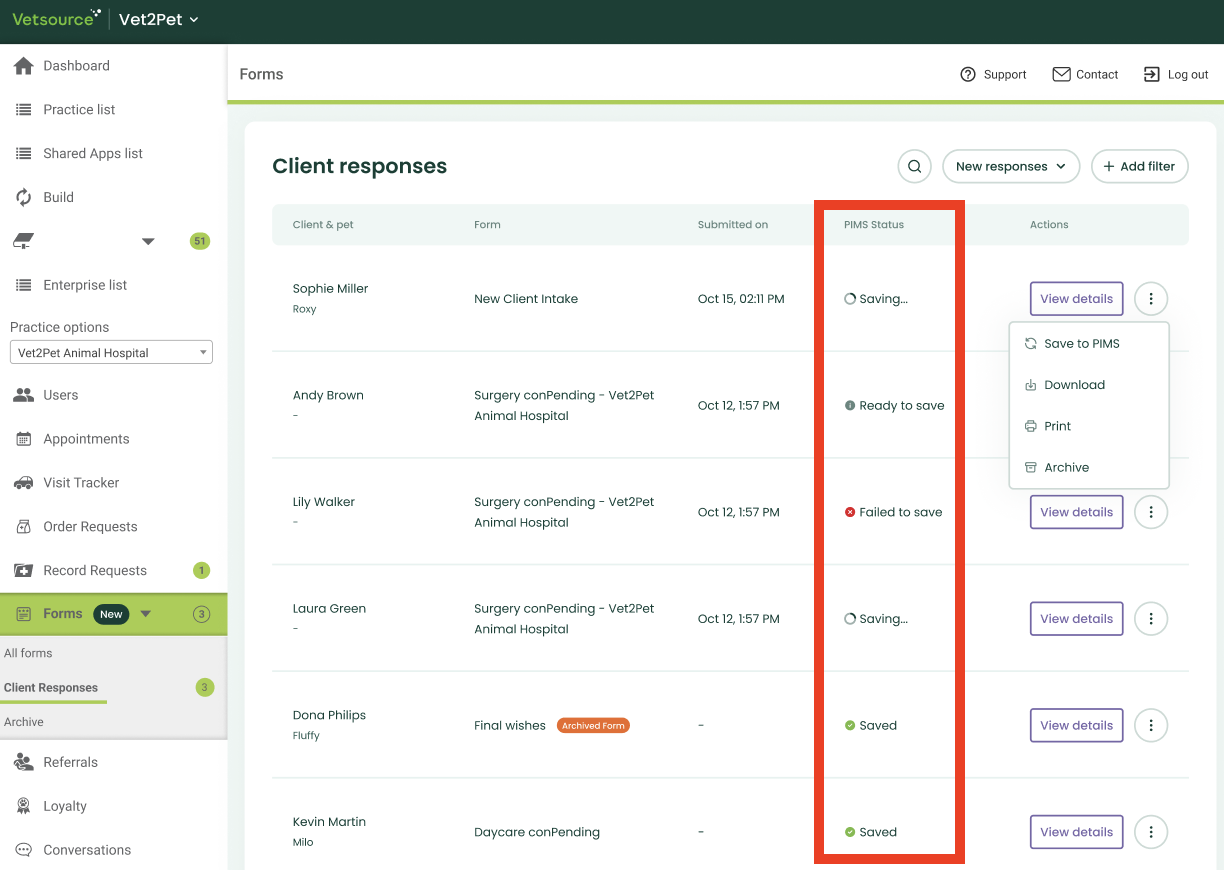
Viewing & Managing Client Responses
To see completed submissions, click the Client Responses sub-menu option on the Forms tab. This table provides a high-level overview of all incoming forms submitted by pet owners.
- Submissions Actions
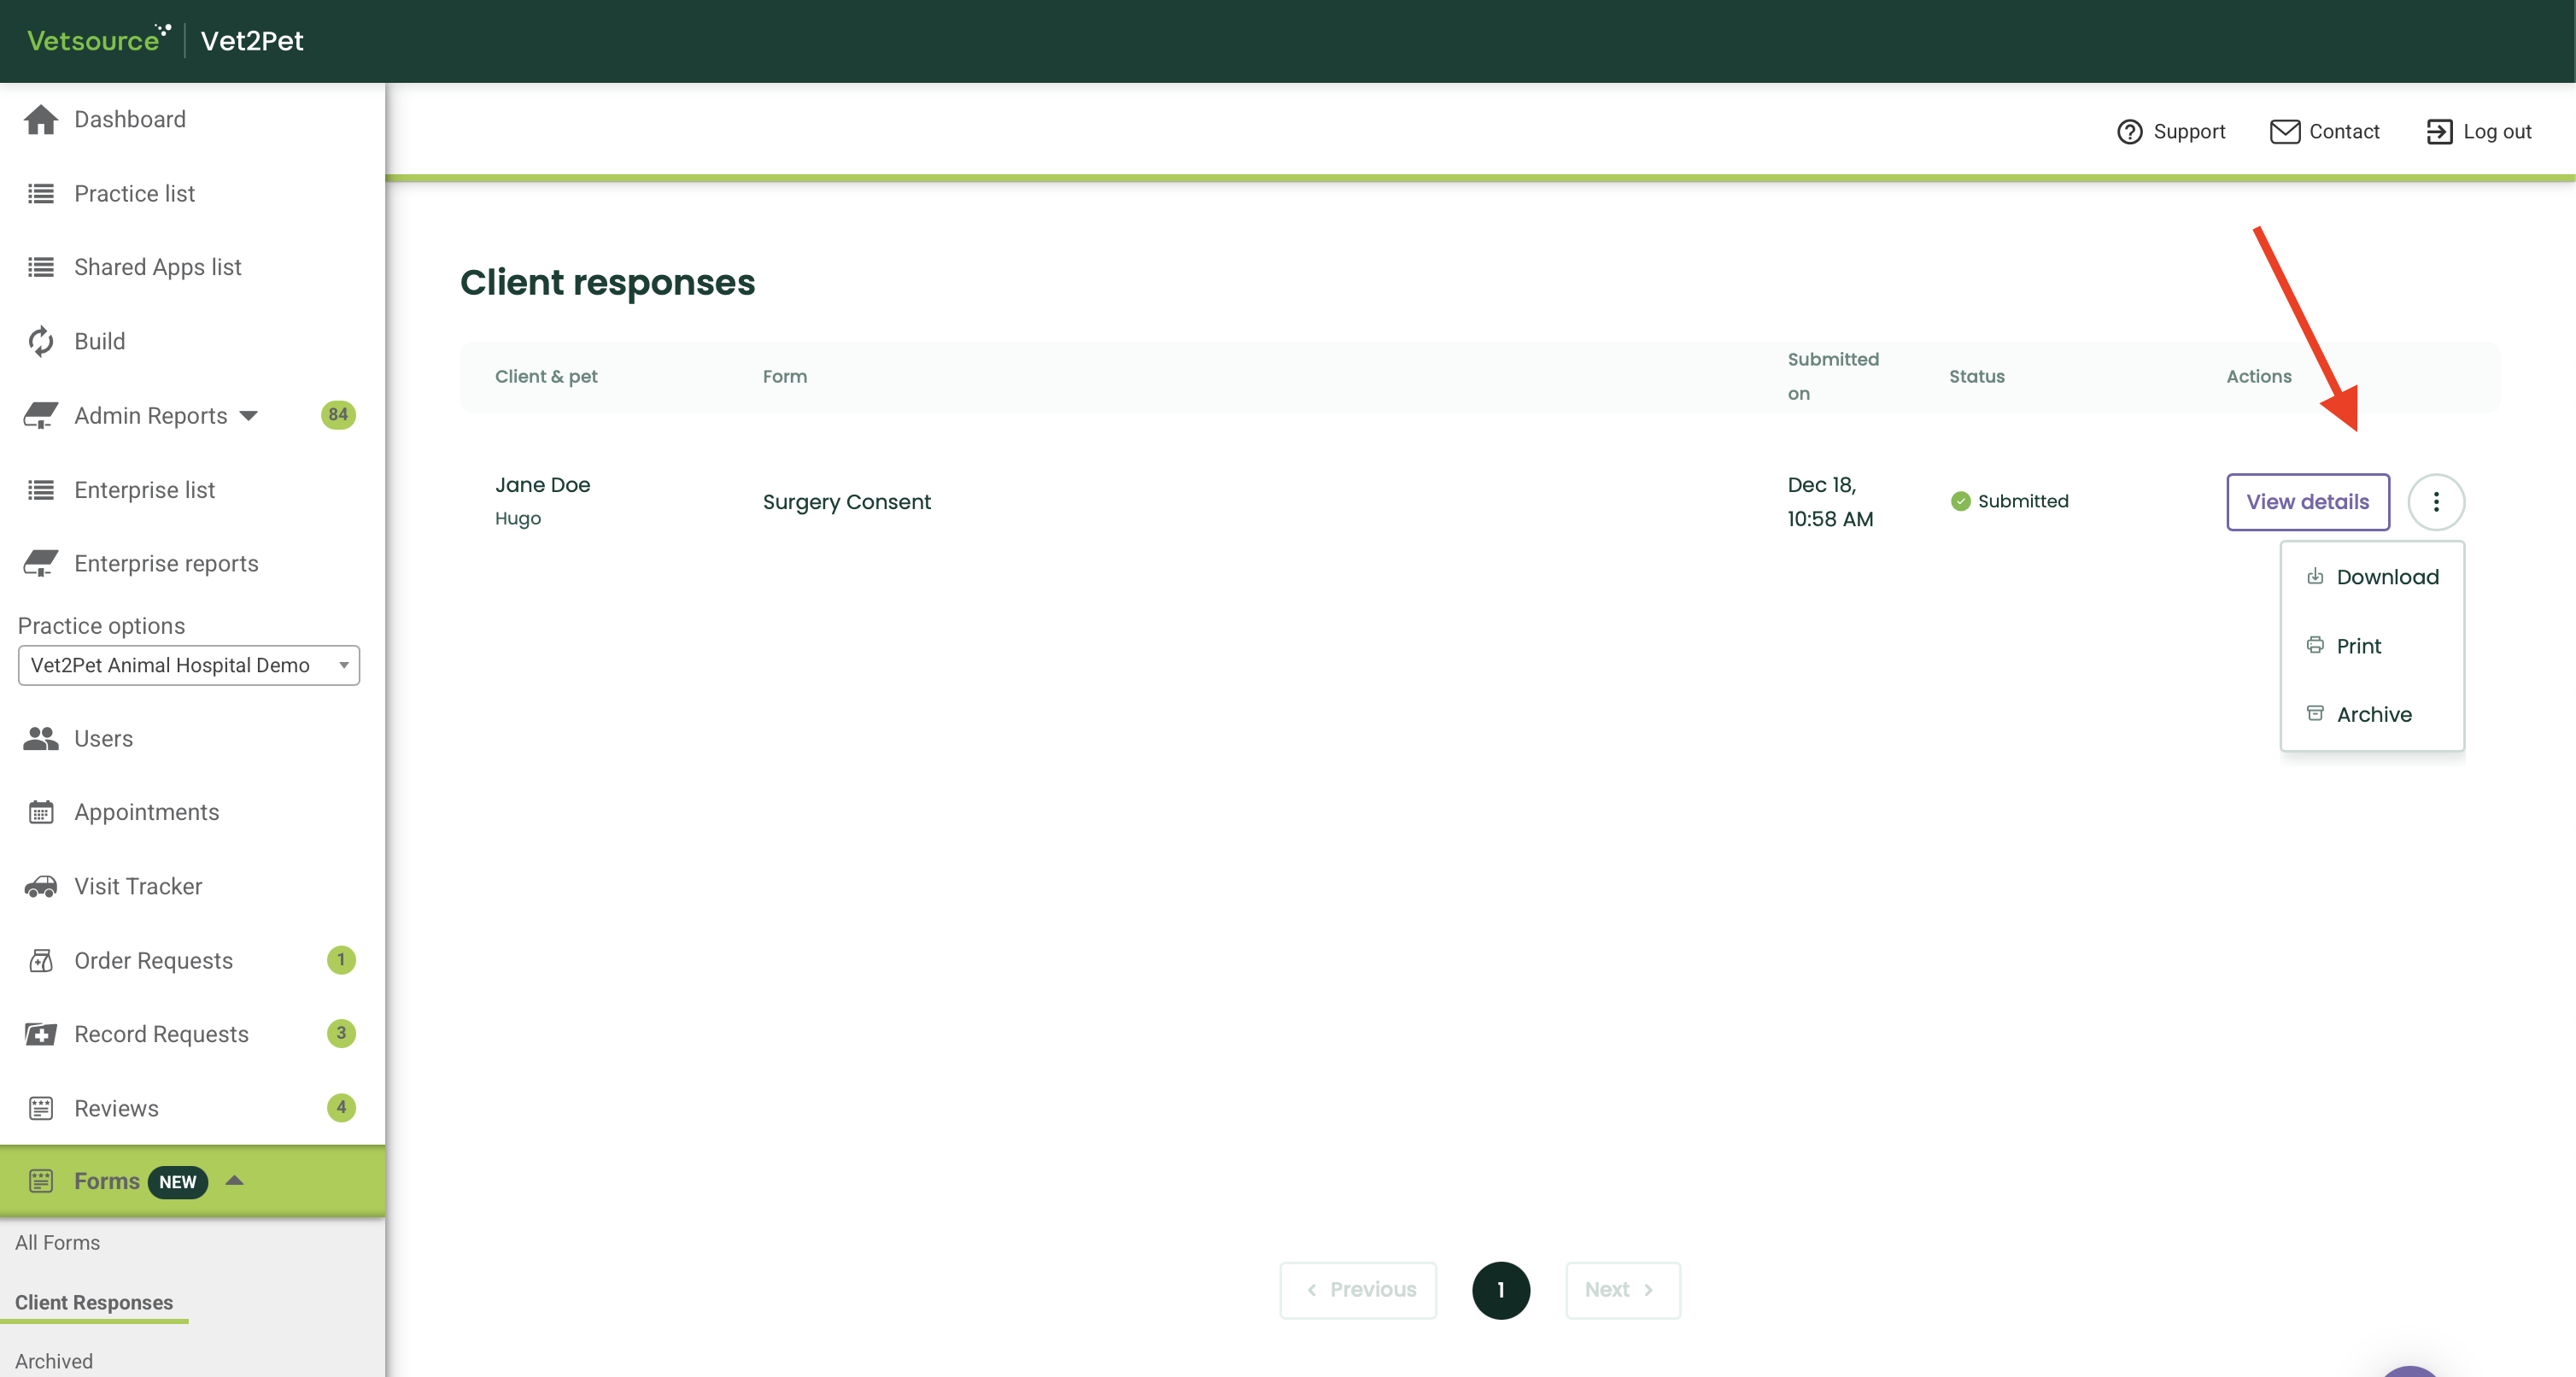
- Download: Instantly download a PDF version of the completed form.
- Print: Open the print dialog to generate a physical copy for the patient's file.
- Archive: Move submission to the Archive tab to declutter your view
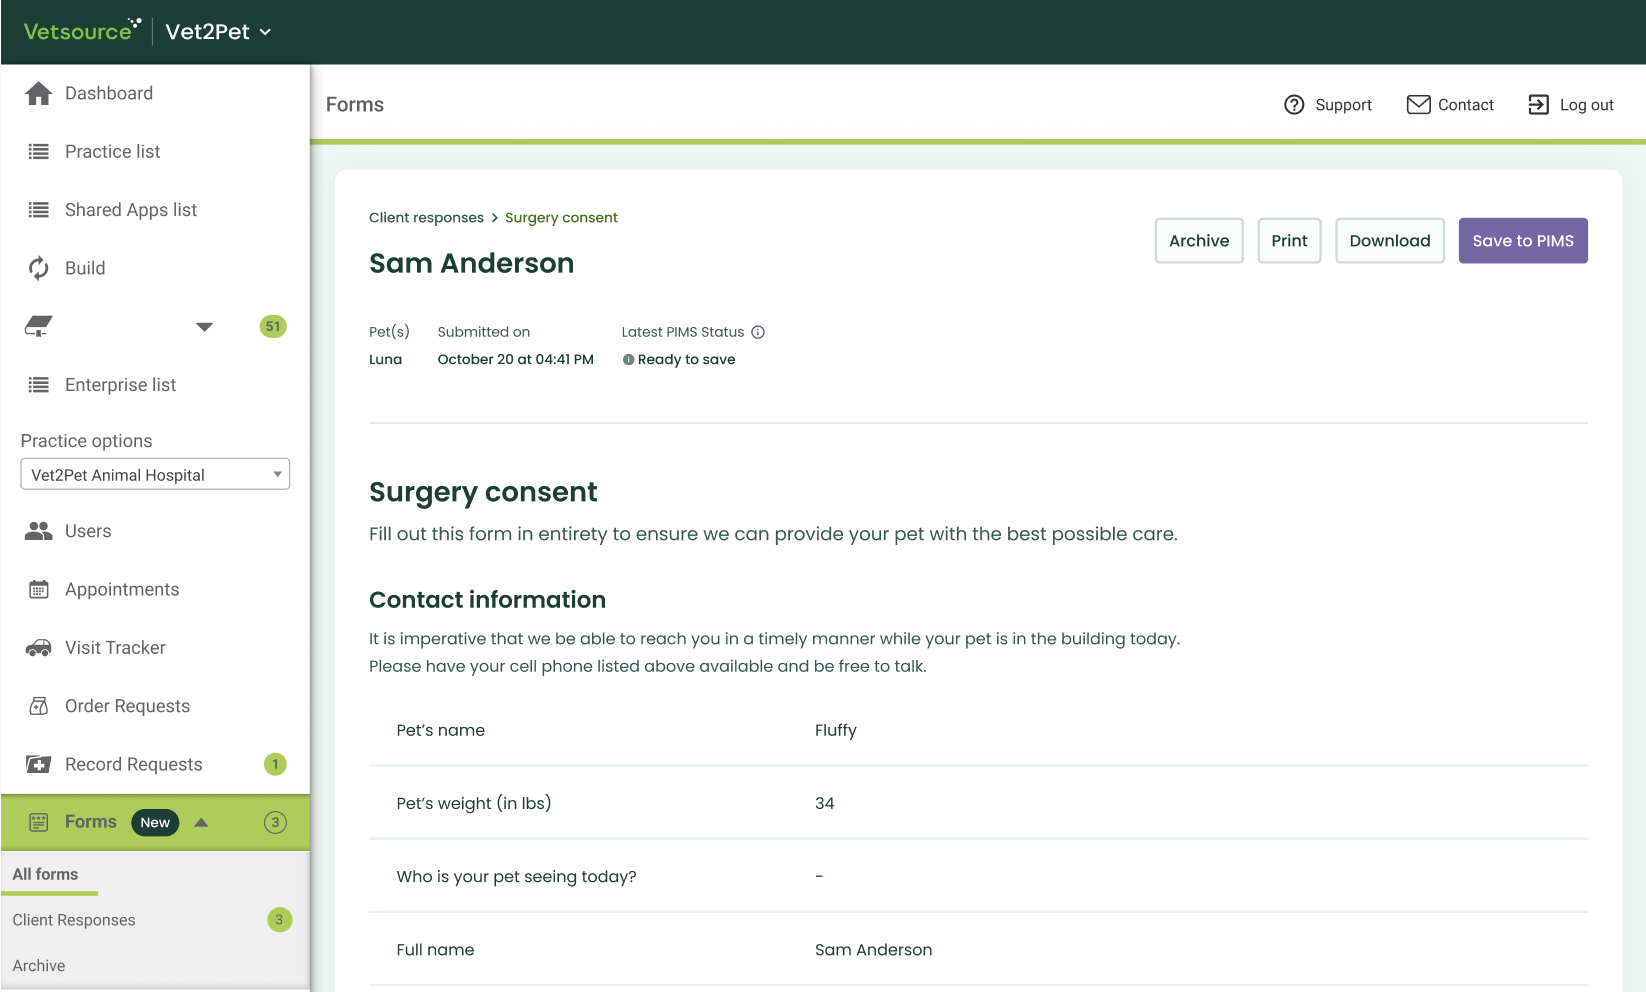
- Review a Submission
Click the View details button to open the full submission page. From here, you can:- Review answers: Read through all the information, uploaded photos, and signatures provided by the pet owner
- Download: Instantly download a PDF version of the completed form.
- Print: Open the print dialog to generate a physical copy for the patient's file.

NEW: Smart Form Pre-Population
To leverage the Smart Form Pre-Population feature and provide a seamless experience for your pet owners, it is essential to utilize Smart Fields during the form-building process. Unlike standard input fields, Smart Fields are designed to recognize and pull existing data directly from the file. When a form is built using these specific elements, the system can automatically fill in known information - such as contact details or pet information - saving your clients time.
For pre-population to work, the form must be sent through our integrated communication channels, including Conversations, Message Center, Appointments, or Health Service Reminders. This allows the system to securely identify the recipient and surface their specific data.
Updating pre-populated information
While these fields fill automatically, pet owners maintain full control; they can always edit or update the information in these fields before submitting the form.
NEW: PIMS Writeback
Once a form is completed, you can sync the data directly to your PIMS. This ensures that your records stay up to date without the need for manual data entry or external file uploads. This feature is currently supported for:
- Avimark
- Cornerstone
- Shepherd
- Vetspire
- Initiating writeback
You can trigger a writeback from several areas within the platform where forms data is managed.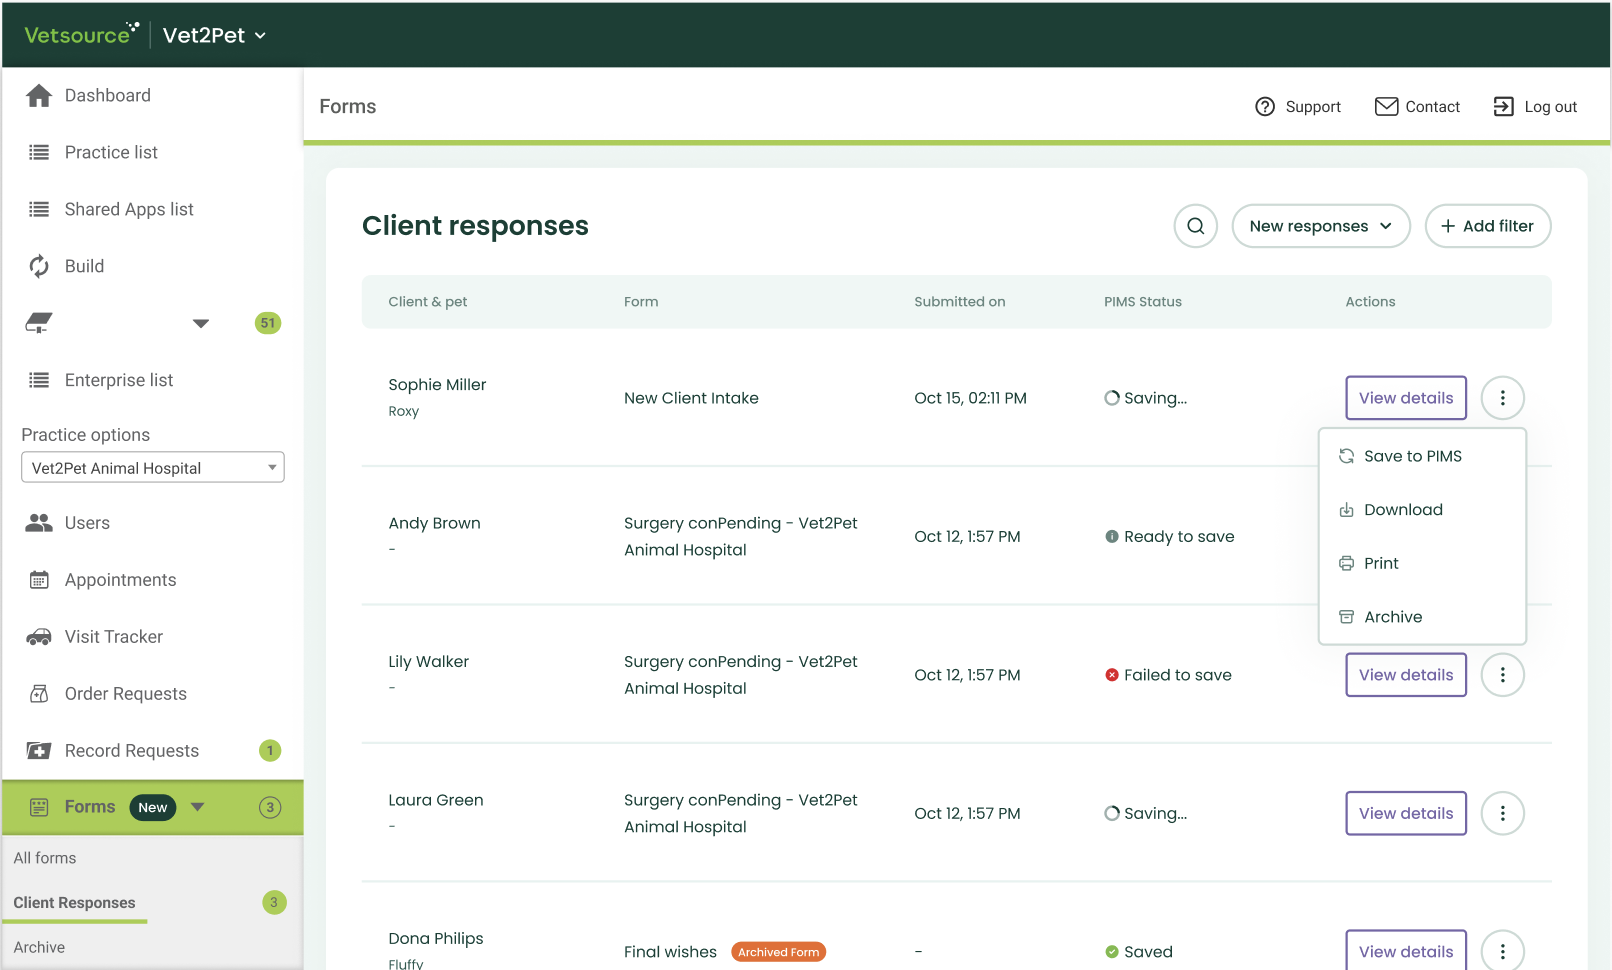
- Selecting client and patients
Once you click the writeback button, a selection dialog will appear. The system automatically cross-references our database with your PIMS to provide a list of eligible synced patients for the specific client.
For households with multiple pets, you aren't restricted to a single file entry. If a form applies to several animals, you can check multiple boxes from the pet list. The system will then attach the completed form to each selected patient's record simultaneously.
- PIMS writeback status
You can monitor the progress of any writeback directly from the Client responses page or the individual submission details page. Each request will display one of the following statuses:- Ready to Save: The form is complete and waiting for you to initiate the writeback.
- Saving: The data is currently being transmitted to your PIMS.
- Saved: The writeback was successful and the file is now attached to the patient record.
- Failed to Save: An error occurred. You can always retry the writeback.
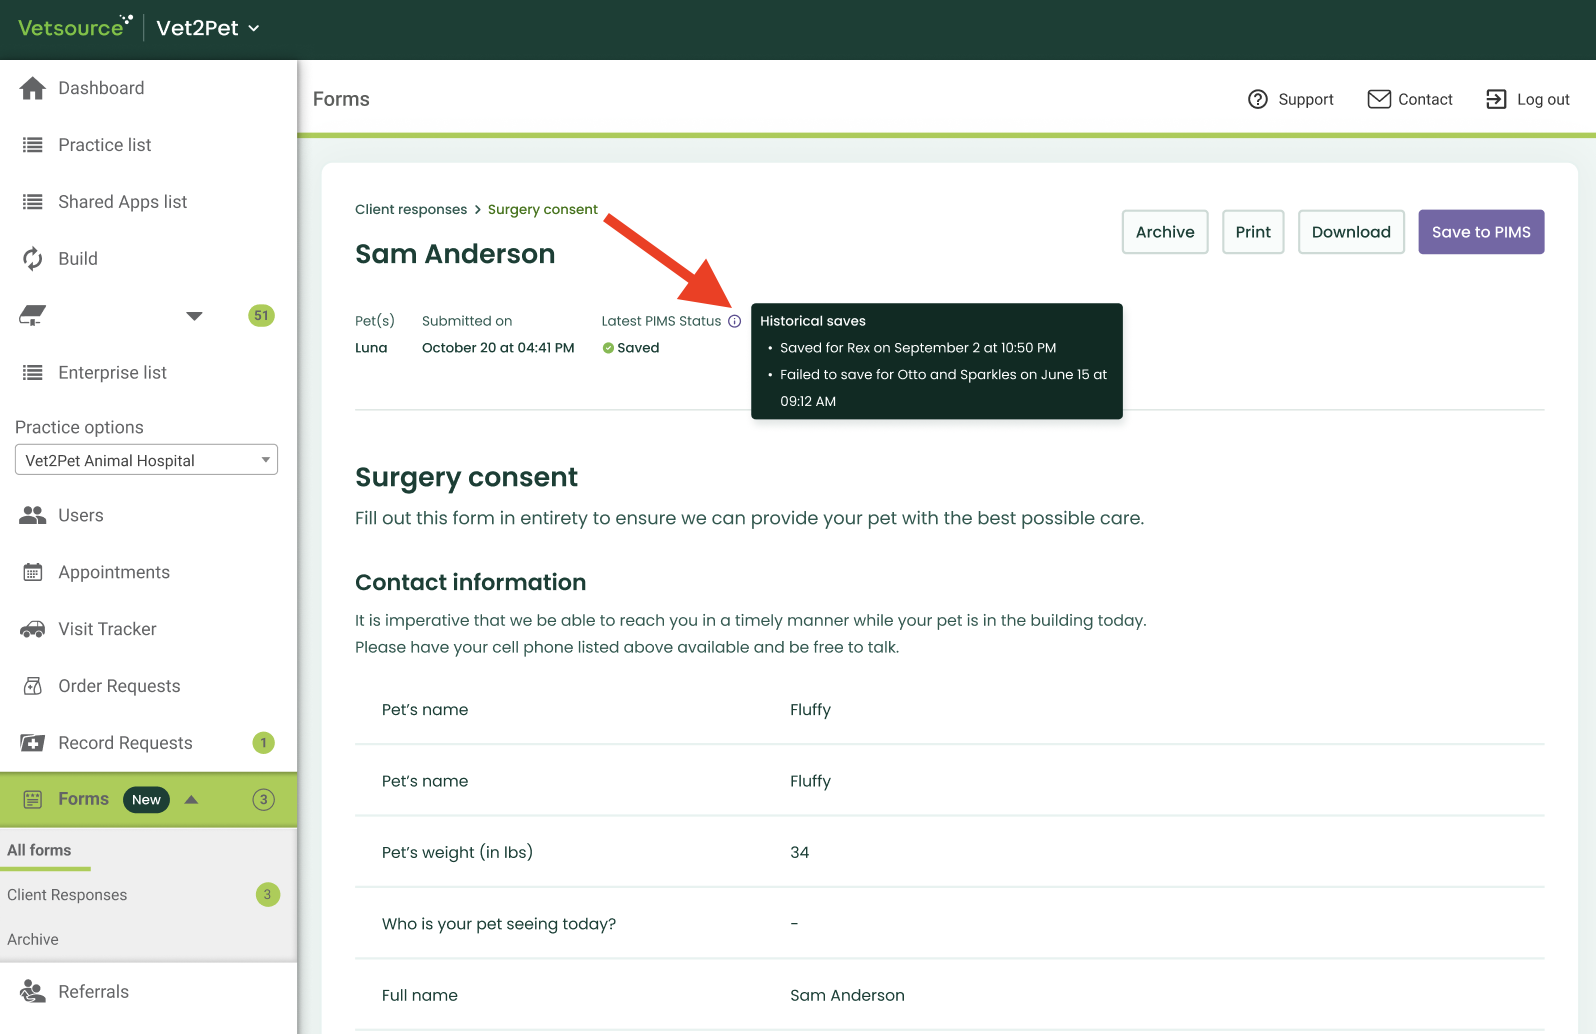
- Historical Logs & Audit Trail
For full transparency, the submission details page includes a historical log of all writeback activity. This log shows:- Timestamp: When submission was saved to PIMS.
- Target Patients: Which specific pet(s) the form was saved to.
- Result: Whether the attempt was successful or if it encountered an error.
NEW: Feature Interconnection: Accessing Forms Anywhere
To eliminate unnecessary context switching, we’ve integrated your forms library directly into your daily tools. You can now pull form links into your messages and workflows instantly, ensuring you never have to leave your current work to find the right document.
- Using Forms in Conversations & Message Center
Whether you are chatting in real-time or drafting a message, sending a form is now a seamless part of your workflow.
- Look for the "Add Form" button directly within the message input area.

- A dialog will open, allowing you to search and select the specific form you need from your library.

- Once you click Insert link, the system automatically populates the message input.
- Appointments & Health Service Reminders
You can also automate form delivery by attaching them to your appointment and health service reminders communication. This ensures the pet owner receives the right paperwork at the exact moment they need it.
How to Set Up: To enable or manage these connections, navigate to your Settings menu. From there, you can link specific forms to your Appointment or HSR notifications so they send automatically.
Archiving & Restoring
If you delete a form or a client response, it isn't gone forever. It moves to the Archive section.
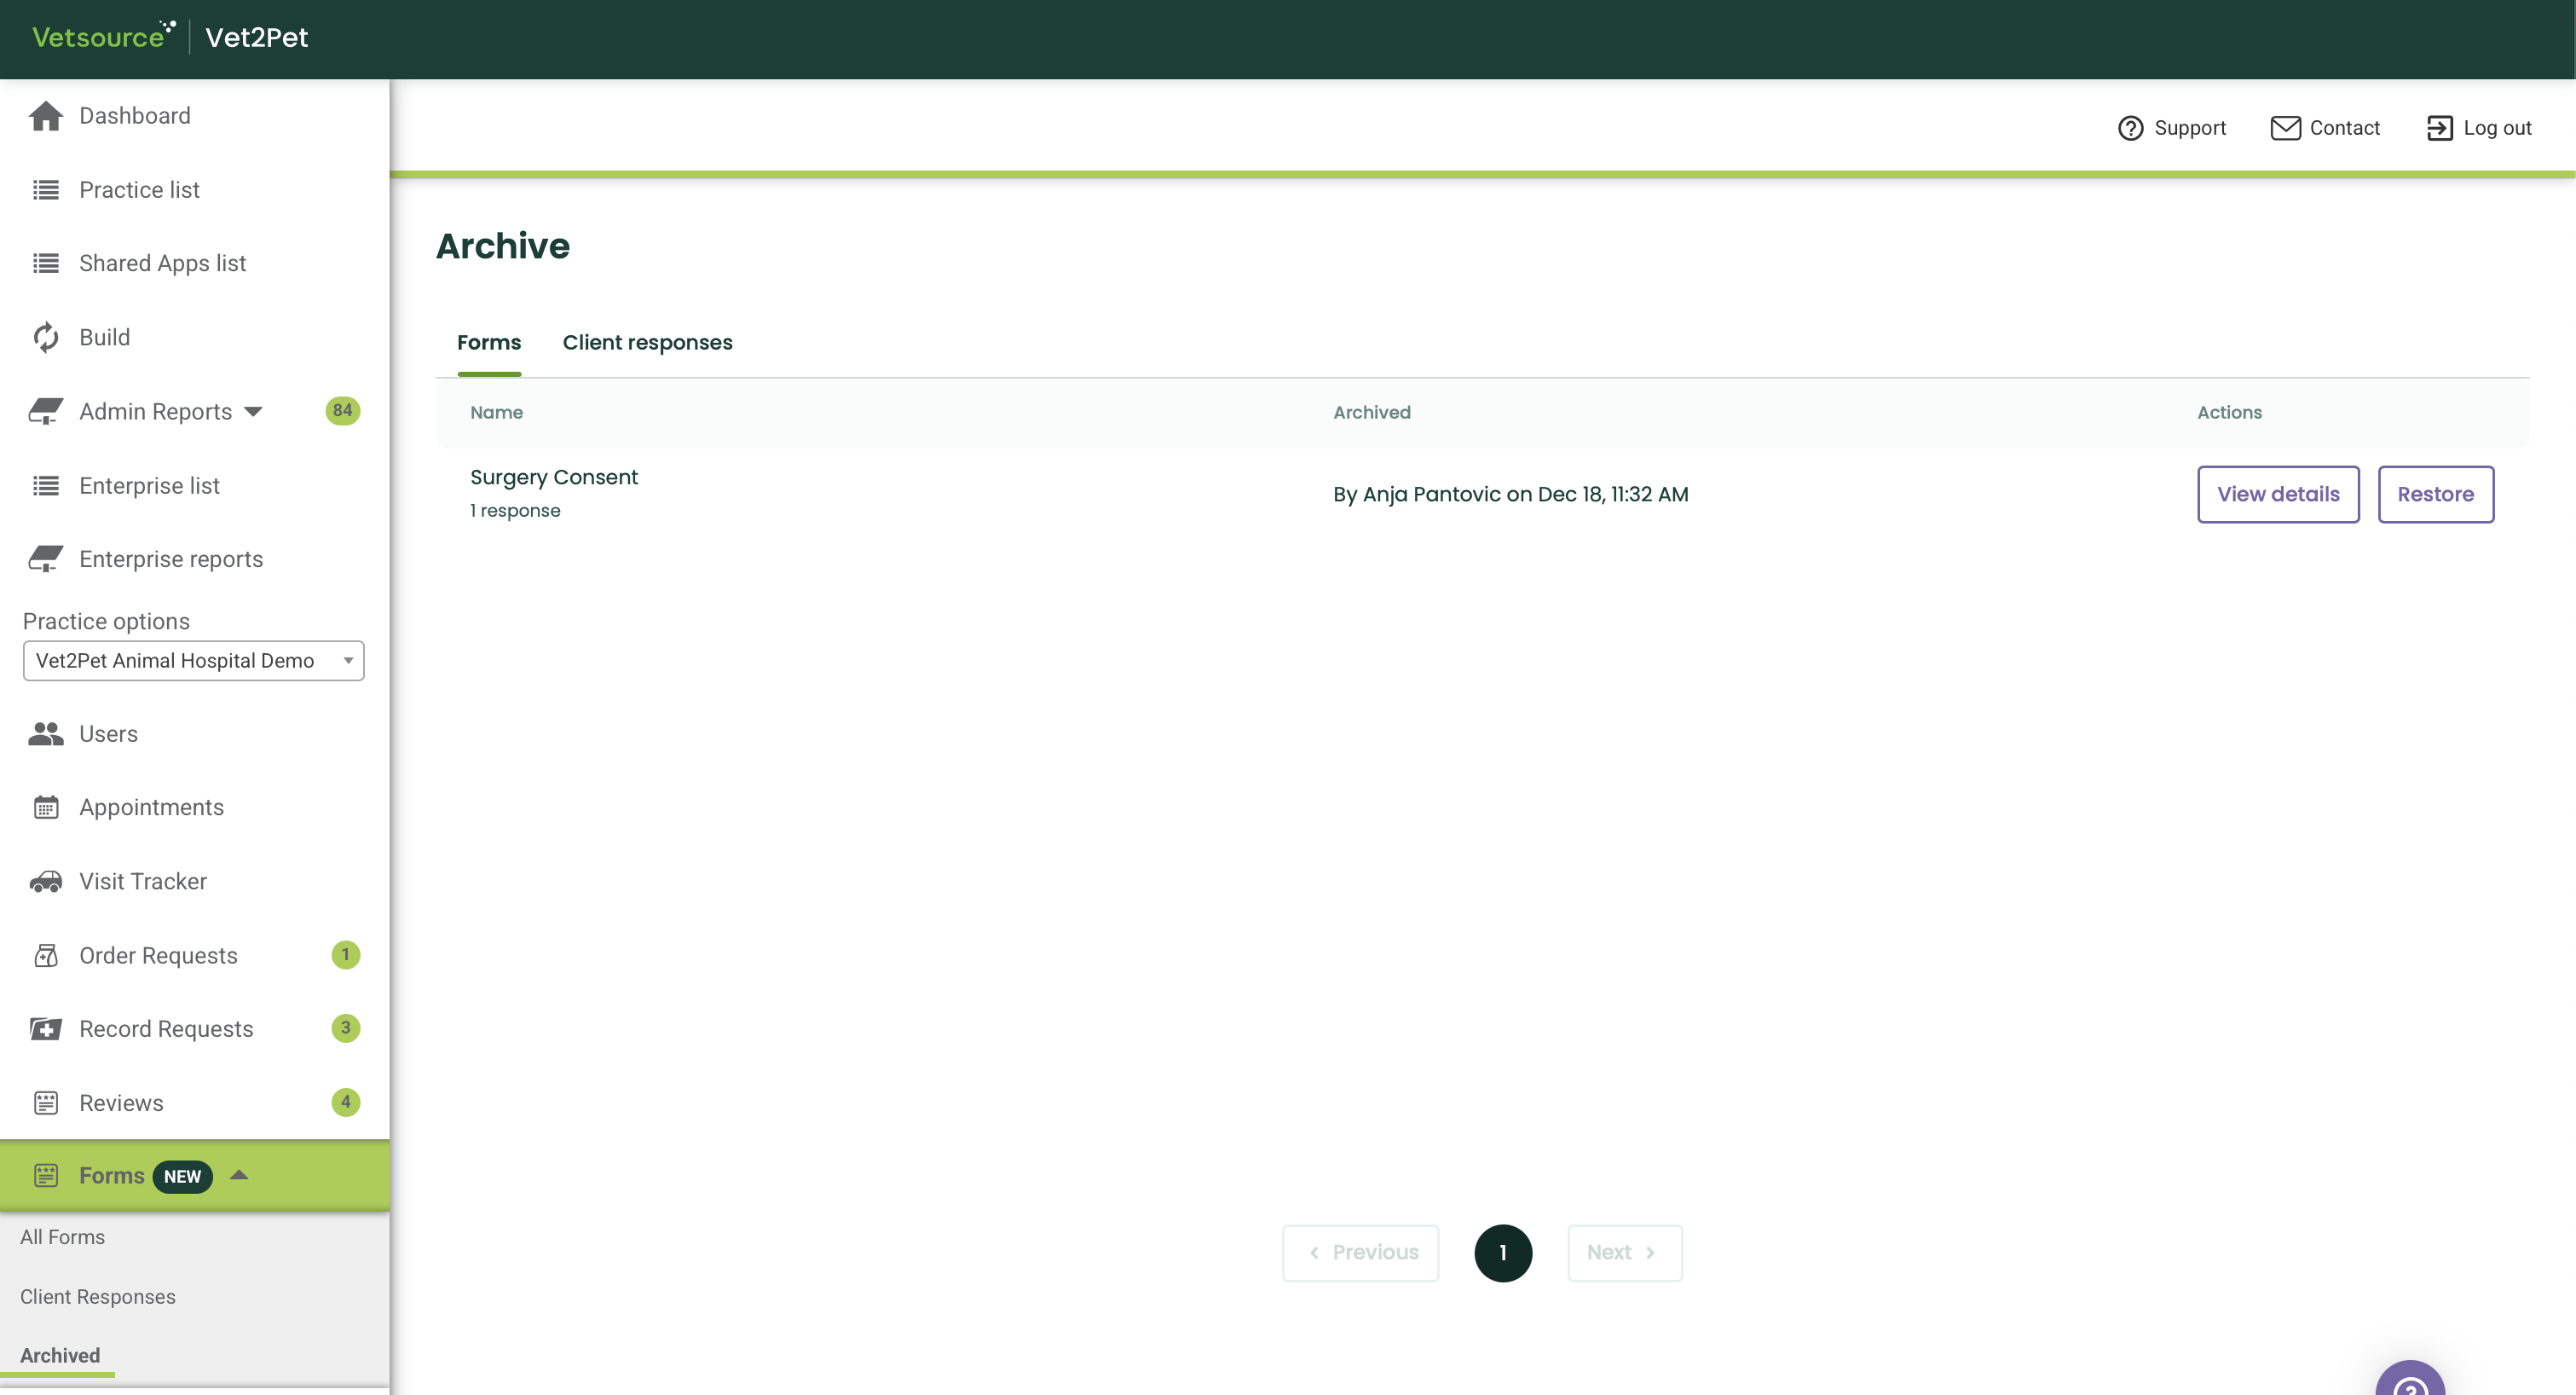
- Forms Archive: View old form templates. You can click Restore to bring them back to your active list and start using them again.
- Client Responses Archive: View individual submissions you have cleared from your main list. These can also be restored if you need to reference them later.
We want to hear from you - whether you're actively using this tool or if you are waiting for specific functionality before you jump in. Let us know how we can make this feature work better for your team!
[Take our quick survey]